Category:
Bind-Offs
Video: Tulips Buttonhole

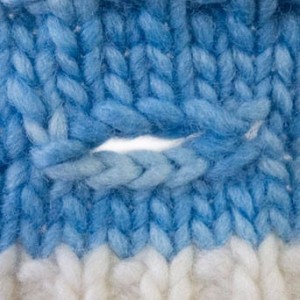
This buttonhole, invented by TechKnitter, can be done over 2 or more stitches.
It creates a strong buttonhole with matching cast-on and bind-off edges that has uniquely strong sides.
You will need a crochet hook and a small double-pointed needle for this bind-off.
Instructions
- K to 1 st before buttonhole sts.
- Move yarn to front.
- Sl 1.
- Move yarn to back.
- Move st from R to L needle.
- Repeat steps 4-5.
- Drop yarn so that it hangs down in front.
- With needle tip, lift the wrap and put it on the R needle.
- Sl 1.
- BO 1 (the wrap).
- Sl 1.
- BO 1.
- Repeat steps 13-14 4 times.
- 4 sts bound off.
- Move st from R needle to L needle. 3 sts on either side of buttonhole (in this case).
- Stabilize the L needle somewhere comfortable so you can let go of it.
- Remove R needle from sts.
- Replace with a smaller needle (~2 sizes smaller).
- Move st from R to L needle.
- Move yarn to back.
- Sl 1.
- Pull yarn firmly to tighten.
- Move yarn to the front.
- Repeat steps 20-22.
- With needle tip, loosen the wrap.
- Insert a crochet hook into the wrap.
- Do a chain (crochet) cast-on as follows:
- Wrap the yarn counterclockwise around R needle.
- Hook the yarn from over the top with the crochet hook.
- Pull the yarn through st on crochet hook. Work this cast-on 4 times.
- 4 sts cast onto R needle. 7 sts on needle.
- Place st from crochet hook onto R needle.
- 8 sts on R needle.
- Sl 1.
- BO 1.
- K to end of row.
- Buttonhole is technically done. Turn.
- P across WS row. Turn.
- The buttonhole after finishing the WS row.
- The finished buttonhole after finishing 1 more RS row.
- Pat yourself on the back (and maybe pour a glass of wine). You did it!
The Finished Tulips Buttonhole

Tulips Buttonhole - Step-by-Step Photo Instructions

Restricted Content
This content is available to customers of the following class: I Love Bind-Offs
Click here to learn more about I Love Bind-Offs OR
Join our KnitFreedom Premium now and get this and every other content we sell FREE.
If you own this class or are a member of KnitFreedom Premium, please LOG IN to view.
More Information
This is the hardest technique in this course. But don’t be discouraged! I challenge you to give it a try. As long as you go slowly and follow the directions carefully, you’re going to be fine.
It you haven’t done a lot of these techniques before, learning this buttonhole is going to teach you a wide variety of knitting skills and give you a lot of confidence.
Basically, if you can do this buttonhole, you can do anything. In the video below, I show you how to do a 4-stitch Tulips buttonhole. If you want a bigger or smaller buttonhole, just bind off (steps 12-13) and cast on (steps 27-30) the number of stitches you want in your buttonhole.


