Stockinette Stitch
This next project is going to teach you all about the most useful and famous stitch pattern out there: Stockinette stitch (abbreviated St st).
Stockinette Stitch

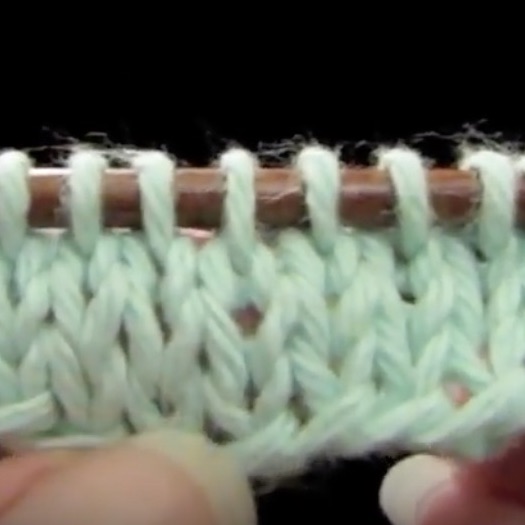
Stockinette stitch is the fabric that happens when you knit on one side of the fabric and purl on the other.
Remember how we took a close look at the purl stitch and saw that it was just a knit stitch in reverse? We’ll take advantage of this fact to make a fabric that is all smooth on the front, and all bumpy on the back.
Almost all garments (knit and machine-made) are made in Stockinette stitch.
Take a look! Look at your t-shirt, sweatshirt, or sweater – see if you can find little Vs (the knit stitches) all over the outside, and little horizontal bumps (the purl stitches) all over the inside.
So let’s try some Stockinette stitch. Work along with the video to learn all about it.
Restricted Video
![]()
![]() This video is available to members of Knitting Superstar University or the following classes:
This video is available to members of Knitting Superstar University or the following classes:
If you own this class, please LOG IN to watch.
One thing about Stockinette stitch is that it likes to curl toward the knit side. Ever cut the sleeves off a t-shirt? The edges will curl, making an informal-looking edge – the same thing happens in your knitting.
We are going to use the flat-as-a-pancake properties of garter stitch on our next project, combined with Stockinette stitch, to make a dishcloth that will be smooth in the middle, but won’t want to curl at the edges.
This is called a garter-stitch border, and it’s useful on any project that you want to have lay flat.
Before we get started on the next project, let’s use Stockinette stitch and garter-stitch borders to really quickly learn about making swatches and checking your gauge.
Swatching and Gauge
A swatch is just a sample of your knitting, and it’s almost always done in Stockinette stitch.
It’s a way to make sure your knit stitches are the size they are supposed to be, BEFORE you start out on a pattern.
Since we’ve only done scarves up until now, gauge hasn’t been an issue, but now we have a great opportunity to get our feet wet and learn a few techniques that will save you hours and hours of grief later.
This is important.
Gauge is the number of knit stitches and rows that fit into a specified unit of measurement, usually one inch. It’s important because if your stitches are too big or too small, your project will be too big or too small. Sad. Avoidable. With me?
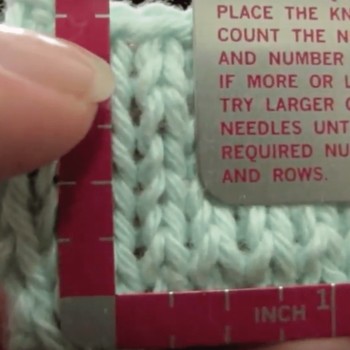
Checking your gauge is as easy as knitting a small sample square, called a swatch, and placing a ruler or a gauge-checker over the fabric, and counting how many stitches there are in a few inches, and then dividing by the number of inches to get the average number of stitches per inch.
Checking just one inch is a little risky, which is why knitters take the average of two or three inches. You can also check how many rows are in one inch (called the “row gauge”), although this measurement isn’t nearly as important as your stitch gauge.
People really like to skip this step – they think it takes too long, or they feel that their swatch has to be pretty or perfect, or somehow useful later. Nope! It just has to be done. If you care about your project coming out the right size, you’ll check your gauge.
Don’t worry, though – in this next video I’m going to give your four tricks to make checking your gauge seriously fast and fun. Here’s how to knit a swatch and check your gauge.
Restricted Video
![]()
![]() This video is available to members of Knitting Superstar University or the following classes:
This video is available to members of Knitting Superstar University or the following classes:
If you own this class, please LOG IN to watch.
Yarn Secrets
Okay, good work – you’ve learned how to check your gauge.
Now it’s time to let you in on the secret of always knowing what thickness of yarn you have – you can always tell by the gauge.
Remember the chunky yarn we were looking at earlier? Knit up a swatch- you should get about 3 ½ stitches per inch, which you can confirm by looking on the yarn’s label.
How about aran-weight yarn? It will knit up at 4 stitches per inch. And your worsted cotton yarn? 5 stitches per inch.
This time when you start looking at yarn labels, you’ll notice the suggested gauge.
Watch out – a yarn manufacturer might use a four-inch square, or 10 cm x 10 cm, to tell you how many stitches you can expect to get with their yarn and using the suggested needle-size.
They might say 20 sts in 10 cm – that’s 5 stitches per inch – a worsted-weight yarn.
One thing to watch out for: while gauge is a holy measuring stick for knitting, needle sizes are not. Knitting tension is individual and varies per person, and therefore so does needle size.
Basically, I don’t care WHAT size needles you use on a project – as long as you’re getting the right gauge.
You can start with the size suggested on your yarn label or in your pattern, but you may need to use a smaller or bigger needle size to get it just right – the only way you’ll know is to knit a swatch and check your gauge. Yay!
You now have the beginnings of the yarn secrets belonging to all Knitting Superstars, which will help you understand more and more about the yarn you buy and knit with.
Okay, ready to knit another project? We’re going to be using the skills we’ve learned so far, plus more advanced pattern-reading practice, so let’s get started.
You’ll need the same materials you used for the garter-stitch dishcloth.
