Ribbing
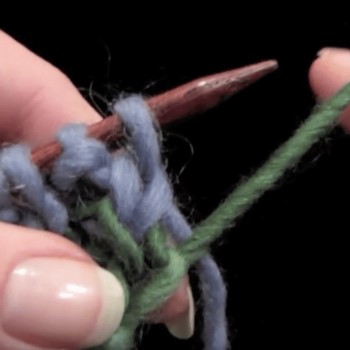
Here's your next challenge - moving between knitting and purling.
You've got to do it right, or else you'll end up with a big munched-up tangle that won't look like anything at all.
Ribbing – Switching Between Knitting and Purling

Grab the swatch that you’ve been practicing on, and work along with the video as I show you how to move between the two kinds of stitches.
Restricted Video
![]()
![]() This video is available to members of Knitting Superstar University or the following classes:
This video is available to members of Knitting Superstar University or the following classes:
If you own this class, please LOG IN to watch.
The fabric that you’ve just created – the combination of alternating single knit and purl stitches, is called ribbing, and you may recognize it as the stretchy weave the you find on almost every sweatshirt or sweater cuff and collar.
This particular pattern is called “1×1 Rib” or “K1P1 Rib.”
In the same vein, if you were to knit two stitches and then purl two stitches, that pattern would be called “2×2 Rib” or “K2P2 Rib.”
You are going to delve deeper into learning how the rib stitch works, what it’s good for, and much more on your first project: a ribbed scarf.
Examining 1×1 Rib
![]()
![]()
The simple but elegant ribbed scarf you will be making is the perfect introduction to the intermediate skills of choosing the right yarn, reading your work, and fixing your mistakes.
We’ve got the first one covered – let’s practice the latter two skills before we start the real thing. Still practicing on your swatch, let’s take a closer look at the anatomy of knit and purl stitches – we’ll also examine how ribbed fabric behaves, and why.
Restricted Video
![]()
![]() This video is available to members of Knitting Superstar University or the following classes:
This video is available to members of Knitting Superstar University or the following classes:
If you own this class, please LOG IN to watch.
Reading Your Work
![]()
![]()
Work a few more rows, and then watch the next video, where I show you how to recognize where you are and what you just did when you lose track (also known as “reading your work”).
Restricted Video
![]()
![]() This video is available to members of Knitting Superstar University or the following classes:
This video is available to members of Knitting Superstar University or the following classes:
If you own this class, please LOG IN to watch.
As you continue to knit on your swatch, practicing the 1×1 rib, hopefully you will make some mistakes – that is, that you will purl where you should have knitted or knit where you should have purled.
You might also forget to move your yarn to the front or the back of your work when you should. This gives us a great opportunity to learn. If you haven’t made any mistakes, well, just make some on purpose! ;)
The following videos will help you catch and fix mistakes in ribbing. Review them before you start your ribbed scarf.
Removing Stitches One By One
![]()
![]()
Here’s how to recognize when you’ve made a mistake in ribbing, and how to fix it. This video applies when you notice the mistake right away.
Restricted Video
![]()
![]() This video is available to members of Knitting Superstar University or the following classes:
This video is available to members of Knitting Superstar University or the following classes:
If you own this class, please LOG IN to watch.
Forgot to Move Yarn to the Back or Front

Here’s what to do when you’ve forgotten to move the yarn to the back or front of your work.
Restricted Video
![]()
![]() This video is available to members of Knitting Superstar University or the following classes:
This video is available to members of Knitting Superstar University or the following classes:
If you own this class, please LOG IN to watch.
If You’ve Knitted or Purled in the Wrong Spot

Here’s what to do if you’ve knitted or purled in the wrong spot.
Restricted Video
![]()
![]() This video is available to members of Knitting Superstar University or the following classes:
This video is available to members of Knitting Superstar University or the following classes:
If you own this class, please LOG IN to watch.
Knitted Past a Wrong Stitch

Here’s how to tell if you did a knit where you were supposed to purl, or vice versa, and then continued to knit without noticing.
You have a few options, the easier two of which I show you here.
Restricted Video
![]()
![]() This video is available to members of Knitting Superstar University or the following classes:
This video is available to members of Knitting Superstar University or the following classes:
If you own this class, please LOG IN to watch.
Now you’re ready to start your scarf.
It’s going to be just like what we’ve been practicing, only you’re going to make it wider, and you’ll use a soft, lovely, and possibly colorful yarn instead of the plain practice yarn we’ve been using.
To sharpen your pattern-reading skills, I’m introducing two new kinds of instructions: options and repeats.
Options In Pattern Instructions
Options in patterns can range from different sizes, to instructions for different yarn, or even different styles of the finished garment.
There is a standard format that designers use to make these options clear and easy to choose between – parentheses.
In the introductory section of the pattern, the designer will indicate the options using a format similar to these two examples:
Sizes: Small (Medium, Large)
or
Yarn: Aran (Bulky).
What this means is that in the pattern instructions, the designer will write the instructions for the first option, and then follow with the instructions for the other options in parenthesis, separated by commas.
For the first sample above, the instructions might start out:
CO 40(50,60) sts.
You can see that by following the first number, 40, you will be making the small size, whereas casting on 50 or 60 will make the medium or large sizes, respectively.
When a pattern gives you options like this, it’s a very good idea to scan through the pattern and either circle or highlight the number that pertains to your size.
You don’t want to be accidentally switching around halfway through.
Believe me, this happens to the best of us, so use an ounce of prevention and circle your numbers. ;)
On our ribbed scarf project, I’m giving you the option to knit it with one of two different thicknesses of yarn. The thicker yarn requires thicker needles and the scarf will go a little faster, and it will look more bulky.
Circle the options in the pattern below that pertain to your choice.
Repeats in Pattern Instructions
When the designer would like you to repeat a set of instructions more than once in the same row of knitting, he or she will use an asterisk and/or parentheses to show you which parts of the pattern to repeat.
For example, what we’ve been doing (starting with a knit stitch and then alternating purl and knit stitches all the way across the row) would be written as:
Row 1: *K1, p1, repeat from * to end of row
or, in even more abbreviated language:
Row 1: *K1, p1, rep from * to end.
Reading across the instructions like a sentence, you can see that after you knit one and then purl one, the next instructions tell you to go back to the beginning (where the * is) and start again, over and over until you get to the end of the row.
In the case of a simple stitch like 1×1 rib, it might seem a little clunky to use all these extra words and symbols, which is why you may often see a designer write
Row 1: Work in 1×1 rib across
which just means to work in 1×1 rib across the whole row.
Another way to show which parts of the pattern need to be repeated is with parentheses, indicating that whatever in the parentheses can be treated as one unit for the sake of repeating it a certain number of times.
In the case of 1×1 rib, that would look like this:
Row 1: (K1, p1), repeat to end of row
or, in more abbreviated language:
Row 1: (K1, p1), rep to end
or simply
Row 1: (K1, p1) across.
Every single one of the above examples means the same thing. I’ll be using a mix of these styles of abbreviations in this e-book to give you practice reading them.
Alright, you’re ready to get out the big guns and start your scarf.
Read through the directions as well as the tips that follow the pattern, circle the number of cast-on stitches that corresponds with your yarn choice, and take it away!
Note that you will run out of yarn and will have to switch to a new ball of yarn at some point during the project.
Knitting patterns will not tell you to do this – it’s assumed (review Switching To a New Ball of Yarn in the Learn-to-Knit course if you don’t remember how to do this).
Pattern: Ribbed Scarf
Finished Measurements: 5 inches wide x 5–6 feet long
Materials

Yarn: 300 yds aran (bulky) weight yarn
Needles: One pair straight needles US size 9/5.25 mm (US size 10 ½/6.5 mm)
Notions: Tapestry needle, scissors
Instructions
CO 22(18) sts.
Row 1: *K1, p1, rep from * to end.
Repeat row 1 until scarf measures 5 to 6 feet long, according to your taste.
BO in pattern (see video below).
Finishing
Weave in ends (see video below).
Tips, Tricks, and Troubleshooting For This Project
Accidentally Going the Wrong Way

If you have to put down your scarf in the middle of a row, how to you know which way to go when you pick it back up again? Well, watch the video.
Restricted Video
![]()
![]() This video is available to members of Knitting Superstar University or the following classes:
This video is available to members of Knitting Superstar University or the following classes:
If you own this class, please LOG IN to watch.
Counting Your Stitches

You’ll want to make sure you are on track every once in a while while knitting this scarf, so that it doesn’t accidentally get wider or narrower without you knowing.
The easiest way to do that is to count your stitches occasionally (more often initially; less often once you feel comfortable). Here’s the fastest way to count your stitches in knitting.
Restricted Video
![]()
![]() This video is available to members of Knitting Superstar University or the following classes:
This video is available to members of Knitting Superstar University or the following classes:
If you own this class, please LOG IN to watch.
If You Drop a Stitch

If for some reason you have fewer stitches than you are supposed to, you make have accidentally let a stitch slide off your needle.
Here is a video showing four different scenarios and options for fixing this mistake.
Restricted Video
![]()
![]() This video is available to members of Knitting Superstar University or the following classes:
This video is available to members of Knitting Superstar University or the following classes:
If you own this class, please LOG IN to watch.
Dropped Stitch Far Down

If you have dropped a stitch but continue knitting without noticing, here’s how to fix that.
Restricted Video
![]()
![]() This video is available to members of Knitting Superstar University or the following classes:
This video is available to members of Knitting Superstar University or the following classes:
If you own this class, please LOG IN to watch.
If You’ve Added a Stitch
An added stitch usually happens at the beginning of a row, because you haven’t started with your yarn in the back of your work. The good thing is, if you’ve added a stitch, you’ll probably notice right away, because it will mess up your “knit 1, purl 1” pattern.
Review this video from the Learn-to-Knit course to recognize and stop this from happening.
How’s Your Tension?

I just want to check in with you to make sure you’re not developing any bad habits with your tension.
This is an important issue to nip in the bud if it comes up, so follow along with the video to check to see if you’re slipping into any of these habits, and the adjustments you can make to make sure you have great tension.
Restricted Video
![]()
![]() This video is available to members of Knitting Superstar University or the following classes:
This video is available to members of Knitting Superstar University or the following classes:
If you own this class, please LOG IN to watch.
Binding Off In Pattern – BO in Pattern
![]()
![]()
Binding off in pattern (BO in pattern) just means that as you work your bind-off row, you’ll be knitting the knits and purling the purls on the last row (like you’ve been doing all along), instead of just knitting them all like you learned in the Learn-to-Knit bind-off video.
Work along with the video and see how even and flat this bind-off lays on this scarf.
Restricted Video
![]()
![]() This video is available to members of Knitting Superstar University or the following classes:
This video is available to members of Knitting Superstar University or the following classes:
If you own this class, please LOG IN to watch.
This is abbreviated “BO in pattern.”
Weaving in Ends on Ribbing

Making your yarn ends look invisible on a double-sided project like this ribbed scarf can be a challenge. Here’s how I do it.
Restricted Video
![]()
![]() This video is available to members of Knitting Superstar University or the following classes:
This video is available to members of Knitting Superstar University or the following classes:
If you own this class, please LOG IN to watch.
Great work! You’ve completed a gorgeous ribbed scarf, practiced your purling and ribbing skills, learned how to count stitches, watch out for and fix common mistakes, read more complex patterns, and finish your projects professionally.
Now it’s time to show off your project.
Introduction to Ravelry.com
I’d like to introduce you to a fabulous site called Ravelry, where you can put up pictures of your project, link them to their pattern pages, browse other people’s projects and notes, look for yarn, and so much more.
Ravelry is a great way to discover beautiful new patterns as well as connect with other knitters and share your experiences with them as well.
Why not head over and sign up for a free account? Ravelry will walk you through the steps of adding your first projects and finding your way around the site. I’ll be sending you to Ravelry often to look at yarns and project throughout this course.
It’s a big site, so don’t worry if you don’t learn how to use it all at once – we’ll be gradually getting to know it better as we go.
Also, you don’t need to sign up for an account to click the links and see the yarns and projects I’m going to show you on Ravelry, so do whatever you feel comfortable with.
Now, are you up for a knitting challenge? If you enjoyed the ribbed scarf project, why not try the following challenge project? You can start it and continue working through the rest of the course at the same time.
Challenge Project: Noro Self-Striping Scarf
This gorgeous and elegantly simple scarf isn’t a new concept, but it made a huge splash when designer Jared Flood photographed it and published it in 2007.
It takes advantage of the gradually-changing stripes of Noro yarns, and pairs them together to get this effect.
 Using four balls of Noro’s Silk Garden or any other self- striping worsted-weight yarn, Jared’s scarf can be made by casting on 38 stitches and working in 1×1 rib just like we did on the first scarf, using US size 7 (4.5mm) needles to get a width of about 5.5 inches.
 The only trick here is that you knit with one ball of yarn for two rows, then switch to the next ball, without cutting the yarn at all. You simply let it hang until you’re ready to use it again, two rows up.
This technique is called “carrying yarn up the sides,” and below is a video showing how it’s done. Line
For more information and photographs, visit Jared Flood’s pattern here.
Here’s my version of the pattern, written for you: Noro Striped Scarf Pattern
Here’s how to carry yarn up the sides of your scarf when you’re making stripes.
Restricted Video
![]()
![]() This video is available to members of Knitting Superstar University or the following classes:
This video is available to members of Knitting Superstar University or the following classes:
If you own this class, please LOG IN to watch.
