Ch. 3 Video Knitting Dictionary (Cracking the Code)
Knitting Terms and Abbreviations Defined
-
( ) – Refers to whatever is in the parentheses as a discrete group. As in “(K1, P2) 5 times.”
1×1 Rib – K1, P1 Rib
2×2 Rib – K2, P2 Rib
Across – To the end of the row
Around – To the end of the round
BLCO – Backwards Loop Cast-On
CH – Back loop only
BO – Bind Off
BO in Pattern – Knit the knit stitches and purl the purl stitches as you bind off.
BOR – Beginning of Round
Br-ssk – Brioche slip, slip, knit: Slip 1 st knitwise, slip next st knitwise. One of these sts will have a wrap. Slip the stitch along with its wrap. Knit slipped sts together.
Break Yarn – Cut yarn. Always leave a six-inch tail for weaving in.
British Crochet Terms – While the stitches are made the same way, British and American patterns have different words for the same stitch.
Brk – Brioche knit: Knit the stitch together with its wrap
Brp – Brioche purl: Purl the stitch together with its wrap
CC – Contrasting Color
CDD – Centered Double Decrease
CH – Chain stitch
Cn – Cable needle
CO – Cast On
DC – Double crochet
DC – Dark color
Garter St – Garter Stitch
HDC – Half-double crochet
In Pattern – According to the same stitch-pattern you’ve been doing
Instep – The half of the sock that goes around the front of the ankle
JMCO – Judy's Magic Cast-On
JSSBO – Jeny's Surprisingly-Stretchy Bind-Off
K – Knit
K2TOG – Knit 2 Together
K2togtbl – Knit 2 Together Through the Back Loops
KFB – Knit Front and Back
Kitchener St – Kitchener Stitch
LC – Light color
LH – Left-hand
LTCO – Long-Tail Cast-On
LYS – Local Yarn Store
M1 – Make One
M1L – Make One Left
M1R – Make One Right
Mattress St – Mattress Stitch
MC – Main Color
P – Purl
P/u and Knit – Pick up and knit
P2TOG – Purl 2 Together
PFB – Purl Front and Back
PM – Place Marker
PSO – Pass Stitch Over
PSSO – Pass Slipped Stitch Over
Rem – Remain/Remaining
Rep – Repeat
Rep From * – Go back to the * and repeat. As in “K5, *(P2, K5), rep from * to end.”
Reverse St St – Reverse Stockinette Stitch
RH – Right-hand
Rnd(s) – Round(s) – row(s) of round knitting
RS – Right Side
S2KP – Slip 2, Knit, Pass
SC – Single crochet
SKP – Slip, Knit, Pass
Sl 1 – Slip 1
Sl 1 wyif – Slip one with yarn in front
SL ST – Slip stitch
Sl1 wyib – Slip one with yarn in back
SM – Slip marker
SSK – Slip, Slip, Knit
SSP – Slip, Slip, Purl
St – Stitch
St St – Stockinette Stitch
Sts – Stitches
TBL – Through the back loop
To End – To the end of the row/round
DC – Triple crochet
Turn – Turn your work around so that the other side is facing you
W&T – Wrap and turn
Work Even – Continue in the same stitch pattern without increasing or decreasing.
Work in Brioche stitch – On DC rounds, when you come to a DC stitch with a wrap, br-p (see above). When you come to a LC stitch without a wrap, yfsl1yo (see below). On LC rounds, when you come to a LC stitch with a wrap, br-k (see above). When you come to a DC stitch without a wrap, yfsl1yo.
WPI – Wraps per inch
WS – Wrong Side
Wyib – With yarn in back
Wyif – With yarn in front
YF – Yarn forward
Yfsl1yo – Yarn forward, slip 1, yarnover: Move yarn to front, slip next st, bring yarn over needle to back, making a yarnover. The yarnover will pass over the slipped stitch and sit next to it like a cape.
YO – Yarnover
Video Knitting Dictionary
1×1 Rib/2×2 Rib – Ribbing
Ribbing is a stretchy fabric created by alternating knit and purl stitches across a row.
It is stretchy and does not curl, and is useful for cuffs and necklines.
When making ribbing you can use any repeated combination of knit and purl stitches, such as: (K2, p2), (k2, p1), (k3, p5), etc.
“Work (or continue) in ribbing” = “Knit all the knit stitches and purl all the purl stitches for as long as you want to maintain the pattern.”
1x1 Rib
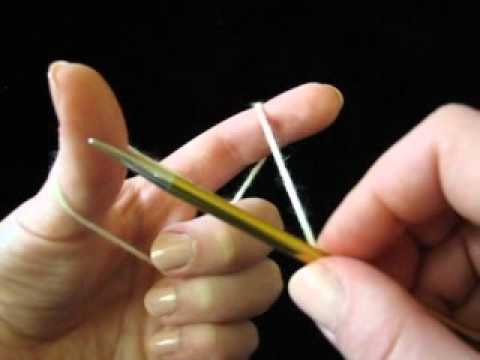
BLCO – Backwards Loop Cast-On
This is a beginner cast on that you can teach to anyone just starting to knit, including children.
You can also use this cast-on when you have accidentally run out of tail at the end of your Long-Tail Cast-On or when you are required to cast-on at a midpoint in your knitting (like on a buttonhole).
The edge is not very strong, so this cast-on should be used sparingly.

Backwards Loop Cast-On
Blocking Knitting – How to Block Your Work
The final touch for most knitting projects is blocking.
Soaking your project in warm water with a little soap and then laying it out to dry is all it takes to make your edges and stitches more even and to cover up any inconsistencies in your tension.

KnitFreedom | Finishing | Blocking - How to Block Your Knitting
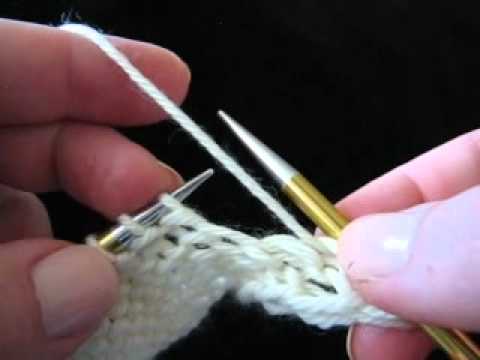
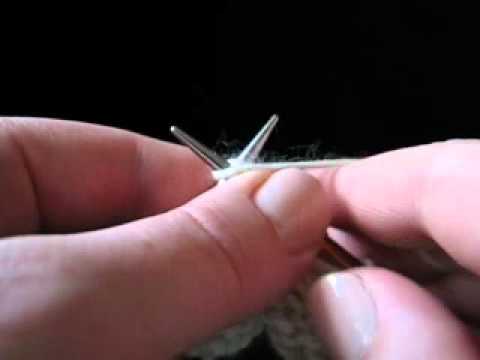
BO – Bind Off
In order to wear and enjoy your project, you must take the stitches off the needle.
Use this bind-off (called the Standard Bind-Off) to finish every project unless the directions specify otherwise.

BO - Bind Off
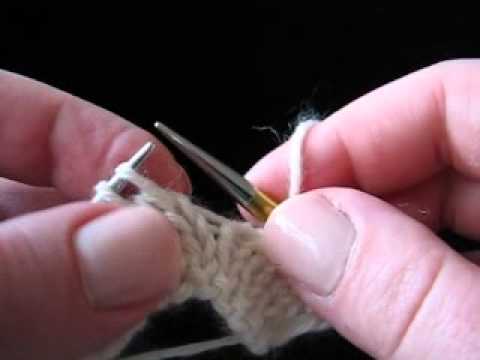
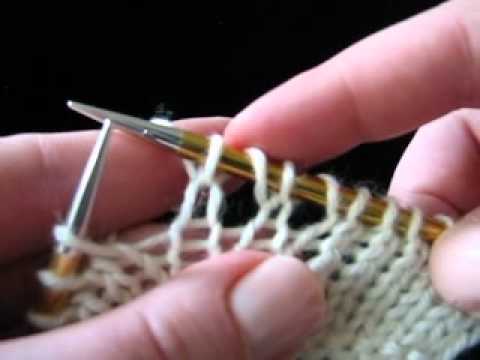
BO in Pattern – Bind Off In Pattern
“Bind off in pattern” means to knit your knits and purl your purls as you bind off.
This flattens the bound-off edge. In order to do it right, you’ll need to be able to recognize your knit and purl stitches.
Bind Off In Pattern
Garter St – Garter Stitch
Garter stitch is the fabric created when you knit every row, that is, on both the RS and the WS.
Garter stitch is reversible, lies flat, and is bulkier than Stockinette stitch.

Garter Stitch
Gauge – How to Check Your Gauge on Flat Knitting
Gauge is the number of knit stitches and rows that fit into a specified unit of measurement, usually one inch (2.5 cm). It’s important because if your stitches are too big or too small, your project will be too big or too small.
Checking your gauge is as easy as knitting a small sample square, called a swatch, and placing a ruler or a gauge-checker over the fabric, and counting how many stitches there are in a few inches, and then dividing by the number of inches to get the average number of stitches per inch.
Here are my tips for knitting a swatch and checking your gauge.

KNITFreedom - How To Measure or Check Your Gauge in Knitting
How to Do Kitchener Stitch Without Fear

How to Do Kitchener Stitch Without Fear - KnitFreedom.com
K – Knit Stitch – American Style
In this style (most common for beginners), the yarn is tensioned in the right hand.

The Knit Stitch - American Style
K – Knit Stitch – Continental Style
In Continental-style knitting, hold the working yarn with your left hand.

The Knit Stitch - Continental
K2TOG – Knit 2 Together
The Knit 2 Together is a basic, right-leaning decrease. It decreases two stitches into one. It is the mirror image of the SSK.

K2tog - Knit 2 Together
K2TOGTBL – Knit 2 Together Through the Back Loops
An easy way to do a left-leaning decrease, this technique creates a twisted stitch, so only use it if that’s what you want.
K2togtbl - Knit 2 Together Through the Back Loops
KFB – Knit Front and Back
An easy increase, the Knit-Front-and-Back leaves a horizontal purl bump under the increased stitch.
KFB - Knit Front and Back
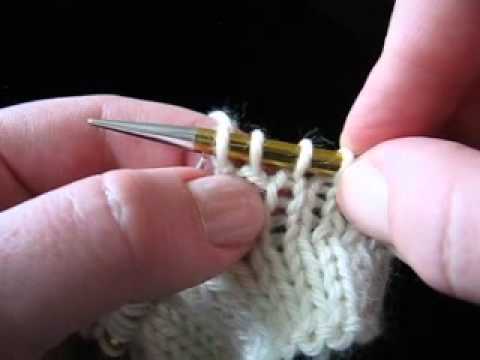
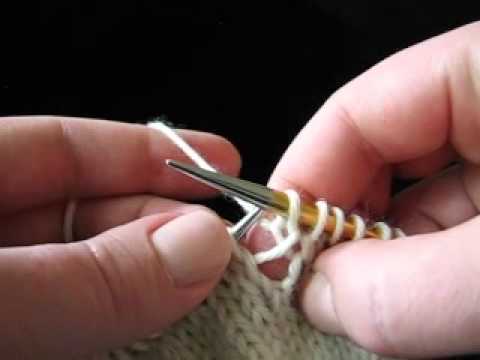
Kitchener Stitch
This is an advanced sewn bind-off that is completely flat and invisible. It is slow but it gets faster as you get better at it.
Not only is this a fabulous way to invisibly join two pieces of knitting, this technique is used in a lot of other advanced bind-offs, making it an investment in your future knitting happiness.
I would consider it “required reading” for intermediate knitters.

Kitchener Stitch
Long-Tail Cast-On
The Long-Tail Cast-On is a great all-around cast-on.
Use it to begin every project, unless the directions or your further cast-on knowledge specify otherwise.
Long-Tail Cast-On
M1/M1L – Make One/Make One Left
Make One is a nearly invisible increase that seems to appear out of nowhere. The increased stitch leans to the left.
M1L - Make 1 Left
M1R – Make One Right
A mirror image of Make One Left in both appearance and execution, this increase leans to the right.
M1R - Make 1 Right
Mattress Stitch
Mattress stitch is a way to seam together pieces of knitting. To make this process as easy as possible, block the pieces to be seamed and use a sturdy, contrasting yarn as your seaming yarn.
Once you get the hang of Mattress Stitch, you can use the tail yarn of your project to do it (this is slightly more challenging because the yarn won’t stand out as you work).
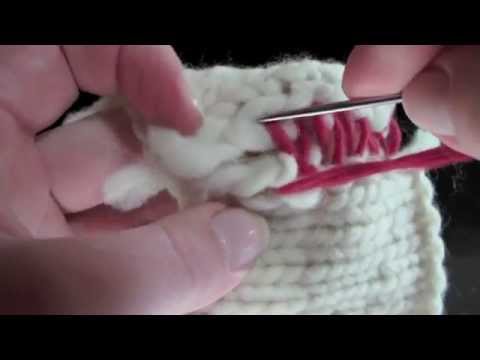
KnitFreedom | Seaming | Mattress Stitch - How to Invisibly Sew Up Your Knitting
P – Purl Stitch – American Style
In this style (most common for beginners), the yarn is tensioned in the right hand.

The Purl Stitch - American Style
P – Purl Stitch – Continental Style
In Continental knitting, the yarn is tensioned in the left hand.
Purl - Continental
P/u (Pu) and Knit – Pick up and Knit

KNITFreedom - Pick Up And Knit - How To Pick Up And Knit Stitches On 2 Edges
P2TOG – Purl 2 Together
This is a right-leaning decrease that reduces the number of stitches on your needle by 1.
The purl 2 together is identical to the knit 2 together, only it’s used on the purl side (usually the WS) of the fabric. Doing a p2tog on the purl side will result in a k2tog on the knit side.
P2tog - Purl 2 Together
PFB – Purl Front and Back
The purl front-and-back is an easy increase which is nearly invisible when used on Reverse Stockinette stitch.

PFB - Purl Front and Back
Recognizing a Knit and Purl Stitch
The hallmark of a knit stitch is that it looks like a “V” (I like to think of a V-neck sweater).
The hallmark of a purl stitch is that is it looks like a horizontal line “–” (I like to think of a turtleneck sweater). This is called the “purl bump.”
These two stitches are the fundamental stitches of knitting. Each stitch is the exact opposite of the other – it’s really just one stitch, seen from either side.

Recognizing a Knit or Purl Stitch
S2KP (Slip 2, Knit, Pass)
This reduces the number of stitches by two and is neatly centered (no leaning at all). One of my personal favorites.
Also called: Centered Double Decrease

KNITFreedom - S2KP (Slip 2 Knit Pass) or Centered Double Decrease
SKP – Slip, Knit, Pass
The Slip, Knit, Pass is left-leaning decrease that is almost identical to the SSK. Reduces the stitch count by 1.
SKP - Slip, Knit, Pass
Sl – Slip 1 – Slip a Stitch

KNITFreedom - How To Slip A Stitch In Knitting - Sl 1 - Slipped St
SSK – Slip, Slip, Knit
Slip, Slip, Knit is an easy decrease that is good for beginners. It leans to the left in a mirror image of a k2tog.
The Slip, Slip, Knit decreases your stitch count by one stitch. It turns two stitches into one.

SSK - Slip, Slip, Knit
St St – Stockinette Stitch
Stockinette Stitch is the fabric created when you knit on the RS and purl on the WS.
It is the basis of most knitted garments. It tends to curl in on itself when it doesn’t have a border that lies flat.

St st - Stockinette Stitch
TBL – Through the Back Loop
As in K tbl (“knit through the back loop”) and P tbl (“purl through the back loop”).
Knitting or purling through the back loop of a stitch creates a twisted stitch. It is tighter than a normal knit or purl stitch and can be used functionally as well as decoratively.

Knit or Purl Through the Back Loop (TBL)
W&T – Wrap and Turn (Short Rows) Plus Picking Up Wraps on the Knit Side
A “short row” is simply what happens when you work across a row but don’t get to the end.
The pattern instructs you to go almost to the end (maybe one or two stitches before), and then turn around and go back.
This creates a domed shape that is good for heels and other curvy parts of the body.
![[KnitFreedom] How To Do Short Row Shaping And The "Wrap and Turn"](https://i.ytimg.com/vi/_PAADqkCjrg/hqdefault.jpg)
[KnitFreedom] How To Do Short Row Shaping And The "Wrap and Turn"
Weave in Tails/Ends on Stockinette Stitch
Weaving in your yarn ends, or tails, is a way to secure them so that they don’t come loose when you wash or wear your knitted items, leading to unraveled knitting or a hole in your garment.
To make weaving in your ends easier, always leave at least a six-inch tail when you cut your yarn.

KnitFreedom | Finishing | Weaving in Ends - How to Weave in Ends on Stockinette Stitch
Work Even
Designers instruct you to “work even” or “work stitches as they appear” when they want you to knit all the knit stitches and purl all the purl stitches along a certain row.
In order to do this, you have to know which are the knit stitches and which are the purl stitches!
Here’s a video showing exactly how to recognize knit and purl stitches. I also show you how to see when you guessed wrong, and how to fix it.

KNITFreedom - How to "Work Even" in Knitting - Knit the Knits and Purl the Purls
YO – Yarnover
This simple increase makes a lacy-looking hole in your work, so only use it if you want a hole. Increases by 1 stitch.
Not incidentally, the yarnover, in combination with Knit 2 Together, is the basis of all lace patterns.
YO - Yarn Over
