Decorative Bind-Offs
 This section contains bind-offs that serve not only to finish your knitting but also to look pretty. They mostly have interesting, unusual edges — some are ruffled, some have picots (which are little points), some have patterned edges, etc.
Luckily, a lot of the decorative bind-offs are also stretchy, which means they would work fine as functional edges, for example, on the cuffs of toe -up socks or on button bands, neckbands, or headbands.
They would definitely work on the edges of non-garment items like bags, coasters, potholders, dishcloths, and tea cozies (ruffle, anyone?).
My favorite bind-offs in this section are the Knit 2 Together Bind-Off, because it’s dead easy and really pretty, the Picot/Purled Hemmed Edge Bind-Off, because I invented it myself (as a bind-off) and it gives you the perfect way to get a hemmed edge on toe-up socks, the Frilled Standard Bind-Off, because it’s the best bind-off for lace projects ever, and the Ruffle Bind-Off, because it makes a huge ruffle and is also really easy.
Keep in mind: the decorative bind-offs in this section aren’t the only interesting or pretty bind-offs you can use. The Latvian Bind-Off, Icelandic Bind-Off; the Cable Bind-Offs for 1×1 Rib, 2×2 Rib, and Seed Stitch; as well as all three Two-Color Bind-Offs, while not as decorative as the ones in this section, are all pretty and have interesting edges, and they are also relatively easy and fast to work.
The decorative bind-offs in this course are just the beginning when it comes to fun edges on knitting. Check out Knitting on the Edge by Nicki Epstein for tons more edges and borders. Her books are an important part of my library and I really recommend them.
Decorative Bind-Off Sampler Instructions
Decorative Bind-Off Sampler Instructions


With white yarn, CO 108 sts onto a long circular needle.
Work in 1×1 rib for 5 rows.
With purple yarn, work in St st for 4 rows, starting with a K row.
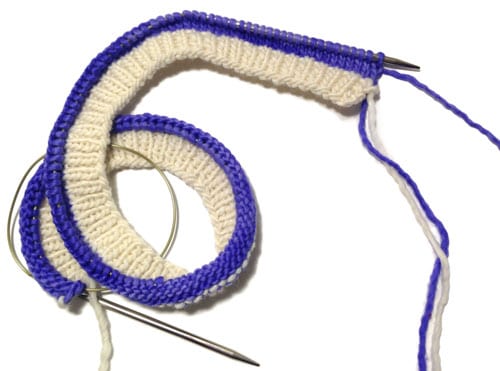
- BO the first 12 sts using the Knit 2 Together Bind-Off.
- Pass the st back to the L needle. This counts as the first cast-on stitch. Use it and the cable co to co 2 more sts. BO the next 12 sts using the I-Cord Bind-Off.
- Pass the st back to the L needle. This counts as the first cast-on stitch. Use it and the cable co to co the remaining number of sts needed for your edging in order to BO the next 12 sts using the Edging Bind-Off.
- Keep the st on the R needle. Set up for the Picot/Purled Hemmed Edge Bind-Off as follows: K23. Turn and work 5 rows in St st over the 24 sts just worked. Put a marker in the 1st row so it’s easy to count where you are.
- Next row: (k2tog, yo) 6 times. P12. Turn.
- Work next 9 rows in St st. Turn.
- Fold the work at the yarnover/purled edge, and complete the Picot/Purled Hemmed Edge Bind-Off.
- Keep st on the R needle. Starting with step 2, BO next 12 sts using the Frilled Standard Bind-Off.
- Keep st on the R needle. Starting with step 2, BO next 12 sts using the Frilled Decrease Bind-Off. When done, move st to L needle.
- BO next 12 sts using the Ruffle Bind-Off. Either break the yarn and join it again for the next bind-off, or use a crochet hook and slip-st down the side of the work until the working yarn is even with the row of live sts, so that you can start working then next bind-off without breaking the yarn. It doesn’t have to be pretty. :)
- If you crocheted over to this section, you have a live st on your crochet hook. Put it on the R needle. k1, BO 1. Move st to L needle and BO 12 sts using Picot Point Bind-Off #1. When done, k across rem sts in sampler. Turn work.
- On WS, BO remaining sampler sts using Picot Point Bind-Off #2.
Block this sampler lightly to prevent the edges from rolling.
The Bind-Offs
Knit 2 Together Bind-Off
This bind-off is not stretchy, so don’t use it for anything like a mitten, hat, or sock cuff that you need to stretch over a body part to wear it.
It would be great for the edge of anything that is intended to lay flat, like a dishcloth, coaster, or potholder.
This bind-off is part of: the Beginner Bind-Off Challenge
Restricted Video
![]()
![]() This video is available to customers of the following class(es):
This video is available to customers of the following class(es):
Click the links above to learn more about the class(es) OR Join KnitFreedom Premium now and get this and every other video we sell FREE.
If you own this class or are a member of Premium, please LOG IN to watch.
To Do the Knit 2 Together Bind-Off:
- K2tog.
- Move st back to L needle.
- Repeat steps 1-2 across row.
- Cut yarn and pull through last st. That’s really all there is!
1. Use good bind-off technique to make sure the bind-off doesn’t get too tight.


Also, make sure not to tension the working yarn too tightly. These cautions will ensure that the stitches don’t become too tight.
Click image to play. If GIF doesn’t play immediately when clicked, wait 20-30 seconds. Click the GIF again to stop.

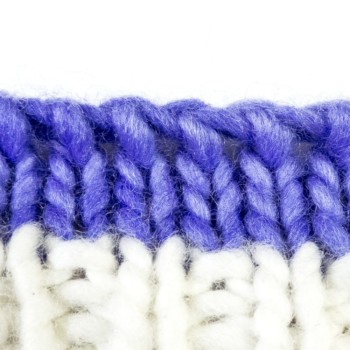
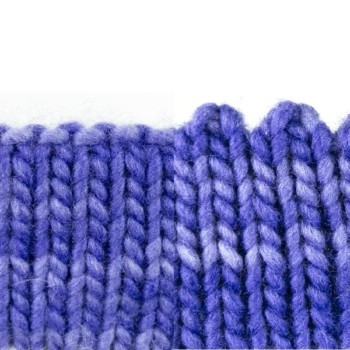
I-Cord Bind-Off
This is a great intermediate bind-off that puts a round decorative column along the edge of your stitches to be bound off.
The nice thing about this bind-off is that not only is it decorative, it’s also pretty stretchy.
It does sort of help to know how to make an I-cord, but you don’t really need to because I explain it all to you in the tutorial below.
Options: You can work this bind-off in a contrasting color. In order to do that, just work the last row before the bind-off (the WS row) in the contrasting color and then do the bind-off in the contrasting color.
You can also make the I-cord as thick or thin as you want, and I include instructions below on how to do so.
One reason to make a thinner I-cord is to create a matching bind-off for the popular Chinese Waitress Cast-On. A 1-stitch I-cord bind-off is not a perfect match but it does match a lot of the characteristics.
A 3-stitch I-cord is shown in this tutorial.
Matching Cast-On: I-Cord Cast-On
Note: A one-stitch I-Cord Bind-Off also sort of matches the Chinese Waitress Cast-On. This and Jeny’s Surprisingly Stretchy Bind-Off were the closest I could get to a similar-looking bind-off!
A technique used in this bind-off is also used in: the 3-Needle I-Cord Bind-Off (for seaming)
Restricted Video
![]()
![]() This video is available to customers of the following class(es):
This video is available to customers of the following class(es):
Click the links above to learn more about the class(es) OR Join KnitFreedom Premium now and get this and every other video we sell FREE.
If you own this class or are a member of Premium, please LOG IN to watch.
To Do the I-Cord Bind-Off:
For a thinner or thicker I-cord, cast on more or fewer stitches. To do so, substitute the # of sts you want for the “X” in the instructions.
- CO 3 (X) sts using the Knitted Cast-On.
- K1. Do not drop st off L needle.
- Place new st back on L needle, moving front loop to back. Repeat steps 2-3 three (X) times.
- K1 twice.
- K2togtbl.
- Pass st from R to L needle three times. Working yarn is 3 sts down on the needle.
- Repeat steps 3-5 across.
- BO last 3 sts using the Standard Bind-Off.
Click image to play. If GIF doesn’t play immediately when clicked, wait 20-30 seconds. Click the GIF again to stop.

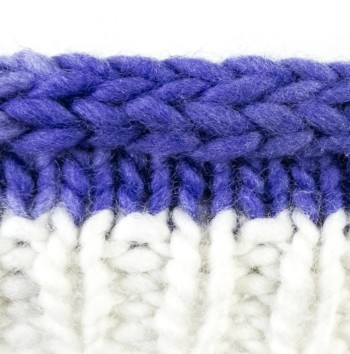
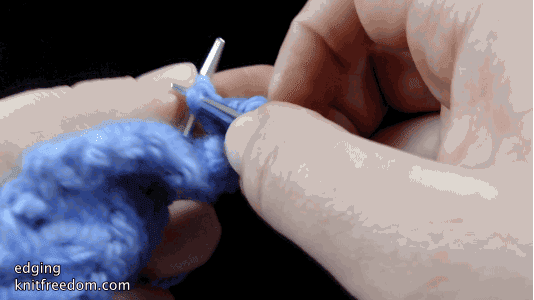
Edging Bind-Off
The edging bind-off is an easy way to add a lace, cable, or decorative border pattern to the edge of your work while simultaneously binding off your knitting.
If you have a shawl-collared or a kimono-style sweater and you want to add a five-stitch lace pattern to it the edge, this is a very easy way to do so without knitting a strip of lace and then sewing it onto the edge (which would be slow and also bulky where you had to seam it).
This is the technique used to add the beautiful leaf border to the popular Cedar Leaf Shawlette.
The way that this bind-off works is that you choose an edging pattern from a lace, cable, or stitch-pattern resource, like one of Barbara Walker’s Treasuries of Knitting Patterns.
You then cast on the number of stitches required for the edge pattern and work the first row of the pattern. When you get to the edge where the border stitches meet the work to be bound off, you either p2tog or k2tog across the gap and then turn and work back across the edge.
I really suggest that you try this bind-off because it’s not as hard as you think.
Similar to: I-Cord Bind-Off
This bind-off is part of: the Intermediate Bind-Off Challenge
Restricted Video
![]()
![]() This video is available to customers of the following class(es):
This video is available to customers of the following class(es):
Click the links above to learn more about the class(es) OR Join KnitFreedom Premium now and get this and every other video we sell FREE.
If you own this class or are a member of Premium, please LOG IN to watch.
To Do the Edging Bind-Off:
To do this bind-off with any edge you desire, cast on the # of sts in your edge pattern in place of the 4 sts shown in the instructions below.
- Setup: CO 4 with Knitted Cast-On.
- K1. Do not drop st off L needle.
- Place new st back on L needle. Repeat steps 2-3 for as many sts as you need for your pattern.
- Work next RS row of your edge pattern across sts.
- K2tog tbl.
- Turn.
- Sl 1.
- P across.
- Repeat steps 4-8 across.
- BO using the Standard Bind-Off.

K2tog across the gap if you want a visible chain of stitches showing on the RS between the knitted work and the patterned edge.
2. Instead of turning and working across the wrong side of the edging, I recommend that you try purling backwards.
That makes this bind-off go even faster, as I demonstrate in the video.
Click image to play. If GIF doesn’t play immediately when clicked, wait 20-30 seconds. Click the GIF again to stop.
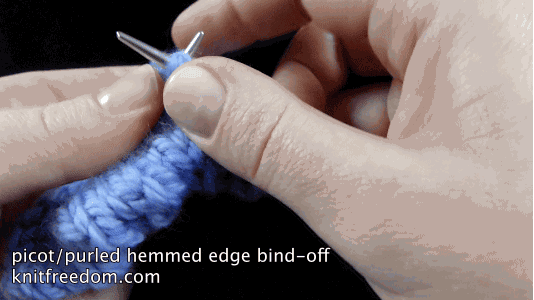
Hemmed Edge Bind-Off – Purl or Picot
This is an advanced bind-off that I adapted myself by taking the Picot/Purled Hemmed Edge Cast-On and turning it into a bind-off.
To do it, fold your work at a line of purl bumps or simple lace and bind off the edge to the inside of your knitting.
This makes a perfectly flat, hemmed edge that can be fancy or neutral, depending on which variation you choose.

This is a perfect bind-off for toe-up socks where you don’t want to do ribbing, because it’s stretchy and sturdy and the edge doesn’t roll.
I really recommend that you try this technique. It’s a beautiful bind-off and you’re going to be very proud of yourself once you finish it.
Restricted Video
![]()
![]() This video is available to customers of the following class(es):
This video is available to customers of the following class(es):
Click the links above to learn more about the class(es) OR Join KnitFreedom Premium now and get this and every other video we sell FREE.
If you own this class or are a member of Premium, please LOG IN to watch.
To Do the Hemmed Edge Bind-Off – Purl or Picot:
To set up this bind-off:
- Work 6 rows in St st.
- Put a marker into one of the sts in the 1st row when you do it so it’s easy to count your rows later.
- Next row (RS):
- For the picot edge: (K2tog, yo) across.
- For the purled edge: P across.
- Work next 5 rows in St st. turn.
To work this bind-off:
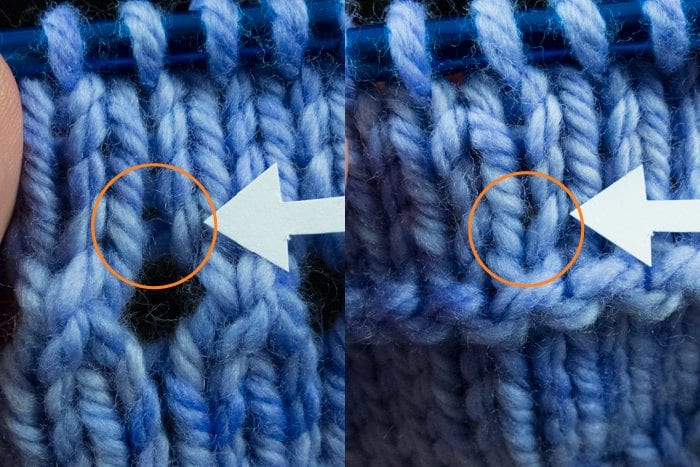
- Count how many rows you’ve done after your picot or purl row. The circled stitch is row #1.
- Fold your work at the picot/purl row.
- Find the purl bump directly below the stitch on your needle, right where your needle falls when the fabric folds evenly. Grab it with your R needle tip.
- Place the loop on your L needle.
- K2tog. This is what I call “hemming” 1 stitch.
- Hem next st.
- K 2 sts on R needle together.
- Repeat steps 6-7 across.
The trickiest part of this bind-off is finding the right purl bump on the WS to slip onto your needle to hem the edge. Just look at the picture below and watch the video and I’ll show you exactly how to know that you’re getting the right purl bump.
If you’re not getting the right purl bump, the edge will bias a little bit and it won’t lay perfectly flat — you’ll know you got it wrong and you can undo it and try again. When the work lays perfectly flat after it’s been folded and tacked down you’ll know that you’re picking the exact right purl bumps to go into.
_02")
2. Make sure that you knit plenty of rows before and after the picot/purl row before binding off, because if you skimp, the edge is going to flare out instead of laying flat, and it will look weird. Nobody wants that.
I recommend knitting 11 rows before and 10 rows after you do the picot/purl row before folding your work and binding off. I’ve given you the minimum (6 and 5 rows) in the instructions above.
Click image to play. If GIF doesn’t play immediately when clicked, wait 20-30 seconds. Click the GIF again to stop.
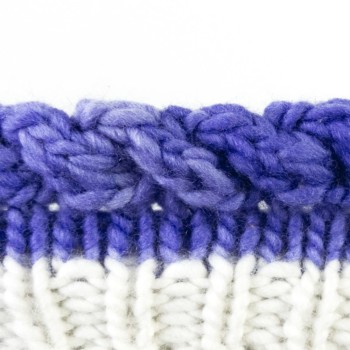
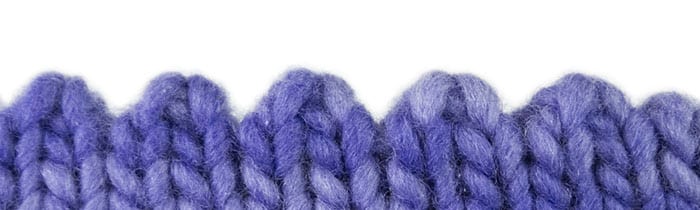
Frilled Standard Bind-Off

This is an intermediate, medium-speed bind-off that I highly recommend you learn, mostly because it’s great for binding off on lace projects — as a frilly bind-off it’s actually not very frilly at all.
It does increase the number of stitches that are in the bind-off, which makes the edge wider (thus making it flare out a little bit – hence, the “frill”).
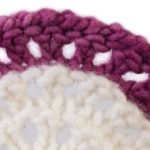
If you’re using this bind-off on something where the edge will be stretched, the bind-off won’t frill but it will still look gorgeous. I recommend that you use this bind-off on any and all lace projects that you’ll be blocking.
At right you can see a photo of how this bind-off looks on a lace project: The Frilled Standard Bind-Off on a Feather-and-Fan lace swatch.
To see how this bind-off compares to other recommended bind-offs for lace, see Bind-Offs for Lace.
This bind-off gets its name from the Standard Bind-Off, to which an extra movement (which you might recognize from the Suspended Variation Bind-Off) is added.
To get the full effect on this and any frilled or ruffled bind-off, you’ll need to block this it: get it wet, squeeze the water out, and shape the edge with your fingers to make it into a frill.
Similar bind-offs: Frilled Decrease Bind-Off (which is more frilly), Icelandic Bind-Off, Elastic Bind-Off.
Based on: Standard Bind-Off + Suspended Variation Bind-Off
This bind-off is part of: the Intermediate Bind-Off Challenge
Restricted Video
![]()
![]() This video is available to customers of the following class(es):
This video is available to customers of the following class(es):
Click the links above to learn more about the class(es) OR Join KnitFreedom Premium now and get this and every other video we sell FREE.
If you own this class or are a member of Premium, please LOG IN to watch.
To Do the Frilled Standard Bind-Off:
- K1.
- K1 but don’t drop the st off the L needle.
- BO 1. Original loop remains on L needle.
- K into the loop that’s still on the L needle.
- BO 1.
- Repeat steps 2-5 across.
Click image to play. If GIF doesn’t play immediately when clicked, wait 20-30 seconds. Click the GIF again to stop.

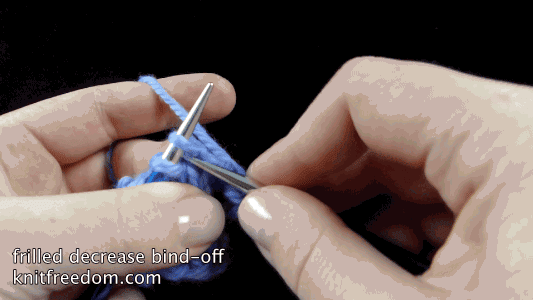
Frilled Decrease Bind-Off
This is a medium-speed frilled bind-off that I see as advanced because it has a lot of steps to remember.
This would be a good bind-off for the top of little girl’s sock, baby booties… anything where you want a little decorative frill.
It’s also very stretchy — this is an increase bind-off, which means that the increased number of stitches along the edge gives it added width and stretch.
This bind-off is similar to the Frilled Standard Bind-Off only it’s noticeably more frilly. It gets its name from the Decrease Bind-Off, to which an extra movement (which you might recognize from the Suspended Variation Bind-Off) is added.
To get the full effect on this and any frilled or ruffled bind-off, you’ll need to block this it: get it wet, squeeze the water out, and shape the edge with your fingers to make it into a frill.
Similar bind-offs: Frilled Standard Bind-Off (which is less frilly), Ruffle Bind-Off (which is much more frilly).
Based on: Decrease Bind-Off + Suspended Variation Bind-Off
Restricted Video
![]()
![]() This video is available to customers of the following class(es):
This video is available to customers of the following class(es):
Click the links above to learn more about the class(es) OR Join KnitFreedom Premium now and get this and every other video we sell FREE.
If you own this class or are a member of Premium, please LOG IN to watch.
To Do the Frilled Decrease Bind-Off:
- K1.
- K1. Do not drop st off L needle.
- Insert L needle tip into 2 front loops on R needle.
- K sts together.
- Move st back to L needle.
- K2tog tbl.
- Repeat steps 2-6 across.
- Cut yarn and pull through last st.
Click image to play. If GIF doesn’t play immediately when clicked, wait 20-30 seconds. Click the GIF again to stop.
Ruffle Bind-Off
This is an intermediate bind-off that is will make a nice, big, girly ruffle, be it at the top of a toe-up baby sock, on the button band of a kimono-style sweater, or at the bottom or top of a girls’ skirt.
The trick to this bind-off isn’t so much in the actual binding-off itself, but in the set ups rows that precede the bind-off.
How it works: On the RS row before you want to create the ruffle, you increase drastically across the row (which, by the way, means you’re going to want to use some very pointy knitting needles).
Then you knit a few rows in St st and these rows, being crowded because you’ve increased the number of stitches so much, kind of fold back on each other — that’s what makes the ruffle.
The reason this is considered slow is because of the time it takes to knit the 5 rows in St st before you actually bind off.
This is a bind-off you absolutely must block and shape by hand to make it as ruffled as possible. Get it wet, squeeze the water out, lay it out on a towel, and then use your fingers to pull, widen, and shape each ruffle while the yarn is damp.
Matching cast-on: Ruffle cast-on (instructions below)
Ruffle Cast-On
- CO on the number of sts required in your project x 2.5 (e.g. if you pattern calls for 88 sts, CO 88*2.5 = 220 sts).
- Work for 5 rows in St st, and then (CDD, k2tog) across the row.
- The ruffle is complete. Continue knitting your pattern like normal.
Similar bind-offs: The Frilled Decrease Bind-Off is similar but makes a much smaller frill.
Based on: Bowdalicious Bikini ruffle
This bind-off is part of: the the Intermediate Bind-Off Challenge
Restricted Video
![]()
![]() This video is available to customers of the following class(es):
This video is available to customers of the following class(es):
Click the links above to learn more about the class(es) OR Join KnitFreedom Premium now and get this and every other video we sell FREE.
If you own this class or are a member of Premium, please LOG IN to watch.
To Do the Ruffle Bind-Off:
- K1. Do not drop st off L needle.
- K1 tbl. Do not drop st off L needle.
- K1. St comes off L needle.
- K1. Do not drop st off L needle.
- K1 tbl. St comes off L needle.
- Repeat steps 1-5 across.
- You have 2.5 times the # of sts you started with. Turn.
- Start purling across WS.
- Tip: place a marker around a st in the row after you purl it. This will help you keep track later.
- Do a total of 5 rows of St st.
- 5 rows finished. The marker marks row #1. The row on the needle always counts.
- BO using the Frilled Standard Bind-Off or any stretchy bind-off.
Just a simple tip: when you are doing the increase steps, the stitches will get cramped up on your needle. Make sure to push the stitches down to the barrel of the needle every so often so they don’t get jammed up at the tip.
Click image to play. If GIF doesn’t play immediately when clicked, wait 20-30 seconds. Click the GIF again to stop.

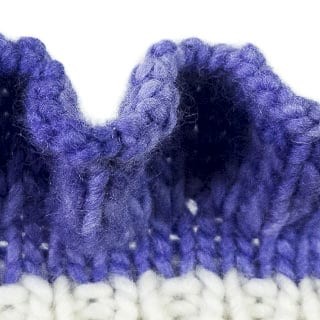
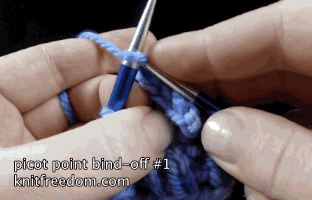
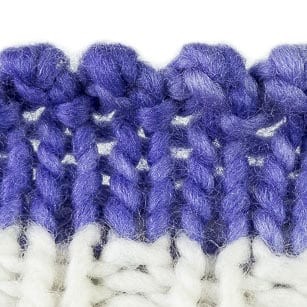
Picot Point Bind-Off #1
This is an intermediate bind-off that makes little picots along the top of your knitting.
You can make the picot points however high you want. In tutorial I show you a 2-stitch picot bind-off, with added instructions for making the bind-off pointier.
Similar bind-offs to this one are the Picot Point Bind-Off #2 and the Picot Hemmed Edge Bind-Off, which both have smaller picots.
I don’t love this bind-off because I don’t like how long it takes, but if you want to add a little points that don’t frill this one might be a good choice.
Matching cast-on: Picot Cast-On
Similar bind-offs: Picot Point Bind-Off #2, Picot Hemmed Edge Bind-Off
Restricted Video
![]()
![]() This video is available to customers of the following class(es):
This video is available to customers of the following class(es):
Click the links above to learn more about the class(es) OR Join KnitFreedom Premium now and get this and every other video we sell FREE.
If you own this class or are a member of Premium, please LOG IN to watch.
To Do the Picot Point Bind-Off #1:
To make a pointier or less-pointy picot, substitute the number of stitches you want in your picot for the “x” in the instructions below. In the instructions below, x=2.
- Setup: CO x sts on L needle with Knitted Cast-On.
- K1. Do not drop st off L needle.
- Place new st back on L needle. Work steps 1-2 twice.
- K1 tbl twice.
- BO 1.
- K1.
- BO 1. Work steps 5-6 three times.
- Move st back to L needle.
- Repeat steps 1-7 across.
- Cut yarn and pull through last st.
Click image to play. If GIF doesn’t play immediately when clicked, wait 20-30 seconds. Click the GIF again to stop.
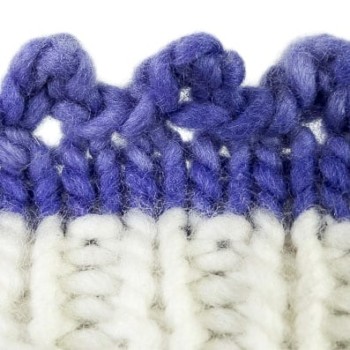
Picot Point Bind-Off #2
This is an intermediate-to-advanced bind-off that’s done on the wrong side of the work.
It takes a while to do and it results in very small delicate picots.
I chose to include this bind-off out of the many picot bind-offs that are out there because these picots are very small and sweet.
This bind-off does tend to flare out and roll forward a bit because of all the picots sitting next to each other.
Blocking the edge will help a little. Soak it in water, squeeze the water out, and lay the bind-off flat. Take your fingers and shape the little picot points so that they lay next to each other as flat as possible.
Similar bind-offs: Picot Point Bind-Off #1, Picot Hemmed Edge Bind-Off.
Restricted Video
![]()
![]() This video is available to customers of the following class(es):
This video is available to customers of the following class(es):
Click the links above to learn more about the class(es) OR Join KnitFreedom Premium now and get this and every other video we sell FREE.
If you own this class or are a member of Premium, please LOG IN to watch.
To Do the Picot Point Bind-Off #2:
Note: Do this bind-off with the WS facing you.
- With WS facing, K1. Do not drop st off L needle.
- Place new st back on L needle.
- Work steps 1-2 twice.
- On L needle, lift 2nd st over 1st st and off needle, twice.
- Sl 1.
- K1.
- BO 1.
- Move st back to L needle.
- Repeat steps 1-7 across.
- Cut yarn and pull through last st.
Click image to play. If GIF doesn’t play immediately when clicked, wait 20-30 seconds. Click the GIF again to stop.

