Buttonholes
The Search for the Best Knitted Buttonhole Ends Here


I didn’t expect to learn anything about buttonholes when I started writing my I Love Bind-Offs video course.
Up until then, I’d always done a standard two-row buttonhole, which consists of “Bind off, turn, cast on.” I never knew there was a different way to do it, and I was sort of fine with it.
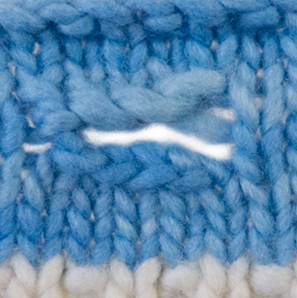
My buttonholes were not pretty by any means, but they were holes, and my buttons fit into them. When I started doing the research for the I Love Bind-Offs course, I kept coming across advice in reference books that said, “This firm and sturdy bind-off is good for buttonholes.” I would think, “Really? Why? The Standard Bind-Off is a nice, firm, good bind-off for most things, and it’s also really easy. I’ve never had a problem with my bind-offs not being firm enough on a buttonhole…” At first I thought, “This author must know better than me. I’ll just pass on this advice to my readers that this firm bind-off is good for buttonholes.” … But I couldn’t. I experimented by trying the “firm” bind-offs on my regular two-row buttonhole, and I was’t impressed (see below left). If anything, the firm, bound-off side contrasted even more with the cast-on side above it. The messy part wasn’t the bind-off anyway, it was the side stitches.
Doing some Google-searching about buttonholes, I found some blog posts that talked about exactly what I was noticing; that a sturdy bind-off isn’t the problem. The problem is that the standard two-row buttonhole leaves the corner stitches unsupported, and you basically have the edges of the buttonhole tugging on just one strand of yarn. Whenever you have just one strand of yarn, it is weak and can get stretched out. No matter how firm your bind-off is, it’s not going to solve that problem. Then, in a blog post by TechKnitter, I found something she invented called the Tulips Buttonhole, so called because it looks like two lips. Accompanying the invention was a very, very, long set of instructions about how to do it.

Even though I felt like I was sort of going down the rabbit hole and away from Bind-Off Land, I thought, “I’ve come this far, let me try this. If this is truly a better buttonhole,” I thought, “I’ll put it in my bind-offs eBook just as a bonus.” When the computer-illustrated instructions proved unenlightening for my learning style, I found a video on it. Even though the video was made by a knitter I admire very much, it was so far away and small and barely in focus, that I thought, “Oh my God, my poor students. If they ever try to learn this buttonhole, they will give up.” I myself wanted to give up! And I almost did. But I followed the video until I understood the technique, and, let me tell you, the finished buttonhole is awesome. The finished Tulips Buttonhole has a beautiful bound-off edge and a beautiful cast-on edge. The corners are nice and strong, and it is without a doubt the buttonhole that I’m going to use from now on.
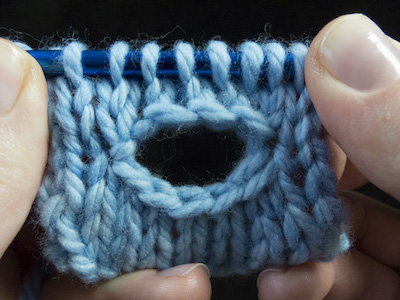
Just to compare, I knitted a little swatch with a regular buttonhole and the Tulips Buttonhole side by side (shown below), and if you look at the regular buttonhole, you’ll be like, “Are you serious? People actually tell you to do it that way when it could be so much better? You’ve got to be kidding me.” 
Now It’s Your Turn to Learn
Not only did I film my own video for you showing the technique, I wrote up the instructions in my own shorthand and distilled the technique down to its separate steps. I also took over 100 step-by-step photos just to make sure that any level of knitter would feel comfortable following along. Even though this is probably the most challenging (and unusual) technique demonstrated on this site, all you have to do is slowly follow the steps and you’re going to be able to do something that you never thought possible.
Buttonhole Sampler Instructions
Buttonhole Sampler Instructions

With white yarn, CO 23 sts.
Work in 1×1 rib for 3 rows.
With blue yarn, k across.
Next row: K2, p to last 2 sts, k2
Repeat last 2 rows once more.
- K5, (k1, BO 1) 4 times, k2. This is the first half of a traditional 4-st 2-row buttonhole.
- Follow the directions for the Tulips Buttonhole to create a 4-st Tulips buttonhole centered over the next 10 stitches.
- On step 38 of the buttonhole instructions, continue knitting across the edge of the swatch. Turn.
- K2, p14, slip out DPN and replace with a regular needle. CO 4 sts using the Knitted CO or Cable CO, turn and p to last 2 sts, k2.
Work 3 more rows in St st, continuing the 2-st Garter-st border on either edge. BO using the Standard Bind-Off (top variation).
Block the sampler.
Tulips Buttonhole

This buttonhole, invented by TechKnitter, can be done over 2 or more stitches.
It creates a strong buttonhole with matching cast-on and bind-off edges that has uniquely strong sides.
You will need a crochet hook and a small double-pointed needle for this bind-off.
Restricted Video
![]()
![]() This video is available to customers of the following class(es):
This video is available to customers of the following class(es):
Click the links above to learn more about the class(es) OR Join KnitFreedom Premium now and get this and every other video we sell FREE.
If you own this class or are a member of Premium, please LOG IN to watch.
