Ch. 1 Beginning Mosaic Knitting
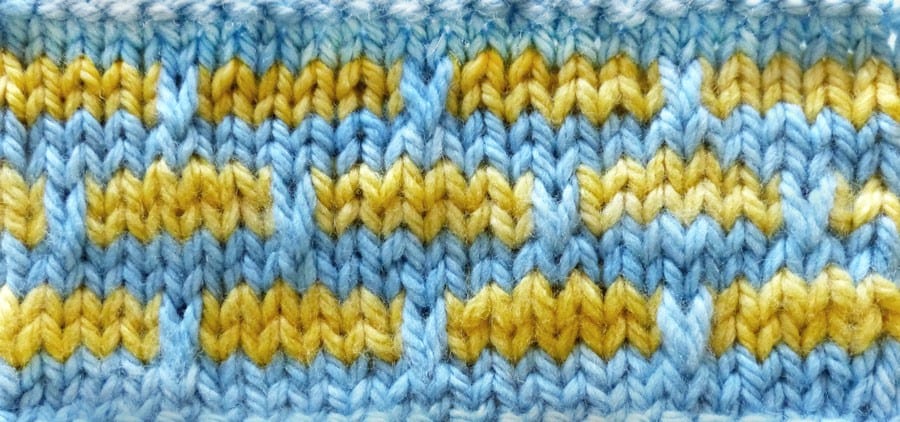
Learn Basic Mosaic Knitting – Easy Mosaic Brick Pattern
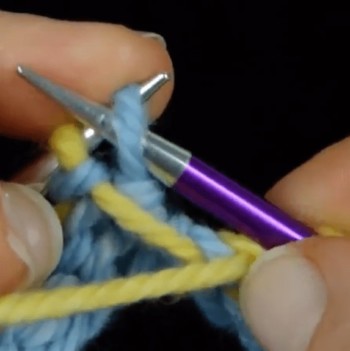
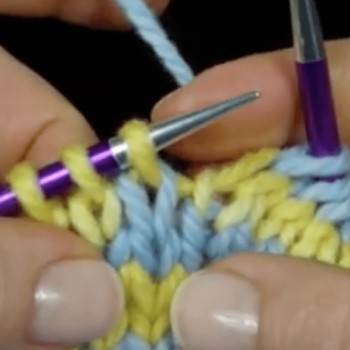
 To start learning mosaic knitting, let’s dive right in and make a swatch.
Find two yarns of the same weight in two different colors and a pair of needles in the size recommended on the yarn ball-band.
Bulky yarn is my favorite choice for things like this.
Take a look at the instructions for the Easy Mosaic Brick Pattern below the video.
If you understand most of the abbreviations, give it a try and try to knit the swatch on your own. Refer to the Three Tips for Mosaic Knitting and Basic Mosaic Troubleshooting sections that follow if you need help as you go.
The reason I want you to try it on your own is that then, when you watch the video with me, you will have some experience and context, and maybe some questions you want answered.
Either way it will set you up to learn more, faster, if you attempt the patterns in this ebook on your own before watching the videos.
If you don’t feel comfortable doing that, or don’t understand the pattern instructions, that’s perfect too – I’ve explained everything in the videos that follow.
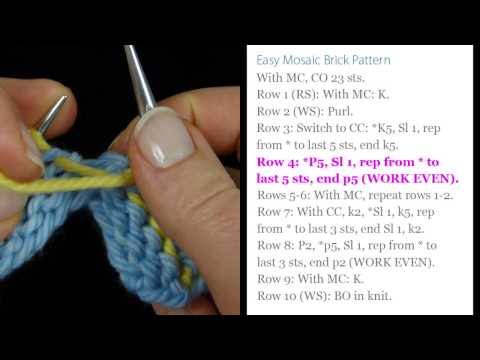
Easy Mosaic Brick Pattern
Easy Mosaic Brick Pattern
CO 23 sts or a multiple of 6 sts -1.
Row 1: (RS): With MC: K.
Row 2 (WS) and all WS rows: Purl all purl sts and slip all slipped sts.
Row 3: With CC, *K5, sl 1, rep from * to last 5 sts, end k5.
Row 4: *P5, sl 1, rep from * to last 5 sts, end p5.
Row 5: With MC, repeat Row 1.
Row 6: Repeat Row 2.
Row 7: With CC, k2, *sl 1, k5, rep from * to last 3 sts, end sl 1, k2.
Row 8: P2, sl 1, *p5, sl 1, rep from * to last 2 sts, end p2.
Row 9: With MC: K.
Row 10: BO in knit (k each stitch as you bind it off even though you’re on the WS). This helps the edge of the swatch not curl so much.
Three Tips for Mosaic Knitting
Restricted Video
![]()
![]() This video is available to members of Knitting Superstar University or the following classes:
This video is available to members of Knitting Superstar University or the following classes:
If you own this class, please LOG IN to watch.
1. Slip All Stitches With the Yarn on the Wrong Side (WS)
This keeps the messy stuff on the wrong side of the work. You will be able to recognize the wrong side of the work because it has horizontal rows of purl bumps.
2. Keep Your Floats Barely Loose, Never Tight
Floats are the strands of unused yarn that remain behind slipped stitches.
Float tension refers to how tight those strands of yarn are. The floats need to be loose and even for your knitted fabric to lay flat and smooth.
The time to pay attention to float tension is right after you slip a stitch. Basically, don’t pull your yarn too tight after slipping a stitch.
Being careful to not pull your floats too tight is a good habit that will come in handy when you are ready to do more complicated two-color knitting techniques like Fair-Isle and Intarsia.
3. Always Work Even On the Wrong Side
On a mosaic knitting project, you don’t have to think hard or look at your pattern to know what to do on the wrong-side rows – simply work even. This means slip the slipped stitches and purl the purl stitches. Just keep this rule in mind: On the RS, look at the pattern. On the WS, look at your work.
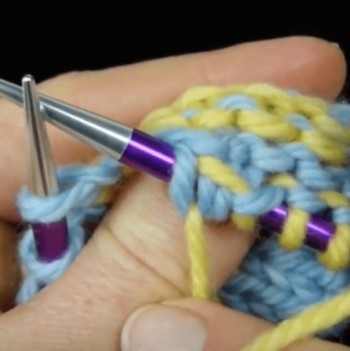
Fixing Mistakes: Basic Mosaic Troubleshooting
The most common mistake in mosaic knitting, both on the right side and the wrong side, is to keep knitting or purling and neglect to slip a stitch when you were supposed to.
The good thing is that, because you’re using two colors of yarn, it’s really easy to notice your mistakes – they will be glaring.
In the example in the video below, I did just that. I messed up on Row 8, which is a wrong-side row.
What I’m going to show you is how to notice mistakes like this and how to fix them without having to take out your work or go backwards.
Restricted Video
![]()
![]() This video is available to members of Knitting Superstar University or the following classes:
This video is available to members of Knitting Superstar University or the following classes:
If you own this class, please LOG IN to watch.
Practice Project – Ballband Dishcloth
This cute free dishcloth pattern is similar to the brick motif you just learned.
However, it takes advantage of a neat aspect of mosaic knitting – that you can do it in Stockinette stitch, Garter stitch, or a combination of both.
This pattern uses Stockinette for the “outlines” and Garter stitch for the “bricks.”
Unlike the brick pattern I showed you in the video, this pattern has you work 2 rows in one color and 4 rows in the other.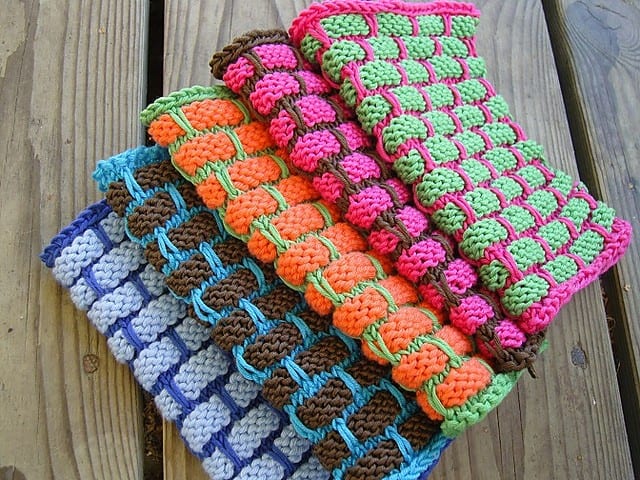
Recommended Free Pattern – Ballband Dishcloth by Peaches & Cream
If you are going to try out this pattern, here’s some extra information that may help:
The abbreviations “YF” and “YB” mean “yarn forward” and “yarn back.” These just serve as reminders for what you already know – that you always leave the yarn to the wrong side of the work when slipping stitches.
