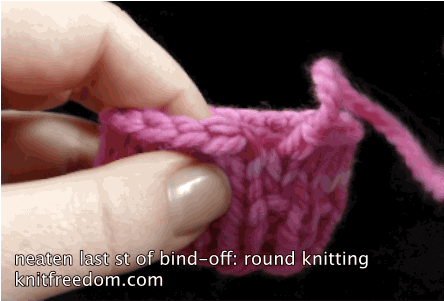
This bind-off trick for knitting in the round totally changed by life. Make the last stitch invisible? It’s a no-brainer.
The Old Way: ICK –>
The New Way: AWESOME –>


Every single time you’re binding off in the round, use this trick to make the join completely disappear. No one will be able to tell where you started and where you stopped!
This is one of those tips that I know is going to change my knitting forever, and what is amazing to me is that I had never learned either this tip or last week’s tip in all my years of working at a yarn shop and teaching classes and being in the knitting industry.
Since many of you have told me you longed for a fix for this very problem, you can imagine how overjoyed I was to find this little gem while researching for my upcoming bind-offs ebook. It’s hard to come across stuff like this – where one small tip makes a big difference in your knitting – especially if you’ve been knitting for a long time.
I’m excited because I am now able to teach this to you, dear reader, and I hope that you teach it to everybody else that you know – all your knitting friends – because it’s just fun!
Scroll down to see a video, step-by-step photo instructions, and an animated demo. Enjoy learning this new technique using whatever style of instructions suits you best.
Neaten the Last Stitch of your Bind-Off in the Round: Video

Neaten The Last Stitch Of Your Bind-Off In The Round - Bind-Off Trick
Neaten the Last Stitch of your Bind-Off in the Round: Step-by-Step Instructions
1
Bind off all sts. 1 st rem on R needle.

2
Pull the needle so the loop gets bigger – about 8″ long.

3
Cut yarn at the top of the loop.

4
Pull the ball of yarn so the working yarn comes out of the stitch.

5
Thread the tail onto a tapestry needle.

6
Find the 1st bound-off stitch.

7
Go in under the 2 loops of the stitch and pull the yarn through.

8
Find the center of the last bound-off stitch.

9
Poke the needle through and to the back. Pull yarn to tension.

10
Weave in tail on the WS.

11
There’s the “fake” stitch joining the first and last stitches. Invisible!.

Neaten the Last Stitch of your Bind-Off in the Round: Animated Demo
Now in a new, bigger size, thanks to your comments!
Remember to pull your last stitch to about 8″ long and cut at the top of the stitch before doing what I show you in the demo.
This Tip Is Part Of “I Love Bind-Offs” — Available Now!

Rated 5 Stars on About.com! Learn More
Related Posts:
- Frilled Standard Bind-Off: Best Bind-Off for Lace
- Icelandic Bind-Off: The Best Easy Bind-Off for Garter Stitch
- How to Neaten the Last Stitch of Your Bind-Off: Flat Knitting
- 5 Ways to Fix a Too-Tight Bind-Off
- What I Learned From Knitting 200 Bind-Offs
- What All the Bind-Offs Look Like: A Bind-Off Extravaganza
Leave A Comment
I read all of your lovely comments from last week, and I’ll tell you, I had the best day I’ve had in a long time. It felt so good to connect with all my readers and know that you were excited about these fun tips.
I took your suggestions and made the animated videos BIGGER and a little SLOWER – all the animations in the new ebook have improved thanks to your comments. So keep ’em coming!
And don’t forget to tell me what you think of this week’s tip – Leave a comment below and let me know.


181 thoughts on “How to Neaten the Last Stitch of Your Bind-Off in the Round”
Holy cow…every time I watch one of your videos…mind blown. This is AMAZING, Liat, and so simple. Thanks again, girl, for another tool in my arsenal!
Wow, thank you so much, Jennie! I love this trick, too. Happy knitting!
Liat
You do make your videos clear! Love the black background and vibrant colored yarn. Also, like your voice, mellow and relaxed. Thanks so much for the handy description that I’ve kinda made up myself only definitely hit and miss. Now I know there is a repeatable pattern. 👍❤️
Thank you so much Mimi!! I hope you sign up for our free stuff, we have lots of video tips like this :D https://www.knitfreedom.com/newsletter
Liat Gat
KnitFreedom.com
Brilliant tip a simple solution to something that has plagued me all the years I have been knitting. Shows that one is never too old to learn! I’m nearly 89.
Well that was my wake-up treat this morning!! Almost finished a hat last night, and now it’s the first thing I’ll do this morning! Amazing solution to the bump! Thank you, thank you for sharing.
Hooray! So glad you liked this.
Happy knitting!
I’ve been knitting for about 60 years and am so excited to learn this new technique! Now I’m in a hurry to finish these Magic Loop socks so I can work this little trick myself. And then, I’m eager to share this with my Stitching Friends! Won’t they be impressed!! Thanks Liat, you’re a peach.
Oh hooray! I’m so glad you saw this trick because it is just the best finishing touch for a project you are proud of. And thanks for spreading the word!
Hugs,
Liat
Hi Liat,
it looks nice. I‘ve tried on my TAAT Toe up worsted Socks.
Thank you.
Maria
Yay! So glad you tried this! I use it every time.
Cheers,
Liat Gat
KnitFreedom.com
This is how I finish off crochet in the round…never thought of doing it in my knitting…duh! Great info, as always.?
Fantastic! Isn’t it genius? I only pass along the amazing things I learn elsewhere, thank goodness for the Internet. Thanks for commenting :)
So simple, so perfect: Very clear visuals and results that look like the pictures. Thank you for sharing!
You’re so welcome, Erica! Love that the pictures were super-clear for you. Thanks!
Wow! Thank you! I knew this once and had forgotten. Can’t tell you how much your photos make it as plain as day. I’m just as happy as all your other admirers!
I knit tons of socks,am really unhappy how the last stitch of Kitchener stitch looks.Any ideas
I am totally sold on the Icelndic bind-off and love your simple explanation. I’ve used it on 4 sweaters so far. My only problem has been with the last stitch when binding off in the round. I tried what you recommend for a regular bindoff, but it’s different with Icelandic. Any suggestions?
Cool post. I have been doing that since I first started knitting in the round 3 1/2 years ago, which is when I first really started knitting. I had just assumed everyone did this.
I don’t see Cat Bordhi’s name anywhere in your intro. She has had a youtube video of this technique online for years. Not giving credit to her certainly makes you look bad.
Hi there,
Thanks for your comment! I actually wasn’t aware of Cat Bordhi’s video on this. I learned this from a book of bind-off techniques. I would never take anyone’s knowledge and present it as my own. If you want to post a link to Cat’s video here, I’m sure that would benefit everyone.
Thanks!
I’m just in the middle of making loads of the “Outlander” wrist warmers and fingerless gloves for the cooler season and for X-mas presents. Thanks for your tutorial, the bind off looks now just perfect :-)))
I was knitting my first ” Downton abbey hat” and wanted to have a smooth finished edge for the brim . I was looking all the knitting sites for help and by chance came across your link . It was very well explained tutorial . Thank you so much.
Awww, that’s great news! I know Liat will be delighted to hear that she’s been able to help you. Thanks for letting us know :-)
Kindly watch on Youtube, Cheryl Burnett’s Sweater neck finishing. At the end of the video, she incorporates knitting the last two stitches together (like you did for the flat knitting) then sewing to neaten the binding off in the round like you did. Much better.
Hi Liat,
first and foremost, thank you for all of your tips! I have found many of them immensly helpful.
Now I finally had a project in the round, remembered your tutorial and wanted to give it a try. Imagine my utter astonishment and infinite joy, when I got through with it and realized it was exactly what I had been doing for quite a long time now! Made up all by myself, because I just couldn’t stand the untidy look of former projects.
Thank you so much for making me feel like a real knitting goddess! :D
You’re a genius! Thanks so much for sharing.
Love it ! Used it for the ribbing at the edge of a top down cap. I love top down patterns, but then have to be careful when binding off. :-)
I’ve done this for a long time, just figured it out because I hated the way it looked otherwise. A variation of it also helps at the beginning, though I can’t begin to tell you exactly how I’ve done that. Thanks for sharing what you found. I never thought it was something so wonderful until I read all the comments of people who where so impressed.
I think I’ve used this new-to-me technique three times in the last week. I’m so happy with how my bind-offs look now! Thank-you!!!
I have been wondering for years how to make a professional clean bind-off. Tried several homemade methods but yours is perfect. Thank you. I can’t wait to order the e-book in March. PS. I am a visual learner so your videos are perfect for me. Don’t ever stop.
Beverly – hooray! I’m so happy to read your comment. If you love professional, clean bind-offs, you are going to love the ebook.
Just a heads’ up: I’ve delayed the launch until March 8th so I can add a few last-minute tips and videos.
And, thanks to the support of readers like you, I won’t ever stop putting up new techniques on KnitFreedom!
What great tip. You make knitting so much easier. Looking forward to the new ebook.
Anita/Idaho
This is my favorite way to end the bind-off in a circular piece. It is beautiful, and you did a superb job of capturing the technique. You’re a great teacher!
Liat,
I am anxious to see this when you get it on your website. I get so excited EVERYTIME I get an email from you. Your website has been a real blessing for me as I begin the “second half” of my life.
Carol
Being a new knitter and self-taught, I depend heavily on You Tube video’s. I did find
this bind off when I was looking for something else and then I bought Cat Bordhi’s e-book on toe-up socks and she showed this same finish for the bind off.
Silly me! I have been doing this with crocheting for years…never occurred to me I could do the same thing with knitting. Thanks for the tip!
Pourquoi je n’ai pas penser moi-même!!!
thanks for your tip
BR
grit
<thanks for your Tip
"why didn't I think before "!!!Lol "
Pourquoi jez n"
In process of making Tiny Owl Knits heart felt rings for our son’s wedding. Your tip is perfect for finishing the rings. Thank you!
Love the pictures/video. Looks great and I can’t wait to try it myself.
So simple and so amazing. Thank you Liat.
This is such a great hint and solution! You never fail to give me a head-slapping “DUH!” moment. This time it was when weaving in with a too short tail. I’ve sewn/crocheted/knitted my whole life and never thought of weaving in the needle, THEN threading the yarn. Like I said, “DUH!” Thanks!
UNBELIEAVABLE!
I have been using this technique for many years for the same reason of the first picture of ick!!!! It was easy to do and the tail stays in place forever. Thanks for your helpful hints and techniques. Now if I could only master that magic loop!!!!
Once again you have come up trumps, thank you so much. You send us the most useful tips and advice and now you have made it even easier to follow. This tip is so easy to do once you know how to do it, thanks again.
This is wonderful! …. BUT… I have enough trouble finding the end when I want to rip something out… It’s gonna be impossible… Thanks for this… just goes to show that you CAN teach an old dog new tricks… <
I too had trouble finding my ends to rip my work out and found that if I left the end a smidgeon longer than I usually did, the first washing/wearing usually took care of that offending end. Hope this helps.
I do use this- gives a finished edge.
I do not understand the need for step 4. Could you explain why doing that is necessary?
She is just pulling out the unneeded yarn coming from the ball. I usually just cut the yarn and pull the tail through instead of cutting the loop and pulling the yarn out. I doubt it makes any difference which way you do it.
Love this tip, it looks so much better than the bump I usually get. Thanks!!
This works like a charm!
This is a great idea! I love getting your emails! Thanks so much.
Susan
I was just finishing the last few rows of a project in the round and remembered getting the email with this technique and thought I would try it! I love it! Also when I went to weave in the tail from the cast on I did a half fake stitch which made the join prettier!
Ooh, I’m going to try that right now!
Oh, my nerves! This is brilliant! I HATE when there’s a disconnect and bump to call attention to it. As usual, you have broken down the process into manageable, understandable steps. Such clear, clean, high quality videos. You are my hero! This will really change my knitting life. Thank you so much.
Another awesome idea! Thank-you, you have helped me improve the speed and look of my knitting.
You are THE BEST teacher I have had the pleasure of coming across and I recommend you highly every chance I get. I think EVERYONE needs to know these things. Thank you SO much for being kind enough to share it with us! This is WONDERFUL!
Thank you Jan!!! Thank you for recommending me and also for commenting here to let me know you are out there enjoying and appreciating these tutorials. You make me excited to do more!
Hello Liat and all knitting compatriots! I was astonished and delighted to see this bind off technique…thank you!
I have a trick for “hiding” the cast on and making it neater when knitting in the round and I’m not sure I can describe it very well. I don’t make a slip knot for the first stitch, I simply twist the yarn once to make a loop on needle and that is the first stitch. Then I continue casting on the requisite number of stitches + 1. When I am ready to join to begin knitting in the round, I slip that extra stitch from right to left needle then pass it over the next stitch on left needle and then move the stitch back to right needle. So round 1 is now joined and stitch number reduced to correct number as project calls for. The tail is weaved in as usual when project completed. This may be something many of you already know. I’d be happy to try to describe it better if anyone is interested. Thanks so much for your wonderful videos and instructions!
Best, Janet
Is the loop passed over the last cast on stitch or the last cast on stitch passed over the loop? Everything else is pretty clear. Thanks.
Last cast on stitch is passed over the “loop” which then becomes last stitch. It also gives you some tail with which to snuggy up the join and for weaving in the end. I’d imagine, Evol, you could actually do it either way and see which you find more invisible and better for your knitting style.
Best,
Janet
Hey, I finally remembered to check for an answer! Now I just have to get my senile old brain to remember this the next time I cast on for something in the round. Um, maybe I should write it down.:^) Thanks again.
Haha you’re so welcome. On the new website, you’ll automatically get notified when I answer your comment – just one of the new features I’m really looking forward to that will help everybody who uses KnitFreedom!
Janet, thanks so much! I am going to give this a try.
You are most welcome. I answered Evol, above, and I think one could pass either way depending on knitting style, left hand, right hand, Continental, etc. Let me know how it works for you.
Best,
Janet
Love your tips – especially this latest one. Your writing style makes me feel like I have a new best friend. Look forward to your book! Thanks for taking the time to post the tips.
I am sooo excited for the e-book!!!! I love your techniquies and I find your instruction easy to follow. Thaank you1
Pat
What else can I say but YOU ROCK! I almost had this, almost, thanks so much for sharing!
Hi Leah,
I’m a new knitter and really appreciate all your tips & videos.
I’ll be attending the Market at Stitches West, will you have a booth??
Hi Regina – next year!
As others have said, I have been doing this bind-off for years (maybe shared by my teacher – my Mom.) But I love your photos – they make it so clear. My daughter is often calling asking for help with her knitting. Many times I find it hard to describe over the phone what she should be doing . Now I will be referring her to your site since your photos are so clear along with detailed steps. Kudos for helping the up and coming knitters.
I was a scarf and afghan knitter for years, you have given me confidence to try other projects. Your instructions are so clear and consise. I can’t wait to try these new hints on binding off for flat knitting and round knitting. Thanks again.
Hmmm I somehow posted the comment I just wrote under your reply to Rachelle’s 7:31 am post. :-)
I will definitely use this for my toe-up socks. Thank you!
Love this new way!!!!!! wish I had known this before all my “funky” bind offs on hats and scarves, but now will use this!
Looking forward to more new things!!!!
thanks!
I really like this in-the-round bindoff trick, and use it all the time…it does make an invisible bindoff. I’m glad that you will be putting bindoffs together. I got a book that is just bindoffs and cast ons, but some writers just don’t know how to SIMPLIFY! Fortunately, you do! Thank you!!
I am so excited to learn this bind off trick.
I am just learning Magic Loop and have not been happy with my bind offs.
Thanks to you Liat, my knitting has greatly imprpoved.
You are an excellent teacher that knows that knows her subject inside out.
I feel so privileged to be a member of Knitfreedom.
Dee
Many, many thanks! I have been knitting many baby hats for my daughter’s newborn photography and have always been dissatisfied with my finishing. This is a fantastic tip!
Hi Liat!
Thanks for another wonderful tip. I was so disappointed with the finish of the first cowl I had knitted mainly because of the looks of the last stitch. I frogged it and ended up knitting a hat. Now, because of your easy and clear instructions, I can go ahead and make the cowl with confidence that the finish will look great. Thanks again. Love this tip!
Liat you are brilliant! Thanks for sharing such a great finishing technique. Do you have an equally brilliant tip for “joining” in the round as neatly? Mine seems a bit looser than I’d like :/ BTW, I loved the video of your visit to the Malabrigo studio, nice to see how one of my favorite yarns is crafted!
Thank you for the great tutorial for the flat knitting and knitting in the round. I have really learned so much from you. You are a wonderful teacher.
Jane
Liat, you’re going to release this new book on my birthday which is just around the corner. I’ll keep an eye out for it. Thanks in advance!!!!
That’s the neatest thing I’ve ever seen. I’m so glad to have found it as I’ve been knitting hats in the round & binding off has been a problem. I seem to have found the answer at just the right time. You’re doing the best thing in showing us all how to knit better, faster and smarter!!!
Glenda, your comment makes me so happy! You encourage me to try to keep finding more wonderful tips and putting together great tutorials to guide you on your knitting journey. Hugs!
Great! Now all projects will look professional. Thank you!
I knit in the round a lot, and this solution is perfect. So simple. Love it!
Thank you!!!!!
Thanks for the neat finish to bind-offs! I can’t wait to finish my toe-up socks so I can try this technique.
Thank you, thank you! I’ve always done various weaving-in tricks to conceal the end of the bind-off with varying degrees of success. This is perfect and easy to do!
I am pretty new to knitting and I love what you are doing! These tips and techniques you share make such a HUGE difference! The best part is how you explain it, it always makes sense! This new bind off tip has me even more excited to finish the skirt I am making for my daughter because I’m knitting it in the round! Thanks for all the great ideas that help keep me motivated and looking forward to more knitting!!
I liked your idea. Years ago I learned another way to do that which is to grab the bar inbetween the last two stitches place it on the needle and then follow through as you did. It made a world of difference with that one last loop as well.
That is a wonderful way to bind off. I love it. You are so clever to come up with these helpful tips. Thank you.
Thanks so much for those tips.Looking forward to using
them.Hope to receive your eBook’
JY
This is brilliant. Thank you so much.
I love this I have done this for some years and it does make a great finish.
I’m glad you did this so more knitters know how to do it.
You absolutely ROCK! I’m 70, recently decided to try to read sock patterns again. My Bucket List had “knit socks” on it for about 40 years…….then found YOU! I am so over my frustrations because of the wonderful videos such as this. THANK YOU, LIAT GAT!!!!!
YES!!!! Hooray!! I’m so happy I helped you check “knit socks” off your bucket list – that is the best thing ever!! I am here for you throughout your knitting journey, wherever it may take you next. Hugs!
Thank You! For all of your knitting videos! Love them all, I have learned a great deal from your postings.
jk
Look forward to book and loose rib cast off.
Dot, thanks for your comment! I’m excited you’re looking forward to the ebook. In the ebook I teach 10 GREAT methods for stretchy ribbed bind-offs – for both 1×1 and 2×2 rib.
LOVE your last two tips on bind offs.
I had a pop up when I opened my email that disappeared. Is there an iphone or ipad app I can use to access your other works? Thx
Hi Pam,
I’m so glad that you’ve been enjoying Liat’s bind-off tips.
While we don’t have an app for KnitFreedom just yet, we are going to have one soon when our new site is up and running.
Please contact us at customer support if there is anything else that we can do for you!
So brilliant, yet so simple!
WAY COOL!!!! Thank you Liat.
Such great tips, Liat–thanks for sharing and looking forward to your new e-book! You’re my all time favorite knitting rock-star and your videos are the best!
Thank you Fran! I got a huge smile on my face as I read your comment. I’m so glad you found me and I have amazing people like you as my students!
I can not WAIT to try this! Last week’s tip for neater bind-offs in flat knitting was perfect timing for me. I have been making a stack of dishcloths for gifts. I was amazed at how much neater the bind-off corner looked on the ones where I incorporated that trick. :-)
Now, I’m working on some headbands in the round, so this one is also perfect timing. I have learned so much from you. I really thank God that I found you and your videos online a couple or so years ago. You really have helped me become a knitting Superstar. :-D
Ooh, Renna, I’m so glad you commented! I know you’re going to love this trick on your headbands.
And it’s ME who’s so thankful to you for finding me – you’ve been one of my longest supporters and I always feel so much joy when I see you commenting on my posts and sharing them on Facebook.
This is very neat! Thanks for sharing.
Thank you for posting this wonderful bind off as well as the one last week. So simple yet it makes SUCH a difference in the finished work. Looking forward to your eBook on Bind-Offs.
That is soooooo kool! I’m just about to finish a Mobius cowl & I will use it. Thanks so much, Liat!
Another fantastic tip Thank You – you never disappoint :-)
Thank you Dorothy! No pressure, lol!
Thanks for sharing your knitting talents. Have used the tip from last week and it works so beautifully! Will try this ending bind off stitch when knitting in the round very soon. Have tried to do this myself and love you have figured it out!
Sheer genius!! I wonder if this would work to make the cast on invisible too?! I love your videos. Keep up the wonderful work!
Rochelle, I was wondering the same thing! I will experiment :)
Great tips! I’ve already used the flat bind-off tip several times on the sweater I’m knitting (my first sweater, btw). I can’t wait to use this trick on my next circular project. Thanks bunches!!
How incredible!!!! Thank you the video is so helpful and rather attractive too.
Wow-I’ve always assumed that the bind-off was going to have a little dip in it–now it can be perfect. Thanks!
Me too! I never knew there was such an easy solution. I learned it from Cap Sease’s book Cast On, Bind Off.
How can there be two books with exactly the same name? I have “Cast On, Bind Off” by Leslie Ann Bestor.
Love this tip for the last stitch in the round – I have a year-old sweater that needs the last stitch done – now I can finish it! Thanks for sharing and not making me wait until the new ebook come out!
Hahaha Vicki you’re too funny! I have some unfinished projects too – here’s a picture of mine – I just couldn’t bring myself to finish it the old way. I was determined to leave it on the needles until I could solve this problem :)
So glad to see this!!!!!! I have done something similar, but doesn’t always come out perfect.. can’t wait to try this!!!!
Wow!! I knit in the round a lot, and have a few really expert knitting friend, but have never seen this exact method. It is beautiful, and works great. I just knitted a little ring and tried it! I am so thankful for this lesson as the rest of my work looks so good, and the bind off was always problematic, but no more.
Yaaay!
I have been doing this for the last few circular knit projects. I though I unvented it! Goes to show you that good ideas float in the ether waiting to be discovered.
Thanks for sharing.
Fantastic, thanks, it is such a better way to bind off in the round. Love it!
Thank you, thank you , thank you….after so many years of hating that very last stitch, you came up with the perfect way to make it look professional!
Laura, I’m so glad you like it! I can’t take credit for coming up with the solution, though – just for finding it hidden away in a very large book of cast-ons and bind-offs. The author presented the tip with absolutely no fanfare, and when I discovered it, I wanted to shout it from the mountain tops! Lol!
This looks sew much better than the old way ! Thank you so much for this and all your other tips.
Liat, you’re a genius! A true Knit-Wit!
What a brilliant tip,as good as the flat knitting tip.Hope your book will be available in the UK
Thank you, Lindsey! The upcoming bind-offs book, and all my books, are available both as online courses and downloadable e-books, so you can definitely get them in the UK.
Great finish, makes all the difference.
I have bookmarked this for when I try toe-up socks. I am now on my third pair of cuff down socks.
This is such an amazing tip. I love working in the round and this tip will definitely get used. Thank you.
This is such a great improvement is the cast off process. It is so professional looking . I love it.
Awesome!!!!! It’s so natural the way you do it and almost instinctive. However, no one else I know of has thought of it! Bravo, Liat…can’t wait for your book.
Susan
Thank you Susan!!
Awesomely clever, thank you. Have been trying to neaten my in the round cast offs but never succeeded, no excuse now tho and can’t wait to try it. Bookmarked!
This last tip was FANTASTIC!
Thank you
That is awesome.
I love this tip! I had tryed doing something like this but mine didn’t come out this perfect.
Thank you :)
Awesome! So easy to follow instructions. Keep em coming.
Thank you! I honestly cannot believe I didn’t think of this before. It seems so obvious once you see it. And the videos and demos are great for someone who learns by seeing. Thanks again.
LOVE this tip~! Can’t wait to use it. Thanks
I love your simple, great tips. Look forward to the new ebook. Thank you for continuing on your knitting journey.
Yay! I’m fairly new to magic loop and knitting in general, and couldn’t figure out why my bind offs looked so cruddy. Now I know it’s not just me and i can fix them. Guess I have no choice but to start another project!
Priceless! I make a lot of fingerless gloves and my bindoff (and starts) aren’t neat. This will be VERY useful.
Thanks!
Hooray! I’m going to explore the cast-on bit, too – I want to come up with something just as elegant. :)
Fantastic!!! This looks so nice. THANK YOU!!!
This is awesome! Thank you so much for this! I was wondering if you have a video on what to do with the tail from the cast on when you are knitting in the round? It leaves a little noticeable area where it does not completely form a neat row of stitches all the way around. Would you do something similar like in the above video to make the tail form a faux stitch?
Rachelle, now I am wondering too! I am going to go try it.
Gorgeous! Can’t wait to use this on my next pair of socks! I love all three of the teaching methods. The knitting videos have always been awesome because I am able to watch them more than once until I truly master what you are showing. I think the step by step instructions and the animated demo will now be a great way for me to review and much quicker than going back through entire videos as I have done in the past. I know everyone will find their own way to use them. Thank you – you never stop surprising us!!! :-)
Absolutely lovely! You are a true knitting artist of the Monet level, dear. You have improved my knitting so much.
Thanks! All the years I’ve been knitting and this is the first time I’ve run into this solution. Beautiful! Perfect for my toe up socks. Thanks again.
I saw how to do this in another video about stretchy bind-offs and it’s the only one I use when knitting in the round now! I’m glad you’re putting all these great tips into a new ebook!
Will that simple, straight weaving-in actually hold? I usually go several directions and still worry my ends will pop out. And who wants their end to pop out?
I usually go in several directions as well – down and then back up on another rib. Seems to hold up fine. If I’m really worried I go down again on another rib – just have to make sure there’s enough yarn to do it.
Hi Julie,
No, that was just going quickly for the video. To weave in your ends properly, you’d double back and weave the tapestry needle in going the other way, and then turn around and do it again.
Love this! Wish I’d known about it sooner (all those hats and socks with kinda funky edges- at least I used the “weirdness” to tell me where the back of the hat was!) Now- hey, it won’t matter! Yay!
Wonderful! Both the flat and the in-the-round bind-offs!
Hoping you’ll explore/clarify some kind of I-CORD bind-off in your new collection, thanks, Liat. xox
I hope so too!
Yes, ma’am! It’s actually much easier than I thought, once I broke it down for the ebook.
I include an I-cord bind-off, a 3-needle I-cord bind-off (for seaming), and also an edging bind-off, which works like the I-cord bind-off but you can do any edge, like lace or cables.
I am loving these tips – patiently waiting for the new book ! I have purchased 3 of your other videos and refer to them often ! Happy Valentine’s Day ! Thanks for sharing.
I absolutely love your site. I haven’t been knitting much for a while but I have and will use your tips as I have saved them.. Thanks so much for taking the time to share them with the world… Looking forward to more.
I learned this technique a while ago, but the instructor’s directions left much to be desired—I was never sure which stitches to use for creating the last stitch of the bind-off. Liat, you’ve left no ambiguity. Just beautiful! Thanks!
Hooray! I also had trouble when I was trying to figure it out from the book that I was studying – I wasn’t sure which piece of yarn to cut. I’m really glad it turns out it’s actually not that hard at all :)
Thanks so much for the info . Looks soooooo much better. Will use this ally he time now.
Oh, how brilliant! Can I borrow your knitting brain for a couple of weeks??
Hahaha sure!! It’s FULL of bind-offs right now – it’s kind of ridiculous! I feel like Bubba Gump talking about shrimp only I go around listing the kinds of bind-offs: I-cord bind-off, edging bind-off, Latvian bind-off, Japanese bind-off, zigzag bind-off, sewn bind-off, tubular bind-off, cable bind-off, picot point bind-off, hemmed bind-offs….. lol – you sure you still want to borrow it?
You’re a genius! This is awesome. Thanks for sharing and for providing several viewing options in your emails. I look forward to the Bind Off book in March.
You are absolutely amazing with all your talents! Can’t wait now to bind off in the round after watching your video and learning your great technique! I look forward to each email I receive and learn from you constantly!!! Thank you!
I am happy you have found this way to finish a circular cast off, but I thought this was known to everyone. My granny showed me this many year ago.
It SHOULD be known to everyone! I hadn’t heard of it, and it seems many other knitters nowadays haven’t heard of it, either. Many self-taught knitters (me included) don’t get the benefit of a knitting granny to guide them :)
Thankyou for the tidier finish for knitting in the round – I do socks and that has ever been a problem for me – never again!
I love this neat bindoff for knitting in the round! Thanks!!
I think that’s fabulous. It looked great. It was so simple I wondered why I’d never thought of it myself and I loved that little quickie at the end on weaving in ends. I hate doing that and it looked so easy when you did it,
What a Valentine that is!! It is terrific and the presentation also. Thank you!
PJ, until I learned this technique from Cap Sease, the picture you saw called “The Old Way” was the best I could do! I’m glad I helped you with weaving in the ends. Just make sure that when you weave in your ends, you double back and go through at least twice more. Here’s a tutorial: How To Weave In Ends Properly.