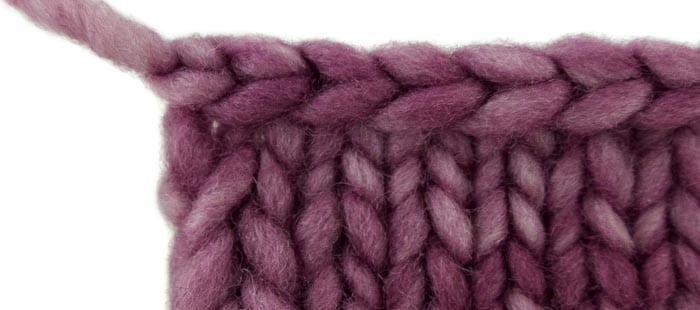
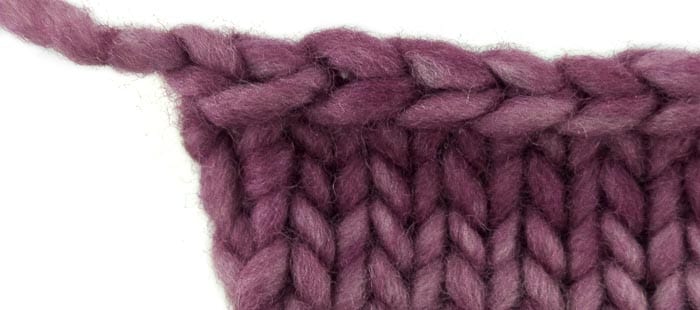
You should be doing this easy bind-off trick at the end of every project. See the results for yourself below – I think you’ll agree.
[column width=”32%” padding=”6%”]
Neat Edge: SWEET –>
Messy Edge: MEH –>
[/column][column width=”62%” padding=”0%”]
 [/column][end_columns]
This is a simple move to neaten the last stitch of your bind-off every time you finish a project. It’s a little superstar trick that you do at the very end that will square up your edges, especially if your side stitches tend to get stretched-out.
Scroll down to see a video, step-by-step photo instructions, and an animated demo. You can learn this new technique using whatever style of instructions your brain likes best.
Neaten the Last Stitch of your Bind-Off: Video

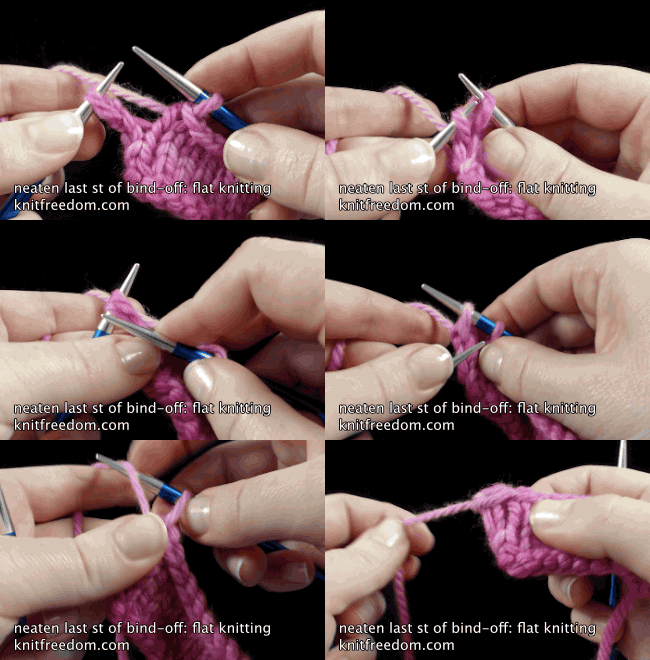
How To Neaten The Last Stitch of Your Bind-Off: Flat Knitting
Update – many readers have asked what needles I’m using in the video and photos. I’m using my favorites: Signature Needle Arts needles. If you buy some, make sure to get the Stiletto Tip.
Neaten the Last Stitch of your Bind-Off: Step-by-Step Instructions
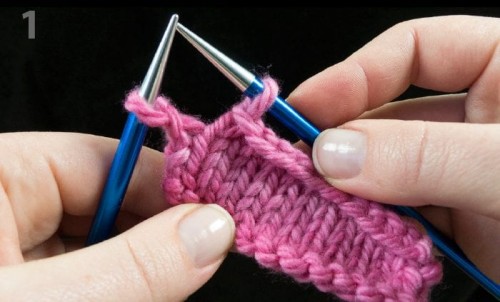
1
Bind off all but last st. 1 st rem on L needle.
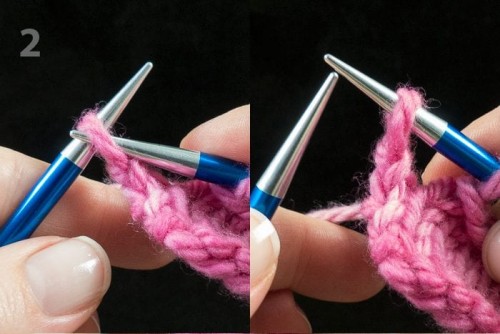
2
Slip 1.
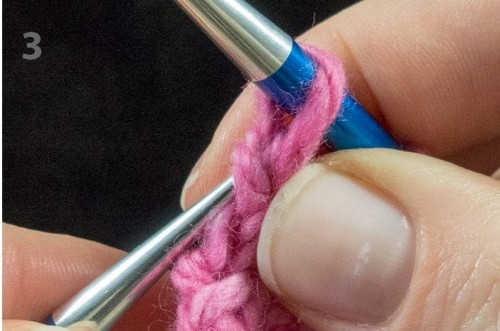
3
Find left side of loop beneath last st.
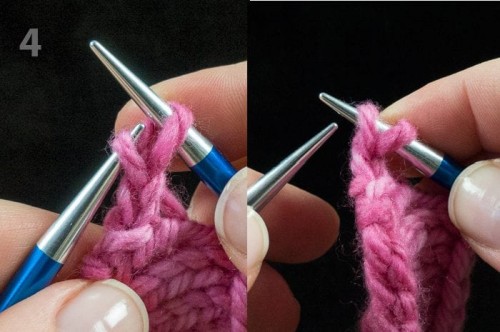
4
Pick up loop and place on R needle.
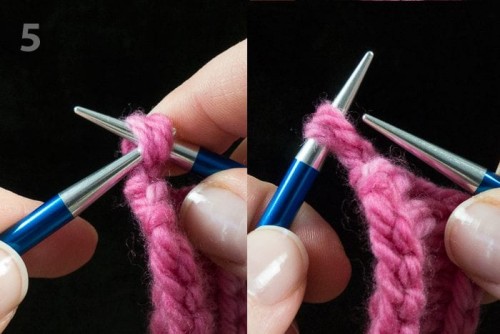
5
Slip 2 loops back to L needle.
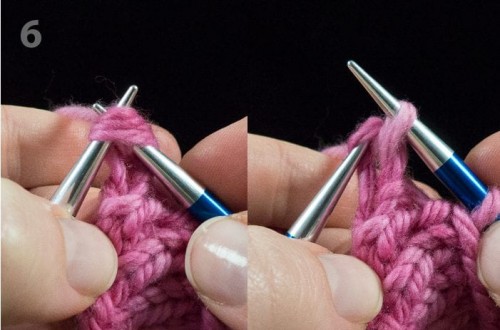
6
K2tog.
7
Bind off 1.
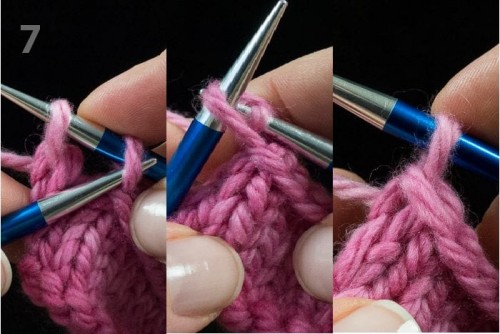
8
Cut yarn, leaving 6″ tail.
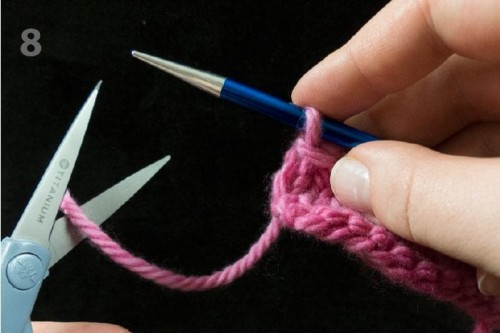
9
Pull tail through rem loop.
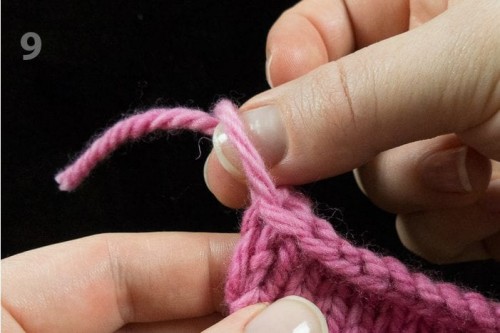
10
Pull tail tight to finish.
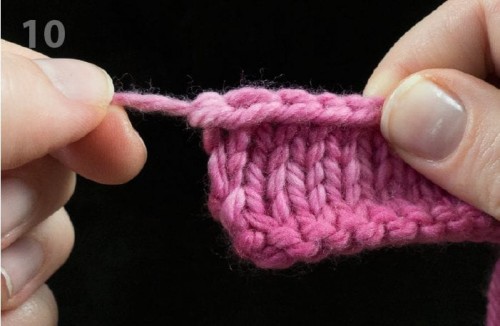
Neaten the Last Stitch of your Bind-Off: Animated Demo
This Tip Is Part Of “I Love Bind-Offs” — Available Now!
Rated 5 Stars on About.com! Learn More
Related Posts:
- Frilled Standard Bind-Off: Best Bind-Off for Lace
- Icelandic Bind-Off: The Best Easy Bind-Off for Garter Stitch
- How to Neaten the Last Stitch of Your Bind-Off: Round Knitting
- 5 Ways to Fix a Too-Tight Bind-Off
- What I Learned From Knitting 200 Bind-Offs
- What All the Bind-Offs Look Like: A Bind-Off Extravaganza
Leave A Comment
What did you think of this post? Do you like the new step-by-step instructions? What about the animated demo?
This is what each technique in the new bind-offs ebook will look like, so I want to hear what you think! Leave a comment below and let me know.



282 thoughts on “How to Neaten the Last Stitch of Your Bind-Off on Flat Knitting”
Thank you! Another easy, wonderful solution to a common annoyance. I’ve always hated that last bound off stitch!! I just pulled out 4 pretty washcloth corners and redid them! Love the video! You have the perfect voice and camera for video teaching.
Thank you so much my dear!!
Hugs,
Liat
I do not care for the animated version!
It seems too fast for me – really love your regular, guided, spoken version..
Hi Marilyn,
I’m going to be passing your comment along to Liat, but I want to let you know that she is currently on maternity leave (she is expecting her baby very soon) and will be taking up to 1-2 weeks to answer.
Thanks so much for your patience and understanding!
Best,
Elias
Thank you so much for the feedback Marilyn! I put the regular video version there for you, too so you can use whichever format works best.
Happy knitting,
Liat
I think this is brilliant and have used it.
I’m so happy you like it! Isn’t it brilliant? Love getting that nice, even corner on the bind-off.
Cheers,
Liat
Finally! A bind off stitch that makes the final finish look awesome. Thank you!
A very helpful hint, perfectly demonstrated. Thank you! Pinned it.
Hm! I’ve always hated how funky the last bind off stitch always looks, so I’ll keep this in mind next time. :-)
I tried to copy this for my Notebook, but can not get steps 6-finish. It should be on page 4, but it skips to the video. What am I doing wrong?
Alvina
oops. just saw a typo on Einstein
Thank you so much for the bind off tip in flat knitting. Terrific idea! I’, just finishing the Einstein coat and wish I would have had it at the beginning!
Liat, this is great ! Thank you so much..Will use this at the end of my bind-offs
TODA RABA!
Liat,this is the first time I have not had a stitch hanging over after binding off!!! Thanks for the great video and all your tips . MaryAnn
I really liked the duality of the step by step instructions and video on the loop. It made it easy to understand then check the process.
The tip works too :)
Would this need to be done differently if it’s a purl stitch instead of a knit stitch?
Thanks!
Hi Erin,
I don’t think so! I would leave the yarn to the front when slipping the stitch over, and then purl the two loops together. I think it will come out just as neat. Give it a try and let me know!
Just had the opportunity to try this while binding off the sleeve of a sweater. It looks beautiful!!! I almost wish it wasn’t going to get buried by being sewn to the sweater back :-). Liat, I have finally had time to delve into knitting again and it’s been wonderful to have all your patterns and tutorials just waiting to welcome me back. Happy Valentine’s Day!
Thank you Ellen! I’ve been so busy designing and building the new KnitFreedom website that I, too, have had scant time to knit.
You and I are both delving back in at the same time, and I’m so happy to know that you are enjoying my patterns and the tips and tricks.
Thank you for commenting! It’s really nice to hear from my readers, even if it’s every once in a while. :)
I really like your tutorials, but I don’t know if I will buy the book as reading the instructions just isn’t the way I can learn. I need to see it in action, with your verbal instructions. Couldn’t you do a DVD book instead? Something I could order for my kindle?
Love your videos, my go-to place for learning. The Pink Lady is my 2nd choice.
Kathy, I’m not sure if you missed the video from this post, but I of course made a video with verbal instructions, just like I do for all of my tutorials. I would never take out that part of the instructions! The photo tutorials are just for quick reference. Please watch the video and see if that works for you.
Oh my gosh Liat! This looks awesome! I can’t wait to try this. I’m making a baby blanket (that is taking FOREVER!) and I’m getting towards the end so it’ll be a great chance to try this out. I’m so excited that you’re coming out with a bind-off book! It’s going to be a great counterpart to your awesome cast-on book! Woot woot!!!
Happy Knitting!
Heather D.
Thank you Heather! I got your email and I’m totally going to get you a copy of the book to review. Thank you for all your enthusiasm and support!
Look forward to more emails.
Very helpful and looks great. Thank You
Awesome, Liat! I love the format and the clear instruction! Thanks!
I liked both ways. One way reinforced the other. Thanks.
I like you way . It really looks good. I am a new Knitter and I really like to see it . Thanks so much,
From Sharon Blake
Love your videos as always, Liat! I really like the addition of the animated video at the end – but could I ask that you make it just a tad bit slower?
Hi Shelley, yes! I have slowed them down thanks to your comment and what other readers said as well.
Please put page brakes at a point in the picture tutorial so it can be copied.
Most of us are from “the old school” and want a hard copy to work from.
I get these wonderful knitting tips from you but can’t copy them to share with my knitting group.
Thanks for your tips and consideration.
Bettie, I’m so glad you want to share these with your knitting group. I hope you can be patient with me as I have just started doing these photo tutorials and they are quite difficult to put together. It’s even harder to make them come out correctly on the site. When I switch over to my wonderful new site, there will be page breaks and the images won’t be these crazy long graphics.
Like others, I too was about to bind off a never ending afghan that I am knitting for my son’s bed when you popped into my emails! Looks great!! Mom would have been soooo proud of me!! Love your tutorials especially when you show it so close that you can actually see it!! Have pinned the link to Pinterest, if that is ok with you.
Hi Crafty Grandma, that is wonderful! It really helps me when you share these techniques online in any way you like.
I love your tips! I’ve been knitting for over 60 years and I’m still learning new tricks like this bind-off one. I think that’s what keeps me interested…there’s always something new to learn no matter how accomplished you think you are. ;-)
Fabulous! Never too late to learn – just hope to remember this when actually knitting.
Do you have a ‘bind off’ for getting off the computer?
You come up with the simplest, smartest approaches, once again making me slap my forehead, “DUH!” I’ve always ‘fixed’ that ugly corner when weaving in the tail; your approach is so much better. Love the videos and the way you’ve done the step-by-step instructions. Can’t wait to see the total bind-offs video. As always, Thanks!
Love it! You are a wonderful teacher!!!
I guess I better tell you that I love it too! Can’t wait to see your video on doing it in the round. I did that last night and still used this one, and it still helped, but I’m sure your other trick will make it look even better! Okay I’m waiting for it! I also love how you have the video, that step-by-step directions, and then the animation at the end!
This was great, I prefer reading, and then watching, thanks
Thanks Liat. Fantastic tip and easy to follow instructions. You are a knitting genius! I look forward to the new bind off book.
Love it! Looks so neat & finished. Thanks for the great tip.
Thanks! Actually looking forward to my next bind-off.
I like the written out instructions followed by video. Great tip! Can’t wait for circular bind off.
Love the animated demo!!! Also the technique, thank you! I will use that technique the next time I end a bind off that way.
Hi, Thank you so much for this post, I have always hated the way my cast off looks, now with this simple step it will look much neater, you’re a genius.
I love the new look, the step by step instructions with photos help me with the way I learn things, I especially like the little video of you actually doing it, a lot of people need visual teaching to help with understanding the steps and I am one of those so once again, thank you for being a very generous genius.
Thank you Claire! I’m so glad to know these methods are helpful to you. Even though it takes longer to make them, I’m happy doing it because I know it’s going to make things easier for my students.
Thanks for this tip. All your videos are really a great help.
Thank You Liat! I like that after going through the step by step I can then see the animated version. Great job!!
LOVE your posts, videos and instructions! Sometimes I get tired of reading and trying to visualize the instructions. The videos are so helpful when my mind is weak!
Absolutely brilliant. Thanks so much!
Excellent job!! Love the written out instructions followed by the video it puts everything into perspective. Very easy to follow. Thanks so much!
Thank you so much. I always end up with the last stitch being a bit stretched. Cannot wait to try it.
Great idea and like the how to videos. I love getting your e-mails. Always learn something new.
Love this technique. All three methods of instruction are great, but I guess the Step-by-Step is my fav as I can print and file it or take it along to places with no internet access. Thank you for the trick.
This is an excellent trick, thanks!
Nice and simple! Please keep sharing as it is appreciated.
Thank you for the K2tog….I don’t even blind off the last stitch. I just pull the yarn through with great results.
Love your solution and demos. Video is my choice. But nice to see a choice for all types of folks. I’ve been told “just pick up” the stitch below” but my attempts didn’t produce a nice finish. Now I know how to do it right.
I really appreciate your videos and instructions everything is always so clear and makes sense!!. how do you come up with this stuff? looking forward to the bind off in the round lesson. I try so hard to work in the round as I hate seaming. thank you so much for your wonderful instruction.
I’ve been knitting for decades but I never managed to cast off that last stitch neatly. I always had to hide it when sewing up. I can’t believe the elegant simplicity of this solution. This just goes to show how much better we can do when we share knowledge with one another.
Thank you again for your clear concise instructions.
Regards Linda
I have learned so much from you. I’m getting better every day. Many many thanks.
Your videos are so helpful. Really enjoy watching and learning from you.
So good to hear from you, I have been wondering what you were up to. Thank you so much for just this one very helpful video, I have struggled with that edge forever, I can hardly wait to try it out. I’m so looking forward to the rest of the series. I have probably said this before but it bears repeating, your instructions are the best, they are so easy to follow and I find myself using so much of what you have shown. Thanks again and please keep them coming.
Mary, I’ll send out a blog post soon (after this ebook launches) that describes what I’ve been up to, but basically I’ve been designing and creating a wonderful new site for KnitFreedom that solves all the problems my readers experience.
It’s been so hard! But we are very close to launching the new site now, and hopefully I can get back to devoting my time to finding and publishing knitting tips, instead of designing websites!
Thank you for another great video. Love it.
Great video can’t wait to try it.thanks
Super! Learned a lot! It makes all the difference in the world. Picked up the trick quickly with this double format. Got the idea, and then perfected with the video… checked my accuracy understanding. Thanks! Great idea! :-)
I really did like your video Liat. I have learned magic loop and continental knitting from you. I love all your videos. Can’t wait to try this one.
Thanks for all of your great research and videos! Every detail you provide helps make my knitting look more professional! Michele
Great tip! I’ve always been annoyed at how my bind-off looks, so this is perfect. The step-by-step instructions with the animation are excellent. It’s great to see it over and over again – exactly what I need when learning something new. I like the videos, too. I love listening to your voice. Very soothing.
I love this!! I usually block the heck out of my corners to square them up – pinning and praying that they stay that way. This is absolutely brilliant! Thanks so much for all your tips and tricks, they’ve made my knitting life a joy!
Yaaay! Terri, you’re so welcome. Thanks for following my blog and commenting! Hugs to you.
How great is that?? Thanks so much for your time and effort in finding and sending this tip to us, and for free, too! Your instructions are always so easily understood.
WOW! thanks liat, that sure makes a big difference, can’t wait for the bind off knitting in the round. You are such a wonderful help.
Judy
I learn much better from the step-by-step guide than from a video. Then it gets good reinforcement from the animated view beneath the step-by-step. I liked having both of them. So often I can’t get the picture on the video, so don’t care for that. Just the voice doesn’t tell me much.
Brilliant, terrific, So much neater than that bumpy end cast off
You are too awesome for words! Thank you for ALL your hard work that makes me look good!
As always, updating and old mind. Can use this tonight, thx a bunch…J
Beautiful! Neatly . Thank you.
i wish i’d seen this a couple weeks ago when i finished a scarf with the meh bind-off. the step by step and video were great – the animated was fine after watching the video – the video is slower paced and very easy to follow – the animated was easier to follow after the video and i saw the flow in almost slo mo. thank you so much for sharing your knowledge.
Fantastic!!! Thank you for sharing…
This is a really good thing to know. I’m gonna really enjoy using this trick. How did you get so smart with your hair so short?
Love the step by step. Great tip. Thanks for all your research and work.
a simple but so effective solution….thank you!
What a terrific and very straightforward idea! Thank you! I’ve always struggled trying to make my cast-off as neat as possible and rarely succeeded. You always make things look so simple!
Fantastick! I love it and will use this technique tonight. Now if only I could get the first stitch in casting on to look as neat. I always have a big loop hanging there when I first cast on.
Thank you for the directions; they are nice and clear. I always prefer illustrated step by step directions instead of video, so I can file them in an organized notebook and refer to them without having to look at my computer.
I love it, it always looked so untidy before, also love the video.
WOW! Can’t wait to give it a try. Thank you.
I love this tip! It really makes a difference in the look of that last row. Thanks!
I like how you use the multiple formats- many “instructors” seem to be more interested in showing how fast they can do something rather than communicating exactly how it’s done, or they make a video and spend ten minutes waving their hands around and talking but not doing anything, or they don’t bother reviewing it after it’s done so they don’t catch the blurring or that half of what they’re trying to show is off-camera. The repeating animation is a big help too- it’s easier for the brain to catch something it missed because the repeat comes right back around. And all your little tricks are a gold mine. Thanks for all your hard work trying to make it easier for us beginners!
Clayton, your comment made me laugh – THANK YOU for underscoring the reason why it’s so important to focus on what’s better for the STUDENT, not for the instructor! You have totally justified why I’ve spent so much time on this coming ebook. Hugs!
Great demo, so easy to understand. Please keep up the good work!
Very cool tip. Love the format of including the animation. Thanks.
Great to hear from you again. Wonderful tip. Thank you. It’s the finishing that gives hand knits a professional look which I strive for and need all the help I can get.
Great tip, as usual. How simple, yet I never thought of figuring out a neater way to bind off. Thank you! It’s nice to hear from you again!
Wow, that a great tip, something I never knew I needed to do. I will definitely give it a try next bind-off.
This bind off looks great and is so neat. Thank you!
Brilliant! Love it. It will make finishing all the ssweeter. Thank you
Thank you, No more loops or holes at the end !!!!
Thank you so much for the step be step written instructions.
I can print them out and keep them with me anytime and anywhere.
The only service we get here is dial up and videos are impossible to watch.
They skip, stutter and freeze all the time.
I greatly appreciate the written step by step directions.
Many, many thanks for this great bind off help.
You are teaching this old dog many new tricks.
Dee
Thank you Liat, you are so patient and easy to understand! Love your videos!
Brilliant and yet, so simple. It looks great. Thanks.
You are a genius, Liat! So nice last stitch, wau! Thanks a lot…
This is interesting. You did your usual great job of documenting everything. I just might have to knit up a swatch and give this a try!
This is a very neat bind off” thanks so much for sharing with us. I love your vidios as I learn so much from them. and I very much appreciate that you offer so many of them free. I have purchased your magic loop video and one of these days hope to get that down to make hats. right now I am trying to find nice easy shawl patterns ” I am used to scarf patterns that go row by row and the way a lot of the shawl patterns are worded it sounds like they are worked in different sections. Hopefully I will be able to figure this out too. this is something I don’t seem to find a lot of vidios on. sorry didn’t mean to get so carried away. thanks again for this neat technique.
I’m new to your info and finding your demos and explanations invaluable. In answer to your question, it’s great to offer all types of approach – accommodates all learning styles and reaches more knitters!!! Thanks so much for all of this.
THANK YOU, THANK YOU, THANK YOU!!! You read my mind!! I was just wondering the other day if you had a video for this very topic!! You rock, Liat!!
You don’t need to cast of the very last stitch. It will leave a tail.
Thank you for the clear instructions, I love this bind off tip!
Love it! Sometimes the simple tricks are the best…
Oh wow, this is so tidy! Thank you!
Stupendous!!! You’re a fantastic teacher – clear, concise, great videos. I love that you recognize we all learn differently and accommodate that by teaching in different formats. Wish everyone did that. Thanks so much for your help, and happy knitting.
Very neat. I will try it soon. Love the feedback
What a fabulous trick! I always thought I was doing something wrong when binding off because my end was never squared off. Now I have a great trick to make things look neat. Thank you!
NICE! I like that trick very much! Thank you for sharing it, along with the video animation and written instructions.
Michele in Brooklyn, NY
Love it, love it, love it! I have learned so much from your videos! You do a fantastic job, thanks for sharing your smarts!
I really like the bind off – so simple and yet rather elegant.
Your video is great.
Je l’aime!! I love it.
Thank you. One of my favorite aspects of knitting is the community’s willingness to share tips and advice. Promoting knitting goes a long way to keep the skill from dying out.
Great idea! I watched the video and it was super clear and very helpful. I will definitely try this next time I bind off. Thanks.
Love the trick! So simple yet looks great. I love the animation…especially good for advanced knitters who grasp the concept quickly!!
Thank you Chris! Love to see your comments on the blog. I always appreciate your point of view. :)
After viewing all three methods of instruction, I could tell YOU how to do it! You’re a great teacher, Liat!! Thank you so much for this neat, very practical trick!
Virginia
Thank you so much for sharing these wonderful bind-off instructions, so that we all can continue learning how to improve our knitting techniques. You are an excellent teacher. Your work is much appreciated. I will put them to good use.
You are a remarkable teacher. I am so happy to see someone address those little finishing techniques that really bug me about my own knitting! Thanks very much.
All three teaching tools are good for me. The first one provides a clear look at the technique, the demo provides another quick look in case I want to review the steps while actively working on a project, and the written instructions with photos (my last resort)provide instruction that can be read slowly and repetively, if necessary. You are a great teacher!
As usual – you are my knitting hero! I’ve always had to fiddle with my last stitch on my bind-off to make it look neater and never quite satisfied with the result. This idea works marvelously. Thank you so much for the clear video and a great new trick to add to my bag of knitting know hows.
Individually your tips don’t at first glance appear to be that big a deal. When combined, however, it is the difference between a lovely piece of work and an embarrasing one. I’ve knit for decades on and off and came to you to explore what is new. Instead, I’ve learned so many small essential basics. Thanks for improving my work.
This is simple and leaves a neat edge. Off to try it now. Thank You!
What an awesome trick! And so simple. Thank you very much!
I’ve been fooling with this last stitch for YEARS, trying a different version every time and still not being satisfied with my results. Looks like you really nailed it! Great videos as always, in both formats. Enjoy your emails–instructive and funny.
I think that your video regarding the last stitch bind off is superb. It definitely makes for a lovely edge. Thanks for sharing, Looking forward to your ebook.
I really like this instruction video–it is very informative–I have to try it.
Thank you so much! Like how you present the demo; i.e. text & video. Will try this on my next “flat” project.
What a very clever idea! I am going to do this when I bind off my current project. Liat you have the best techniques! Thank-you
That looks so easy. Will try it real soon. I’m on a shared computer in the senior complex where I live so as soon as I get home I will try it. Thanks for the tip, look forward to many others. Eileen
You are definitely a blessing to have in every knitters life. Love how you make everything so much easier. Your videos as so well done. Thank you.
Thank you will try this when i get to the end of the project that’s on my needles now. Love the tips,very useful.
Thank you, I like seeing the text and the video. Though the video seemed to be on fast forward so a bit hard for me to follow. looking forward to more tips
Thank you
Cannot wait to try this. Thank you for all your tips and tricks!
Great idea. I can’t wait to try it.
This is awesome! Thank you from the bottom of my heart! Sharing your expertise, skill, and wisdom inspires this novice knitter to persevere in this often daunting but intoxicating pastime.
Nice! Great tip. Thanks
Wonderful! This solves a longstanding problem – not even my great-aunt who taught me knew this. Thank you!
Thank you very much for these little gems…..
this looks SO much better !!!
How can something so simple be so neat thanks for the tip
Now I have to knit faster to finish my project so I can give this a try. As always, your directions are great and I REALLY like the short video at the end. Makes it easier to follow what you’re doing step by step. THANKS Sending to all my knitting friends in case they missed it…
Terrific tip, anxious to see the one for in the round bind-off. Really like the animated video!
This is the problem in teaching yourself how to knit. You miss great little tricks like this. Thanks — it’s great!
I always learn so much from your site. Thank you for sharing your talent!
I am not an experienced knitter, but have always been unhappy at the end of the bind off when the bind off is shorter width than the rows before the bind off.
Thank you for your unselfish instructions in knitting!
Gale
Thank you, I love it!!
Simple. Neat. Love it. Thank you.
This is great. I too hate that ugly last stitch of a bind-off. This will fix that problem!
this is really great and helps me alot. the only thing I could add would be that some of us are older and slower so if you could slow the last few steps down it would be more helpful. thanks again, looking forward to learning more.
Lovely. Why didn’t I think of that?
Thanks, Liat. Another great tip and such a good idea to show it in video, animation and written instruction, suits everybody. Certainly love the simplicity of it!
Hi Leat, That was great. I have always had a big problem with my last stitch being very big and so making a hole.. This has solved it. thankyou thankyou thankyou. elaine
I like the idea of the 3 ways of presenting. My students learn differently and I appreciate being able to give them the options.
I will use. Do you have a similar tip for binding off knitting in the round project?
And do you have a tip on how to make the cast on corner square instead of round. I saw a video years ago but can’t find again. In your little sample for the bind off, notice the left corner as you look at screen is rounded. I hate the way that looks when making scarves. Thanks for all your knitting help!
Good questions, Jane!
The video for binding off for knitting in the round will be published in 2 weeks. And it’s awesome! (If I do say so myself).
About making the cast-on corner square instead of round, I’ll have to look for how to solve that. Thanks for the suggestion!
So much better, thank you! I like the animated demo. You provide excellent info and instructions.
That was great! Thank you.
Excellent!
Thank you so much for what you contribute to my leaning to knit and make it look nice. I’ve missed your emails and immediately opened this one today. What a great way to bind off. Thank you, can’t wait to try it.
Very neat bind off…Thank you very much…I never liked the way binding off ended..
Thank you so much for that neat trick! I will certainly give it a try. Will also look at the cast on tips you have as well.
I like having all three presentation methods at once because together they reinforce the
the neat finishing trick. If I want to see how it would look if I was knitting at my normal speed, there’s the animated video. If I want to take it slow, I will do the step by step. The video tells me quickly if I want to take the time now or later to learn it. I would use all three methods so I this works for me.
Great tip. I love visual aids. Thanks
Thank you. That is a great way to bind off that stitch!!!
Wahoo!!!! It’s wonderful! Thank you so much!
I love the way you have shown how to do this bindoff. I am a visual learner and this is wonderfully helpful for me. I absolutely LOVE the animated demo!!!! Thank you for sharing your wisdom ;)
Great Tip. Can’t wait to give this a try. A much nicer finish, than the old way. Thanks so much for sharing.
your little tricks are always so helpful. Thanks so much!!
Great idea! I can’t wait to try it. I love the finished look.
A lovely last stitch bind off, I used it just after I saw your demo, and won’t use any other, EVER!!!!!!
Great tip…I teach newbies and they tend to have loose edges anyway so this will be great to share.
like that i can just scan thru the pics and watch quick animated detail- sometimes don’t have time to watch a detailed video.
thanks
Great tip. Love the animated demo.
Thank you so much. Great information! Always appreciate your insight and approach to new methods and ideas.
I’ve been doing a “k2tog” for the last 2sts and then passing over the last st on the right needle but this looks like an even neater finish. Thank you.
Excellent presentation! I love the variety of the demos and this subject is most helpful.
I LOVE this method. I’ve always hated the way the last bind-off stitch sticks out in a weird way and have tried to fix it as best as I could with my needle when I sewed in my end. Thanks!
Love and have all tour videos. I always prefer a step-by-step, but the animated edition is a welcome addition. Enhances the smooth transition from one step to the other. Would like the animation presentation a bit slower.
Awesome!!!!! Thank you!
Great technique! I will use this!
genius
Thank you so much for all your videos. This one really helps me a lot. I love it.
I love this tip….it will alleviate my frustration with the appearance of the last stitch in my bind-off. Thank you so much for all you helpful tips!!!
Thanks much! This solves an ugly, niggling, little problem that bugs me to no end!
Well done!
Simply neat…………
Thanks, Liat.
Nice one,I’m surely going to use this in my next project. It looks mu h better indeed.
Wonderful tip. Wonder if it would work on all the rows to neaten up those as well.
Love it. Ill use this from now on and teach it in my classes but I can’t use it for the Master Knitters program. They’re pretty picky. Bev
I really like all versions of this, also the animated video. After you have seen the ordinary video, it is very good idea to have very a short version that only shows the most essential part of the longer video, for repetition. But the animated video was a little bit too fast, and the picture too small. But I suppose you will do something about that? Thank you for your enthusiasm and excellent explanations.
You are the best. It amazes me when you come up with better ways to accomplish things people have been doing for centuries. You rule.
I liked the video. I have been ending my bind offs like that so it lets me know I have been on the right track.
Great instructions! Great video! Love all your tips and tricks and will be trying this today.
Thanks Liat!
I love this idea thanks a lot for helping me make my knitting neater
I really like the video of your new technique. Such a simple solution that gives a beautiful finish. So creative!
Beautifully illustrated! Can’t wait to try this.
How cool is that?!! Love to have finishing tips like this. Thanx!
Excellent! Just yesterday I finished a project and had that extended look and didn’t like how it looked. Mahalo for sharing that tip!!!
Very helpful!! Both the still photos and the animation illustrated this technique perfectly. Thank you!
Great Idea! This is one of the great knitting tricks of all time! I will add it to my growing collection. Someday I want to have a class called “Tricks of the Trade!”
Very clever. Such a simple solution to the final stitch really improves the finish. Good for you! I sure wish I could knit as quickly as the video knitting…all my projects would be finished this week!
Thank you!!!
Again a very usefull trick I did not kwow ecxisted!!!
Indeed: a smooth binding off!
So glad I saw this written out and in animated form. It’s an excellent tip.
Brilliant! I’ve never been happy with the last stitch of a bind-off, it always seemed pointy and odd. Now I have the cure. Thank you!!
The step-by-step pictures were great, I was able to see exactly what I needed to do. The video was a bit quick, but with the repeat it worked for me.
Lovely. Neat, tidy and efficient.
Amazing! Finally I know how to fix that annoying last stitch! Seems like a miracle just happened :-)
Thank you so very much Liat! I have learned a lot from your videos over the past few years and I wish you much continued success!
Thank you for this tip! I’ll will never be unhappy with my “end” BO again.
It makes such a difference and so nice,etc.
the step by step was very informative the video helped especially when it was repeated thanks
I love the way you are always thinking about a better way to do something – then passing it on! Thank you!!
I have always hated that last stitch of my binding off! Thank you for the enlightenment!
I could have used this method last night! I spent an inordinate amount of time threading the tail and weaving in and out of stitches to try to cosmetically ‘fix’ the look of a bind-off that will be visible in the finished sweater. Now I’m considering ripping out the entire bind-off and doing it again. I’m impatiently awaiting your tip for binding off that last stitch in the round!!!!
It is very interesting!
Wow!!1 Love it the format of the instructions is great for an old senior like me . This old dog loves learning new tricks Thanks.
i’m glad to see there are other ” old dogs” around
Thank you dear Liat that is prettey neat and usefull I like it very much as it is such a good idia looking forward for you next mail
Lea
A great technique! From a wonderful teacher. Thank you!
Great tip. I love everything that you do. Thanks!
This is wonderful…that “bow out” always bugged me! Thank you for posting these great videos!!
Great job! So simple yet I’ve never seen that before. Looking forward to more tips.
Awesome! And perfectly timed, too, as I’m just about to finish a project. Thanks, Liat!
That is so neat! Thank you. I like both the step by step and the video instructions.
Great! Mine has always looked sloppy
Super! Wish I would have thought of it. Love your tips and methods. You are my role model.
So smart. So simple. Thanks.
Love the step by step instructions and the video is so clear. Keep up the good work.
Thanks,
NK
Why not just pull the last loop straight up after cutting? The end stitch lines up neatly, you won’t have that last smallish stitch.
thanks for the great bind off video, you dont even have to download it! Please can you do a video like that, on joining yarn. thanks
Hi Sandy, here’s a video on how to join yarn: https://www.knitfreedom.com//knitting-basics/change-colors-knitting-stripes
Is that what you meant?
This is great to know – easy & looks so much nicer. Thanks for the demo – very helpful.
Love it! Can’t wait to try it. You make everything look so easy, and it usually is!
I have never liked the “normal” bind off. As you hint it doesn’t look neat. I love this one and will use it. Thnx so much Liat!
This is my 1st post. It looks to be very helpful. Thank you!
Love this! It really is the littlest things that make all the difference. Thank you!
Great tip! Thank you, I too have always struggled with that last bind off stitch. So glad to have found you.
Love this hint. It makes the last stitch so neat looking in comparison to the old method. Thanks.
Thank you I love this! Perfect timing for me too, I’m getting ready to bind off a baby blanket and will give it a try.
what a difference. mine always look pulled. i have to manipulate stitches around to make them look a good as the olthers. thanks for the tip.
Wonderful. Thanks! Do you have any suggestions for the bind of on circulars? I usually ‘neaten up’ when weaving in end, but is there a better way?
Hi Dona,
Yes, I do! The video for how to neaten the last stitch of your bind-off when you’re knitting in the round will be published in 2 weeks, and you’re going to love it!
Good trick. As usual you do a fine, clear explanation. Thank You.
Like the animated demo after the step by step- great idea for teaching reinforcement
Great technique! I love all the videos as well. Recently purchased the toe up sock class and I absolutely love it! I never liked using dpn’s but now I am really enjoying knitting socks. So glad that I found your website. Thank you so much!
Hooray!!
Excellent idea and so simple – I am left handed and had no problem with your directions – that last stitch never seems to line up — now it will!!
Makes such a HUGE difference with such LITTLE effort! Thank you!!
Very well instructed! THANKS
Perfect! I’ve always hated how the final stitch looks off. This solves the problem very neatly!
Thanks!
Cool! Thanks!
This is a very cool way to bind off, I will sure to be using this stitch. Thank you so much for this little trick.
TerryLee
I love this technique, Liat! I can hardly wait to try it. Many thanks!
My knitting techniques have improved so much since I have watched your videos! I am so glad I found you! You are the best!!!!!
Nice! Thanks.
What a great technique! Thanks :)
Looks like a great way to finish bind off. Will use it next time I come to the cuff of a sock (any day now). Am anxious to see if I can make it look as good as yours. Thanks for the great tip!
Patricia, I’m glad you like it! You may want to wait until I publish the “How to Neaten the Last Stitch of Your Bind-Off for Knitting in the Round” – that’s the tip you’ll want to perfectly finish the cuff of your socks. It will be published in 2 weeks.
You could also bind off now and then undo the last stitch when the new video comes out.
A neat bind-off for a cuff is something I’ve been wanting for years. Yeah. Go Hawks!
I love your video’s, make it look so easy I love to watch when you knit, wished I knew how to knit as good as you do. I also wished you would have crotchet tips like you do your knitting. Do you do crochet tips as well as well, if so where do I find it, I love getting e-mail from you, you make it all look like so much fun.
This is so timely for me. I’m binding of a baby afghan today and will give it a try. Thank you.
what a neat idea. I will try it soon
Awesome! My last stitch always looks sloppy and lopsided. Thank you for the tip.
Instead of passing the picked up loop over to the right needle and then passing BOTH sts back to the left needle, why not save a step? After slipping the last st to the right needle, pick up that lower loop on the left needle, and go directly to slip the right st back onto the left needle, setting yourself up to do the K2 tog? Love your videos and your teaching style!
Yep! I just wanted to make it as simple as possible. :)
Love it! Thank you Liat.
How does it work for garter stitich?
I, too, would have noticed that. But do understand why she did that.
A friend was showing me a stitch on SW and after watching her a few times I asked her why she didn’t leave out that extra poke — she said ‘that’s how it’s done’ – and I said ‘well, I’ll do it without that in/out/back out/back in method.’
So, to each her/his own, folks.
TY, Liat, for all you share to help to make us/me better.
Brilliant! I love all of your videos and I have learned SO much. Thanks tons and tons for opening up a whole new world to me.
so looking forward to the bind-off guide. I have loved the cast-on guide and keep referring to it.
Can’t wait to try this.
Very nice, I like it a lot, eager to use on my next bind off.
I’ve used this bind off and it looks very, very neat. I’ve just discovered this website and am so glad I did. Wish I’d found it several years ago.
That is fascinating! I’ve always hated that ugly looking last stitch after it’s bound off. I am thrilled to learn this. :-)
Thank you very much, I love your videos. Everything is easy with you.
Loved it….especially loving the animated visual after reading the other….seeing it in practice (animated, that is) made all the pieces appear so fluid… and easy to do…will use this at the end of my bind-offs. Thanks so much