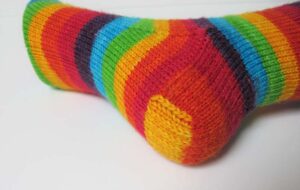
I’m almost done putting my toe-up socks video e-book together, and I wanted to give you a sneak peek of my favorite technique:
The stretchy, hemmed-edge invisible ribbed bind-off.

You need a stretchy bind-off so you can get your foot into your toe-up sock. Watch the complete video tutorial for binding off two toe-up socks…. and go forth and bind off!
Here’s how to do it (written instructions below the video):

KNITFreedom - Invisible Ribbed Bind-Off - A Stretchy Invisible Bind-Off For 1x1 Ribbing
To do the invisible ribbed bind-off, cut a long tail of at least 6 times the circumference of the project you want to bind off. Thread the tail on a tapestry needle.
Set-Up:
– go purlwise into stitch 1 (the stitch closest to the needle-tip)
– go knitwise FROM THE BACK into stitch 2.
Identify stitches 1, 2, 3, and 4. These labels do not change until you finish the repeat.
Repeat:
1) go knitwise into stitch 1, remove stitch from needle
2) go purlwise into stitch 3
3) go purlwise into stitch 2, remove stitch from needle
4) go knitwise FROM THE BACK into stitch 4
An easy mantra to repeat:
1) knit off purl,
2) purl off knit
Here’s an illustration of the steps of the invisible ribbed bind off that has proved to be really helpful for some of my students.
Click to download the Invisible Ribbed Bind-Off PDF
If this invisible ribbed bind off tutorial was helpful, please post in the comments!


50 thoughts on “The Invisible Ribbed Bind Off For 1×1 Rib”
YES!!! I’ve been knitting what seems like forever, and your video, illustrations, and written directions are as the best I’ve ever seen. I don’t do this cast-off often enough, so I always use a refresher in this method. Thank you.
Wow that is so sweet!! Thank you very much. That means the world to me. hey, don’t keep me a secret! Please do tell your knitting friends about KnitFreedom 😃🙏🏼
This is an EXCELLENT explanation of this technique. Thank you so much
Liat, Love, your videos, you explain you instructions so well , you’re so easy to follow.
This Invisible Ribbed Bind Off is a perfect bind off.. Thank you!! You taught me how to make my first pair of toe up socks. I look forward to learning from more of your videos.
Can I use this for 2×2 or 4×4 rub too?
Hi Aleeah, sorry for the delay! I was on maternity leave. The invisible bind-off for 2×2 rib is different. I have not heard of an invisible bind-off for 4×4 rib, but you might be able to extrapolate from the 2×2 rib one. Here is a link: https://www.knitfreedom.com/knitting-video/2×2-invisible-ribbed-bind-off/
I am finishing a Ranunculus. I did a twisty bind off but the hem edge was way too tight. I pulled out the stitches (no easy feat with mohair) and did this bind off! Score! Worked beautifully.
I was unable to get my mind around this so I did not accomplish this bind off, but used another stretchy bind off instead on my socks. Your instructions and the drawings make it much more clear to me and I will use it next time. Yes, there will be a next time. Thank you very much for the sock tutorial.
Hi Naomi,
I’m going to be passing your comment along to Liat, but I want to let you know that she is currently on maternity leave (she is expecting her baby very soon) and will be taking up to 1-2 weeks to answer.
Thanks so much for your patience and understanding!
Best,
Elias
I look forward to a reply at her convenience. Best wishes at this happy time.
Thanks for the feedback, Naomi! I’m sorry this was confusing. It’s not simple. I usually use Jeny’s Surprisingly Stretchy Bind-Off for toe-up socks, because it is very easy and stretchy. (https://www.knitfreedom.com/blog/jssbo).
I enjoyed having you as part of our sock group!
Cheers,
Liat
Thanks SO much for this! I’m knitting a sweater that has this bind off on the neck & I didn’t understand at all, until I found YOUR way on YouTube, which also linked to your blog. I didn’t think of searching for you in the beginning & I should have, as you are one of the easiest/clearest to understand.
And “welcome back” & congrats on your sweetheart & new little one! We missed you for a long time, maybe that’s why I didn’t think of searching for you first! XXOO
Can this type of bind-off be performed on a k2p2 ribbing also?
Yes but the steps are a bit different.
Here is the link: https://www.knitfreedom.com/knitting-video/2×2-invisible-ribbed-bind-off/
I also really love (and very much prefer) the Kitchener Double-Rib Bind-Off for 2×2 rib. It’s part of our I Love Bind-Offs class: https://www.knitfreedom.com/my-classes/bind-offs/stretchy-ribbed-bind-offs/#kitchener-double-rib-bind-off-2×2-rib
LOVE this bind off, printed it out, cut it to size and laminated it! It is always nearby when I need it. Thank you so very much!
Maureen
PS: I love your patterns!!!
Hi Maureen, thank you so much for this sweet comment! I love that you took the time to prepare the illustration and laminate it for your knitting bag. Thank you so much for sharing that with me. Your encouraging words really mean a lot to me!!
Liat
Hi, I know this video is older (a classic!), but I was wondering how do you finish the bind off on a flat piece of knitting? I’m finishing a split-hem edge of a sweater, so the ribbing was back and forth, not in-the-round, and I don’t know what to do with my last stitch on the Left Needle…. I tried purling through it with the tapestry needle, but it leaves an “ear” that is somewhat loose/not secured. I’ve done… something… to it, but would like to know if you’ve got any tips for ending this bind off when it’s for flat knitting.
Thanks for your time!
Hi Merry,
Great question! I will be interested in the answer. I have passed this along to liat and she will get back to you as soon as possible. (she is on maternity leave right now).
Happy Knitting and have a great day
Candy
Hi Merry,
Sorry for the so-slow reply! I do have a video and tutorial answering your exact question: How to Neaten the Last Stitch of Your Bind-Off on Flat Knitting.
I hope this helps!
Liat
Just searched for these instructions after using them for my last pair of socks. These are the best instructions. I like the illustrated ones the best so that I can refer back to them whilst knitting. Thanks!
Fantastic video and cheat sheet! I’ve got a great looking sweater neck now–thank you so much!
Oh, goodness, are those ever clear instructions! Thank you so much. I have another set, printed out from I know not where, that had me totally lost. Even the accompanying diagrams didn’t help. Whew — sure glad I remembered seeing this page
Thank you! The video helped visualize everything then the drawing helped as a reference while completing my top down hat!
Hi Jen,
Just ignore the twists and do the bind-off according to the instructions. Doing this bind-off while trying to twist stitches will be very confusing and will also reduce the stretchiness. I hope this helps!
Happy Knitting,
Thanks for this tutorial! I am going to try this on a 1×1 ribbed neckline that needs a stretchy cast off. However, I knit the ribbing with a twisted purl stitches. Should I just ignore the twist and follow these instructions as written, or do I want to do something different?
Thank you!
This looks easy to follow. I tried following a similar tutorial once before and there was NO stretch. I am a mirror left-handed knitter (I knit from left to right). What modifications do I need to take? Should I also switch the knit wise and purl wise directions?
Thanks for any help.
I am so glad to hear that it looks easy to follow. That was my intention! I am inclined to say that you should not switch the knit wise and purl wise directions.
Happy Knitting!
Thanks for the easy to read lesson on the bind off. Just finished some wristwarmers and it was perfect for the finish.
I am so thankful for your clear instructions, the illustration and most of all, your calming voice! I am new to this type of bind-off, and severely under the deadline to finish a sweater in 2 days. This technique is working beautifully for the collar, and I couldn’t be prouder! Thanks again for taking the time to post this. You’re a life saver!
You made my day Amy. Thank YOU! I am happy to know that it’s working for you. :)
You give fabulous directions. Between the explicit way you say the instructions along with the close up videos it becomes extremely easy to learn the techniques. I did do something else that helped me learn this technique. I placed a marker every 4 stitches so that I didn’t lose my place.
Fantastic instructions, thanks a million!!! I printed the written instructions and they go wherever I go with my knitting :-) Thanks for all the great patterns and videos
Beautifully explained! Thanks for taking your time with a longer video. I was referred here from the Nostalgic Knitter.
Thank you for the videos! Is it possible to do this for “mistake rib” (k2 p1)? I watched both this and the 2×2 video and I’m not quite sure how to adapt it.
Hi Sheri,
I was actually just binding off a mistake rib scarf last night. However, for me, “mistake rib” means 2×2 rib over an odd number of stitches (k2, p2.. end p1).
If that is the case, then you can do the invisible ribbed bind-off for 2×2 rib OR you can do my favorite invisible bind-off, the Kitchener Double-Rib bind-off (learn it in I Love Bind-Offs).
Other easier choices that would look almost as good are the Cable bind-off for 2×2 rib and Jeny’s Surprisingly Stretchy Bind-Off (JSSBO).
If what you are referring to as Mistake Rib is (k2, p1), you’ll need to do a bind-off that will work over any combination of knit and purl stitches. The Cable bind-off and JSSBO will both work for that as well.
Ps – Tutorials for all these bind-offs plus many more choices are in I Love Bind-Offs.
Thank you!!
I have used this bind off now on 2 pair of socks. I always refer to your video and the printed instructions. Thank you so much for all your videos and tips. You have made knitting fun and I have learned so much. Still waiting to start a sweater and checking your emails about what we should be aware of before tackling such a large endeavor.
Thank you so much, Liat, for this very easy to understand tutorial! I’m working on my first sweater project, a hoodie for my granddaughter and you save the day for me! You are a natural teacher, and I love the soothing sound of your voice as you’re directing us through it all. It really helped me to not be stressed out about what at first seemed too advanced for me. Thank you, thank you, thank you!
Liat,
Thanks so much for taking the time to make these wonderful videos. I found the drawing very helpful for keeping me on track for first and second stitches. The little heart and bead columns for the knits and purls are wonderful representations.
Thanks Liat.
great video about invisible bind off, i have a problem, my bind off edge
first stitch is a purl not a knit as shown in your video, how do i
bind off ? thanks
Giulia
Thanks, Giulia!
If you have to start with a purl stitch, set up the stitches like this:
Go into the first purl stitch knitwise, then go into the next (knit) stitch purlwise from the front.
Then, bind off the first stitch like this:
Purl off, then go knitwise into the next purl stitch from the back.
After that you can start the sequence like normal, starting with a knit stitch on the front, and following the sequence in the video:
knit off purl, purl off knit.
I hope this helps!
Thank you, thank you so much! its really good video!!!
You are so welcome, Tamara! Thank YOU for the compliment. :)
Thank you so much! I just made my first pair of socks & I think I may be a sockaholic now, lol! You’re tutorial Toe-Up Socks helped me so much. I couldn’t have done it without you. I’ve tried other classes, books, etc without accomplishing the task. But this tutorial somehow succeeded in helping me when all others have failed. Once again, thanks so much!! :)
Hi Latona –
Thank you so much for your wonderful message! I am SO glad that the tutorial was helpful for you. :)
And the world can always use another sockaholic!
this is great! do you know if there is a similar bindoff for 2×2 ribbing? thanks
Absolutely! Although I do not like it as much. See this discussion in the forum on invisible ribbed bind-offs for 2×2 ribbing.
The combination of the video and the handout made this incredibly easy to understand! This was exactly what I needed to finish off some wrist warmers that had ribbing at the top. Thank you so much!!
Yay! I’m delighted that you got the hang of it and that your wrist warmers look great!