Going Crazy Trying to Figure Out Fair Isle Knitting? Let These Detailed, Step-by-Step Videos Guide You by the Hand.
A Step-by-Step Video Class
Because holding two or more colors at once can be awkward as you learn how to manage the tension of each stitch, I've created a video class teaching you all the secrets of confident Fair-Isle knitting.
$34.99
Get Access
Knitting With Two or More Colors is Within Your Grasp
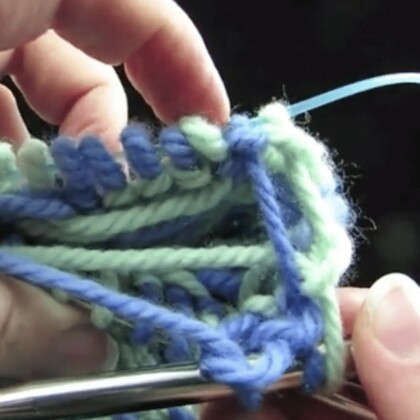
Fair-Isle knitting is the art of knitting with more than one color in a row to make fabulous repeating designs in your knitting.
Our Fair-Isle Knitting class teaches you how to Fair-Isle Knit from the very beginning, including reading a chart, fixing mistakes, Continental and American tensions, tricks to working in the round on Magic Loop, and more... all on a fast, fun project of an easy felted bag with handles.
Included FREE with KnitFreedom MembershipReady to Knit Two-, Three-, and Even Four-Color Designs With Ease?
$34.99
Get AccessReady to Quickly and Easily Learn Everything You Need to Know to Become a Fair-Isle Knitting Superstar?
Skills You Will Learn
- How to Fair-Isle Knit in the Round
- The Difference Between Fair-Isle and Intarsia Knitting
- Tips for Successful Fair-Isle Knitting
- Troubleshooting - Fixing Mistakes, Tension, and More
- Things to Watch Out For in the Future
- Intermediate Fair-Isle Knitting
- How to do Fair-Isle on Magic Loop and Double-Pointed Needles
- Knitting With More Than Two Colors
- How to Knit Fair-Isle Back-and-Forth
- Advanced Fair-Isle Knitting Skills
- Knitting With Three Colors in One Row
- Fair-Isle Ribbing
Class Contents
Fair-Isle Knitting Table of Contents
- Getting Started
- Pattern Overview/Walkthrough of Finished Piece (Fair-Isle Felted Bag)
- Cast On with Color A
- Stripes
- Join Color B to Start Making Stripes
- Knit the Striped Bag Bottom
- Knitting in the Round
- Pick Up and Knit Around Base of Bag
- Begin Knitting in the Round (Magic Loop)
- Knitting Fair-Isle from a Chart
- Learn to Read a Fair-Isle Chart
- How to do Fair-Isle Knitting (Four Options for Holding Your Yarn)
- Fixing Mistakes
- When You Didn't Follow the Chart Correctly
- Pulling Floats Too Tight
- Fixing Mistakes Far Down in Your Knitting
- Preventing "Corners" on Fair-Isle Knitting in the Round (Magic Loop and DPNs)
- Tips for Success
- How to Achieve All-Important Correct Stitch Tension for Fair-Isle Knitting
- How to Consistently Switch Colors for Even Tension
- Twisting Strands to Prevent Long Floats
- Trick: No-Purls Garter Stitch in the Round (Wrap and Turn)
- Finishing the Fair-Isle Bag
- Decrease Round and Final Steps
- Weaving in Ends on Fair-Isle Knitting
- I-Cord Handle
- Assemble the Bag
- Advanced Fair-Isle
- Flat Fair-Isle Knitting (It's a Little Harder)
- Knitting With Three Colors in One Row
- Beautiful Fair-Isle Ribbing
To date, 1110 happy customers have purchased this Fair-Isle Knitting class.
Can’t Wait to Start Other Fair-Isle Projects
"Bought the "Fair-Isle ebook" from Liat Gat/KnitFreedom – I can really recommend it to anyone who is new to Fair-Isle knitting. After taking the online video class I can’t wait to start other Fair-Isle projects."
– alterbridge on Ravelry

Provisional Cast-On

How to Do Kitchener Stitch in the Round

Ladder-Back Jacquard

Fair-Isle Charts - 30-Min Summary

Pattern Walk-Through

Knit The Base Of The Bag

Join Color B To Start Making Stripes

Knit The Striped Bag Bottom

Pick Up And Knit Around The Base

Begin Knitting In The Round

Learn To Read A Chart

Begin Fair-Isle Knitting

Fix Mistakes When Following Chart

Maintain An Even Tension

Pulling Your Floats Too Tight

Fix Mistakes Far Down

Switch Colors Consistently

Twists Yarns to Prevent Long Floats
"Corners" on Magic Loop and DPNs

Garter Stitch in the Round

Final Rounds

Weave Ends

Make I-Cord Handles and Loops

Assemble The Bag

Fair-Isle On Flat Projects

Knitting With 3 Colors in One Row

Fair-Isle Ribbing
Ready to Quickly and Easily Learn Everything You Need to Know to Become a Fair-Isle Knitting Superstar?
What Is a KnitFreedom Video Knitting Course?
A KnitFreedom Video Knitting Course is just like an in-person knitting class, but better.

- Clear, distraction-free videos of everything you need to see
- Instructions get right to the point, so there's NO WAITING
- Helpful text, written instructions, and illustrations to refer back to
- Practice projects and tips to help you keep learning
- Troubleshooting: Fix any mistake you might make - taken from REAL, in-person classes
- Tips and tricks: learn the tips to help you knit faster, more easily, and more efficiently
You Get: A Premium Online Video Course

- Online class works on any mobile device, including iPhone, Android, iPad, and Kindle Fire.
- Set your own username and password to access your products at any time
- Private "My Classes" page to track and keep all your classes in one place
- Easily navigate even large classes with navigable sidebar Table of Contents
- Read, watch, and enjoy your classes online from any device, at any hour of the day
Downloadable Videos for Offline Use*

- Download course videos straight to your computer or mobile device
- Enjoy offline video viewing for traveling or slow connections
- Quickly scroll through videos with no buffering
A Reference PDF of the Class*

- Download a reference PDF directly to your computer
- Video placeholders show when to refer to your downloaded videos
- Refer to all the text of the class without accessing the Internet
- Save all your classes to your computer so you have them at your fingertips
- To be used in conjunction with downloaded video files
- An expert knitting lesson and a knitting book in one.
*Not Included with KnitFreedom Monthly Subscription
Ready to Quickly and Easily Learn Everything You Need to Know to Become a Fair-Isle Knitting Superstar?
Projects You Will Learn to Knit in This Course

What KnitFreedom Students Say About This Fair-Isle Knitting Knitting Class:
Such a Fun Project
This was such a fun Fair-Isle project. I love all the great things you do pertaining to knitting. Your video tutorials are wonderful, and I often refer my friends to your web-site for help and/or to learn new techniques and such. Thanks for all you to do help the knitters (and crocheters) of the world.
– Esther (KnitQuester on Ravelry)
I Have Learned So Much
This was my first felted and Fair-Isle project. I felted it too much but I believe it still turned out good for my first one. My sister loved it for her birthday present. I’m making another one for my daughter and myself. Thank you Liat Gat for your Ebooks. I have learned so much. :)
– kbatten67 on Ravelry
Worth Every Penny
The Fair-Isle Knitting ebook includes several very helpful videos and tips which went far beyond the Fair-Isle instructions. Worth every penny.
– EllenRosewall on Ravelry
Beautifully Structured and Easy-to-Follow
This Fair-isle Felted Bag project was intended as a learning exercise, consolidating both Liat Gat’s Continental knitting and Fair-Isle courses. Both courses are beautifully structured and easy to follow.
– ChrisSpins on Ravelry
Can’t Wait to Start Other Fair-Isle Projects
Bought the "Fair-Isle ebook" from Liat Gat/KnitFreedom – I can really recommend it to anyone who is new to Fair-Isle knitting. After taking the online video class I can’t wait to start other Fair-Isle projects.
– alterbridge on Ravelry
Best I Have Seen
I must tell you that your Fair-Isle course looks fantastic. I love the way you coordinate the text and video in the single ebook. The layout of the ebook is the best I have seen. Not only do you excel at knitting and teaching knitting, but at ebook design.
– Pat

Reviews
There are no reviews yet.