Pattern Stitches
1×1 Rib – K1, P1 Rib
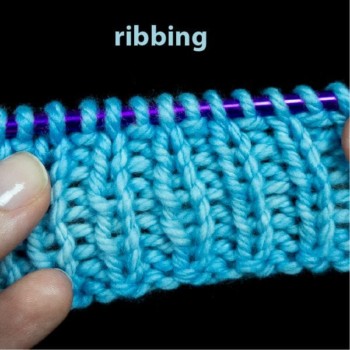
Ribbing is a stretchy fabric created by alternating knit and purl stitches across a row.
It is stretchy and does not curl, and is useful for cuffs and necklines.
When making ribbing you can use any repeated combination of knit and purl stitches, such as: (K2, p2), (k2, p1), (k3, p5), etc.
“Work (or continue) in ribbing” = “Knit all the knit stitches and purl all the purl stitches for as long as you want to maintain the pattern.”
Free Video for Subscribers
![]()
![]() This video is available to anyone with a free subscription. Sign up for free below.
This video is available to anyone with a free subscription. Sign up for free below.
Already a member? Log in here to watch.
To Do the 1×1 Rib/2×2 Rib – Ribbing:
For 1×1 Rib:
CO an even number of sts.
Row 1: (K1, p1) to end.
For 2×2 Rib:
CO a multiple of 4 sts.
Row 1: (K2, p2) to end.
Garter st – Garter Stitch
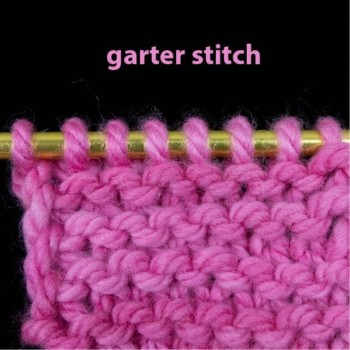
Garter stitch is the fabric created when you knit every row, that is, on both the RS and the WS.
Garter stitch is reversible, lies flat, and is bulkier than Stockinette stitch.
Free Video for Subscribers
![]()
![]() This video is available to anyone with a free subscription. Sign up for free below.
This video is available to anyone with a free subscription. Sign up for free below.
Already a member? Log in here to watch.
To Do the Garter St – Garter Stitch:
Garter Stitch (Flat)
- Row 1 (RS) and all RS rows: K.
- Row 2 and all WS rows: K.
K Tbl – Through the Back Loop

As in K tbl (“knit through the back loop”) and P tbl (“purl through the back loop”).
Knitting or purling through the back loop of a stitch creates a twisted stitch. It is tighter than a normal knit or purl stitch and can be used functionally as well as decoratively.
Free Video for Subscribers
![]()
![]() This video is available to anyone with a free subscription. Sign up for free below.
This video is available to anyone with a free subscription. Sign up for free below.
Already a member? Log in here to watch.
To Do the TBL – Through the Back Loop:
Knit Through the Back Loop
- With the yarn in back, insert the right-hand needle into the back loop of the stitch from front to back.
- Knit the stitch like normal.
Purl Through the Back Loop
- With the yarn in front, insert the right-hand needle into the back loop of the stitch from back to front.
- Purl the stitch like normal.
More Info:


P/u and Knit – Pick Up and Knit

How to pick up and knit stitches in knitting:
Socks patterns and mitten patterns both call for you to pick up stitches.
Top-down socks have a heel flap which usually has a slipped-stitch edge that you need to pick up into, whereas mitten thumbs have a raw edge.
Free Video for Subscribers
![]()
![]() This video is available to anyone with a free subscription. Sign up for free below.
This video is available to anyone with a free subscription. Sign up for free below.
Already a member? Log in here to watch.
Sl 1 – Slip 1

To slip a stitch, abbreviated “Sl 1,” insert the right-hand needle into the stitch as if to purl (with needles tip-to-tip), and slide the stitch from the left-hand needle to the right needle without knitting or purling it.
Free Video for Subscribers
![]()
![]() This video is available to anyone with a free subscription. Sign up for free below.
This video is available to anyone with a free subscription. Sign up for free below.
Already a member? Log in here to watch.
To Do the Sl – Slip 1 – Slip a Stitch:
- Pass the stitch from the left needle to the right without knitting it.
St st – Stockinette Stitch
Stockinette Stitch is the fabric created when you knit on the RS and purl on the WS.
It is the basis of most knitted garments. It tends to curl in on itself when it doesn’t have a border that lies flat.
Free Video for Subscribers
![]()
![]() This video is available to anyone with a free subscription. Sign up for free below.
This video is available to anyone with a free subscription. Sign up for free below.
Already a member? Log in here to watch.
To Do the St St – Stockinette Stitch:
Stockinette Stitch (Flat)
Row 1 (RS): K.
Row 2 and all WS rows: P.
Stockinette Stitch in the Round
All rounds: K.
