Seaming Bind-Offs
Russian Grafting (Blog)
Russian Grafting (Blog)
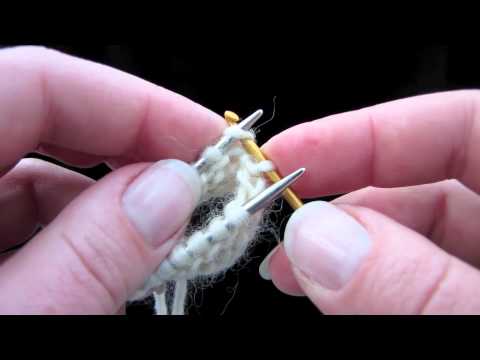
How to Have Great Tension on Kitchener Stitch

How to Have Great Tension on Kitchener Stitch
To improve your tension on Kitchener stitch, try the following tips:
– Only cut as much tail as you need, not more
– Stop every few stitches to see how your bind-off looks. Give the finished section of the bind-off a little tug as you go, so that you can see if it’s too tight or too loose.
– Pull your yarn carefully when pulling it through the stitches. Do not pull hard. Pull until the yarn is just snug.
– Bring the needles close to each other every time you pull the yarn through. If you keep them far apart, it will make it difficult to get the tension right.
– The row of stitches you’re creating should match the tension of the surrounding stitches.
If your Kitchener stitch is too loose, you can use your tapestry needle to move the loose yarn down the bind-off and tighten up the bind-off. If it is too tight, you should undo your bind-off and start again (how to undo your Kitchener stitch bind-off).
For a step-by-step photo tutorial of Kitchener stitch, a downloadable cheat sheet, and lots of Kitchener stitch tips and tricks, see our Complete Video Guide to Seaming Your Knitting With Kitchener Stitch.
How to Undo Kitchener Stitch

How to Undo Kitchener Stitch
To undo Kitchener stitch, take the tapestry needle and follow the path of yarn back through the stitches the way you came, putting each stitch back on the needle, with the needle going in from front to back through the stitch, as you go. Do this very carefully. This will take some time but it will be worth it the effort to get a bind-off you are proud of.
For a step-by-step photo tutorial of Kitchener stitch, a downloadable cheat sheet, and lots of Kitchener stitch tips and tricks, see our Complete Video Guide to Seaming Your Knitting With Kitchener Stitch.
How to Do Kitchener Stitch in the Round

How to Do Kitchener Stitch in the Round
This method works for Magic Loop as well as regular round knitting on circular needles.
Thank you to Knit Purl Hunter for providing the basics of this Kitchener in the round tutorial.
For a step-by-step photo tutorial of Kitchener stitch, a downloadable cheat sheet, and lots of Kitchener stitch tips and tricks, see our Complete Video Guide to Seaming Your Knitting With Kitchener Stitch.
How to Do Kitchener Stitch on 1×1 Rib

How to Do Kitchener Stitch on 1×1 Rib
These instructions show how to seamlessly join 1×1 rib top-to-bottom, that is, when you join provisional cast-on stitches to the edge to be bound off. These instructions will not work for top-to-top seaming, for instance, where you would fold the working edge of your work and seam it together.
For a technical explanation of why this works (and how to graft 1×1 ribbing top-to-top) I recommend Joni Coniglio’s Interweave article Grafting Knitting, Myth 2: Grafted Ribbing Will Always Have a Half-Stitch Jog.
For a step-by-step photo tutorial of Kitchener stitch, a downloadable cheat sheet, and lots of Kitchener stitch tips and tricks, see our Complete Video Guide to Seaming Your Knitting With Kitchener Stitch.
How to Do Kitchener Stitch Without a Tapestry Needle

How to Do Kitchener Stitch Without a Tapestry Needle
How to understand this bind-off without having to learn a completely “new” technique:
- To feed the yarn through the stitch knitwise, purl. Pull the yarn through.
- To feed the yarn through the stitch purlwise, knit. Pull the yarn through.
Watch the video to see what I mean.
Thank you to Knitting I Love for providing the basics of this Kitchener without a tapestry needle tutorial.
For a step-by-step photo tutorial of Kitchener stitch, a downloadable cheat sheet, and lots of Kitchener stitch tips and tricks, see our Complete Video Guide to Seaming Your Knitting With Kitchener Stitch.
NEW! Complete Video Guide to Seaming Your Knitting with Kitchener Stitch

NEW! Complete Video Guide to Seaming Your Knitting with Kitchener Stitch
Most written instructions for Kitchener Stitch are too complex to follow. No more avoiding sock projects because you don’t like Kitchener stitch! KnitFreedom’s Complete Video Guide to Seaming Your Knitting with Kitchener Stitch is your one-stop-shop for understanding and remembering how to do Kitchener stitch.
Get the free guide here: https://www.knitfreedom.com/blog/kitchener-stitch
I’ve helped hundreds of knitters already remember and understand Kitchener stitch with these videos, even those who used to be totally intimidated by the technique. They even tell me they love doing Kitchener now!
Learning Kitchener stitch is simple: You’ll click to go the guide, email the link to yourself or save it on Pinterest or Ravelry so you can have it for future reference, and then watch the in-depth videos whenever you are ready to learn and understand Kitchener stitch without fear.
When you click to go to the guide, you’ll get access to six free video tutorials showing you different aspects of Kitchener stitch.
As you refer to the guide, you’ll learn from an illustrated printable diagram plus step-by-step photos and an animated gif summing up the whole process, plus answers to 12 common questions knitters have about Kitchener stitch.
If you find our guide useful, I encourage you to email it to yourself, pin it on Pinterest, or even paste a link to it in your Ravelry project notes so that you have access to this great resource whenever you need it.
Finally, whenever you have a pattern that tells you to finish your knitting with Kitchener stitch, you can go to those saved links or just go to KnitFreedom.com and search for Kitchener stitch. You’ll have access to the only resource you’ll ever need for understanding exactly how to do and excel at Kitchener stitch.
So check out our Complete Kitchener Stitch Guide today because you deserve to always have great tutorials at your fingertips.
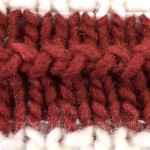
Russian Grafting (Bind-Offs Class)

This is a fast seaming bind-off that’s good for beginners.
It has a visible zigzag seam that lays flush with the knitting. It is one of the few nearly-invisible seaming bind-offs that is not sewn (the other being the Three-Needle Bind-Off ).
This bind-off would work fine for the toe of a sock or anywhere that a sturdy, flat seam is wanted.
Japanese Bind-Off

This is a medium-speed seaming bind-off that leaves a visible ridged seam. It uses three needles.
The stretchiness of this bind-off depends upon which technique you use to finish it.
There are two pieces to this bind-off: Join the two pieces of knitting into one, and binding off those stitches. If you use a stretchy bind-off to do the second part, the whole bind-off will be stretchy and if you don’t, it won’t.
ZigZag (Ancient Greek) Bind-Off
This is a very stretchy seaming bind-off that leaves a visible zigzag-shaped ridge.
It does have a distinctive zigzag look to it that is similar to Russian grafting, only this one has a pronounced ridge and the bind-off is very stretchy. It also stretches back into place nicely.
You’ll need an extra needle for this bind-off.
Three-Needle Bind-Off

This is a strong bind-off that leaves its seam on the wrong side of the work, making it nearly invisible.
It lays mostly flat, and, like the name suggests, requires a third needle.
You would most commonly use this bind-off on the shoulder seam of a sweater to secure the seam firmly (so it doesn’t sag) and to differentiate the back of the sweater from the front.
Three-Needle I-Cord Bind-Off

This is an advanced seaming bind-off that leaves an I-cord along the seam.
It makes a pronounced round ridge, is stretchy and strong, and like the name suggests, requires a third needle.
You would use this on any project where you would want a visible ridge that is shaped like an I-cord (a knitted tube) running along the seam, for example, on a child’s toy or quilt-square-type blanket.
How to Do Kitchener Stitch Without Fear

How to Do Kitchener Stitch Without Fear
This is an advanced sewn bind-off that is completely flat and invisible. It is slow but it gets faster as you get better at it.
Not only is this a fabulous way to invisibly join two pieces of knitting, this technique is used in a lot of other advanced bind-offs, making it an investment in your future knitting happiness.
I would consider it “required” for intermediate knitters.
For a step-by-step photo tutorial, downloadable cheat sheet, and lots of Kitchener stitch tips and tricks, see our post The Complete Guide to Seaming Your Knitting With Kitchener Stitch.

