The Search for the Best Knitted Buttonhole Ends Here


I didn’t expect to learn anything about buttonholes when I started writing my I Love Bind-Offs video course.
Up until then, I’d always done a standard two-row buttonhole, which consists of “Bind off, turn, cast on.” I never knew there was a different way to do it, and I was sort of fine with it.
My buttonholes were not pretty by any means, but they were holes, and my buttons fit into them.
When I started doing the research for the I Love Bind-Offs course, I kept coming across advice in reference books that said, “This firm and sturdy bind-off is good for buttonholes.”
I would think, “Really? Why? The Standard Bind-Off is a nice, firm, good bind-off for most things, and it’s also really easy. I’ve never had a problem with my bind-offs not being firm enough on a buttonhole…”
At first I thought, “This author must know better than me. I’ll just pass on this advice to my readers that this firm bind-off is good for buttonholes.” … But I couldn’t.
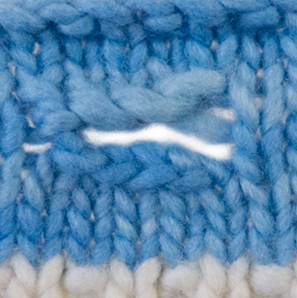
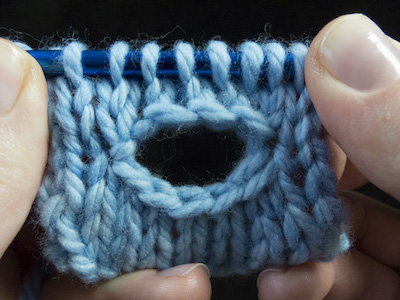
I experimented by trying the “firm” bind-offs on my regular two-row buttonhole, and I was’t impressed (see below left). If anything, the firm, bound-off side contrasted even more with the cast-on side above it. The messy part wasn’t the bind-off anyway, it was the side stitches.
Doing some Google-searching about buttonholes, I found some blog posts that talked about exactly what I was noticing; that a sturdy bind-off isn’t the problem.
The problem is that the standard two-row buttonhole leaves the corner stitches unsupported, and you basically have the edges of the buttonhole tugging on just one strand of yarn.
Whenever you have just one strand of yarn, it is weak and can get stretched out. No matter how firm your bind-off is, it’s not going to solve that problem.
Then, in a blog post by TechKnitter, I found something she invented called the Tulips Buttonhole, so called because it looks like two lips. Accompanying the invention was a very, very, long set of instructions about how to do it.

Even though I felt like I was sort of going down the rabbit hole and away from Bind-Off Land, I thought, “I’ve come this far, let me try this. If this is truly a better buttonhole,” I thought, “I’ll put it in my bind-offs eBook just as a bonus.”
When the computer-illustrated instructions proved unenlightening for my learning style, I found a video on it.
Even though the video was made by a knitter I admire very much, it was so far away and small and barely in focus, that I thought, “Oh my God, my poor students. If they ever try to learn this buttonhole, they will give up.” I myself wanted to give up!
And I almost did. But I followed the video until I understood the technique, and, let me tell you, the finished buttonhole is awesome.
The finished Tulips Buttonhole has a beautiful bound-off edge and a beautiful cast-on edge. The corners are nice and strong, and it is without a doubt the buttonhole that I’m going to use from now on.
Just to compare, I knitted a little swatch with a regular buttonhole and the Tulips Buttonhole side by side (shown below), and if you look at the regular buttonhole, you’ll be like, “Are you serious? People actually tell you to do it that way when it could be so much better? You’ve got to be kidding me.”

Now It’s Your Turn to Learn
Not only did I film my own video for you showing the technique, I wrote up the instructions in my own shorthand and distilled the technique down to its separate steps. I also took over 100 step-by-step photos just to make sure that any level of knitter would feel comfortable following along.
Even though this is probably the most challenging (and unusual) technique demonstrated on this site, all you have to do is slowly follow the steps and you’re going to be able to do something that you never thought possible.
The Tulips Buttonhole by TechKnitter
![]()
![]()
![]()
![]()
![]()

About This Bind-Off
This buttonhole, invented by TechKnitter, can be done over 2 or more stitches. It creates a strong buttonhole with matching cast-on and bind-off edges that has uniquely strong sides.
You will need a crochet hook, a knitting needle 1-2 sizes smaller than the one you are using to knit, and a small double-pointed needle for this bind-off.


In the video and photo tutorial below, I show you how to do a 4-stitch Tulips buttonhole. If you want a bigger or smaller buttonhole, just bind off (steps 14-15) and cast on (steps 29-32) the number of stitches you want in your buttonhole.
How to Do The Tulips Buttonhole

Tulips Buttonhole
1
This tutorial is shown on a 10-stitch swatch.

2
3 edge sts, 4 buttonhole sts.

3
K to 1 st before buttonhole sts (2, in this case).
.")
4
Move yarn to front.

5
Sl 1.

6
Move yarn to back.

7
Move st from R to L needle.

8
Repeat steps 4-5.

9
Drop yarn so that it hangs down in front.

10
With needle tip, lift the wrap and put it on the R needle.

11
Sl 1.

12
BO 1 (the wrap).
.")
13
Sl 1.

14
BO 1.

Repeat steps 13-14 4 times.

15
4 sts bound off.

16
Move st from R needle to L needle. 3 sts on either side of buttonhole (in this case).
.")
17
Stabilize the L needle somewhere comfortable so you can let go of it.

18
Remove R needle from sts.

19
Replace with a smaller needle (~2 sizes smaller).
.")
20
Move st from R to L needle.

21
Move yarn to back.

22
Sl 1.

23
Pull yarn firmly to tighten.

24
Move yarn to the front.

25
Repeat steps 20-22.

26
With needle tip, loosen the wrap.

27
Insert a crochet hook into the wrap.

28
Do a chain (crochet) cast-on as follows.
 cast-on as follows.")
29
Wrap the yarn counterclockwise around R needle.

30
Hook the yarn from over the top with the crochet hook.

31
Pull the yarn through st on crochet hook. Work this cast-on 4 times.

32
4 sts cast onto R needle. 7 sts on needle.

33
Place st from crochet hook onto R needle.

34
8 sts on R needle.

35
Sl 1.

36
BO 1.

37
K to end of row.

38
Buttonhole is technically done. Turn.

39
P across WS row. Turn.

40
The buttonhole after finishing the WS row.

41
The finished buttonhole after finishing 1 more RS row.
Pat yourself on the back (and maybe pour a glass of wine). You did it!.
. You did it!.")
This bind off uses: Without-Knitting Bind-Off, Chain Cast-On.
This bind-off is part of: the Advanced Bind-Off Challenge
Many thanks to TechKnitter for inventing this wonderful buttonhole.
Find This And 50 Other Professional Bind-offs In Our Complete Course/Video Library, “I Love Bind-Offs.”
 “This guide makes it possible to find the perfect bind-off for any project & to approach the end of a project with confidence. ⭐️⭐️⭐️⭐️⭐️ – Sarah White, Editor of About.com Knitting
The Tulips Buttonhole is included in our beloved video library, I Love Bind-Offs. Learn over 50 perfect bind-offs for your projects, including stretchy bind-offs, invisible bind-offs, decorative bind-offs, seaming bind-offs, and even buttonholes.
Check out I Love Bind-Offs here, or access it monthly with Premium Monthly for $12.99/month.
Leave a Comment
Are you going to try the Tulips Buttonhole? Have a buttonhole tip you’d like to share? Please let me know! Leave a comment on this post.


14 thoughts on “Best Knit Buttonhole: Tulips Buttonhole by TechKnitter”
Awesome! Simply awesome!
Thank you for demystifying this technique. I will certainly use it on my next buttonhole band on the sweater that’s been hibernating because of the dreaded buttonholes.
I am at the button band of the second sweater I’ve knit for my (currently 4 yr old) granddaughter. She has outgrown the first one – it was adorable – but she told me “Grandma, you have to use bigger buttons!”, as the buttons I used slid out of the holes. I knew that the buttons weren’t the problem but the holes had stretched. Now that I am faced with this situation again I plan to use the Tulips method. Thank you for this video tutorial! Without it, I would probably not even attempt this method. I agree with Carol’s comments – you break things down to the point where it seems possible to attempt – the “I can do that” feeling. I plan to knit up a swatch like you show in the video to practice before I attempt on the actual sweater. Will let you know how it goes! Congratulations on the birth of your baby!
Thank you so much for your sweet comment! Did you ever end up trying this buttonhole? How did it go?
Cheers,
Liat
Thank you Liat! I feel blessed having you as my teacher/instructor. ❤️
I just had to write to tell you that your picture and video instructions are simply the best. I joined your KnitFreedom in Sept. 2012!!! I loved you then and am so excited that you are back full steam again now.
Thank you for your continued efforts to provide top notch instructions and motivation for all of us.
Hi BG,
Thank you so much! I love that you’ve been a long-time customer and student. It’s been a wonderful ride! I’m so happy to be back and publishing tutorials again. Thank you so much again for the motivation and encouragement. I really appreciate it!
Liat
Once again, you come to the rescue! Thanks so much for your video instructions. I can’t count how many people I have referred to your videos…
Bon
Hi Bonnie,
You are too sweet! Thank you so much. I love that you refer people to my videos. It’s incredible how much that helps. Please let me know if there’s anything else I can do for you!
Cheers,
Liat
This tutorial is amazing. Who am I kidding? It’s YOU that is amazing! Thank you for making so many difficult things easy. I always know if you’ve done a tutorial on something, then I’ll be able to do it, because you break it down and make sense of it in a way that – well, in a way that just makes perfect sense! Thank you for another great addition .
Wow Carol,
What a wonderful comment! Thank you so much. I love that you have so much confidence in my teachings. I hope to always bring you new and interesting tricks that you can add to your repertoire.
Big hugs,
Liat
Wow! I can’t wait to try this. I am almost to the button band on my Throwback sweater, so this comes just in time. A million thanks!
Hi Sarah,
Thank you so much! I really hope you try this! Let me know how it goes. You can post photos on our Facebook page too! (facebook.com/knitfreedom).
Thanks for the Bottonhole Bind-off tutorial Liat,
I liked it so much that I finally decided to buy your Bind-Off class. I was missing this one and didn’t think I needed it, but right now I am binding-off a surprise jacket from Elizabeth Zimmerman and used a normal bind-off instead of the I-cord that looked too hard to do… Well, after watching your video, I find it easy now and will use it for my next vest ;-)
Hi Gilles,
I loved getting your comment! Thank you so much. I love that you found the I-cord bind-off video helpful. It’s really not that hard at all, is it?! And thanks so much for getting the bind-offs class. I love and appreciate your support. Great to hear from you.