 Sometimes, when you are working on a large-diameter Magic Loop project, your loops of cable can disappear.
You just have too many stitches to fit comfortably on a 40- or 47-inch needle. But you still want to use Magic Loop, and you certainly don’t want to buy a shorter needle!
I ran into this problem while making a basic Magic Loop hat for a friend of mine – his head is 23″around, which is just too big to maintain two loops of cable.
So, I used a modified form of Magic Loop, using just one large loop of cable, called the Traveling Loop.
To do the traveling loop, you pull just one loop of cable out instead of two. It’s awesome. You basically get back to Ready Position just once each round, instead of twice.
Video: How to do the Traveling Loop Method for Magic Loop
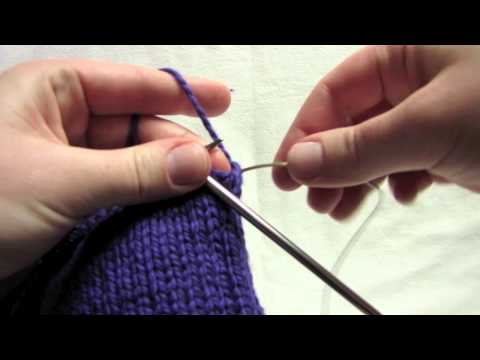
Traveling Loop Method For Magic Loop: One Loop Only
You can do the Traveling Loop until you reach the decreases for the hat, and then switch back to regular Magic Loop.
 To practice the Traveling Loop, try any of our free Magic Loop hat patterns:
• Basic Slouchy Hat
• Man Hat
• Double-Sided Hat
• Easy Lace Hat
• Brioche Hat
Related Tutorials:
If you haven’t already bought it, I highly recommend:
Complete Video Guide to Magic Loop
If you liked this video on the Traveling Loop method for Magic Loop, post in the comments!


18 thoughts on “Traveling Loop Method For Magic Loop”
Genius!
Thank you!!
would this traveling loop method work when decreasing the end of a hat instead of having to switch to dpns?
Hello Linda
Absolutely! I always use Magic Loop or traveling loop when decreasing a hat. I actually like Traveling Loop for the main body of the hat because it works best when there are lots of stitches. Then I switch to regular Magic Loop when the number of stitches gets below 50 or so.
Happy Knitting,
Liat
Traveling Loop is brilliant! What a great solution. When I first learned magic loop recently, I tried to do it on an infinity scarf, and had a lot of trouble until I had an aha moment and thought the problem was that it’s only intended for small diameters…so glad to find out I was WRONG! I love Magic Loop! :)
You are awesome! This is so wicked good! Thank you, Thank you!
How could I do socks that way? Especially the heel area? I currently do socks with two circular needles, but I don’t like the “ladders” of loose yarn on each side. Thank you.
Hi Vicki, I don’t use the travelling loop method for socks – I just use regular Magic Loop. It works great and you don’t get any ladders. Here’s a great tutorial for socks on Magic Loop.
Great tip! I use my circular needles for almost everything, and this is just one more method to have in my tool box. By the way, Knit Purl Gurl sent me! And I’m glad she did.
Hi Lisa!
I’m so glad you came by! I hope you find all my knitting videos helpful!
Liat,
You absolutely have the best knitting videos! I love my Knitting Superstar. Since I don’t have a LYS in my town it is my best knitting tool. I often travel to Bozeman and love the gals at Stix. They are a wonderful resource and great help too. Can’t wait to start their next mystery on Saturday! Thanks for all your knitting advise & valuable lessons!
Bobbi, thank you so much! You make me so happy in my heart! I read your comment and I said to my friend,”I designed KNITFreedom exactly for women like her!!”
Thanks for the great tip! I would have never thought to do that! I was alos knitting a hat and struggling with keeping the ‘loop’.
How perfectly timely! Isn’t Magic Loop awesome?!
This is a great idea! Unless your project has a definite”front side”and”back side”, you don’t need two loops to keep them separate anyway. And even if you did, why not just put a stitch marker where the second loop would have been? My circs just became a lot more useful! Thanks, Liat!
Exactly! Thanks so much for reading and commenting!
Excellent. Thank you for helping me think outside the box. I’m just about to start a child’s sweater (size 8) and realized that after only knitting socks for three years, all my circulars (mostly 32″) are too large for simple (old way) circular knitting and too small for traditional magic loop. But your suggestion of”one loop”is the perfect solution. WOW. You saved me some money. Thanks.
Hooray! Robin, that is so cool! I’ve been wanting to film this video for a while – I’m so glad I put it up just in time!