
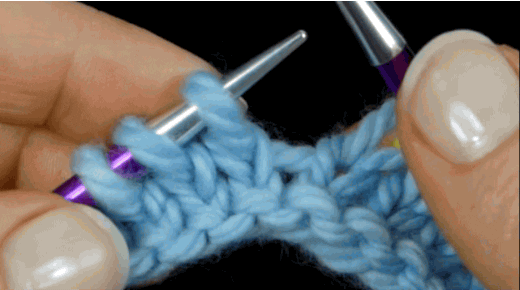
Instructions: To slip a stitch, abbreviated “Sl 1,” insert the right-hand needle into the stitch as if to purl (with needles tip-to-tip), and slide the stitch from the left-hand needle to the right needle without knitting or purling it.
Why Do You Slip A Stich in Knitting?
1) To make a neat-looking edge on Stockinette stitch
2) To avoid loose edges on garter or stockinette stitch
3) To make a nice edge for seaming or picking up and knitting
4) To create beautiful color and texture patterns
Slip The First Stitch To Create A Smooth Edge
1. I slip the first stitch of every row often in my knitting videos, and I get a lot of comments asking why I do it. People also wonder if there is a certain way to do it correctly. Well, wonder no longer!
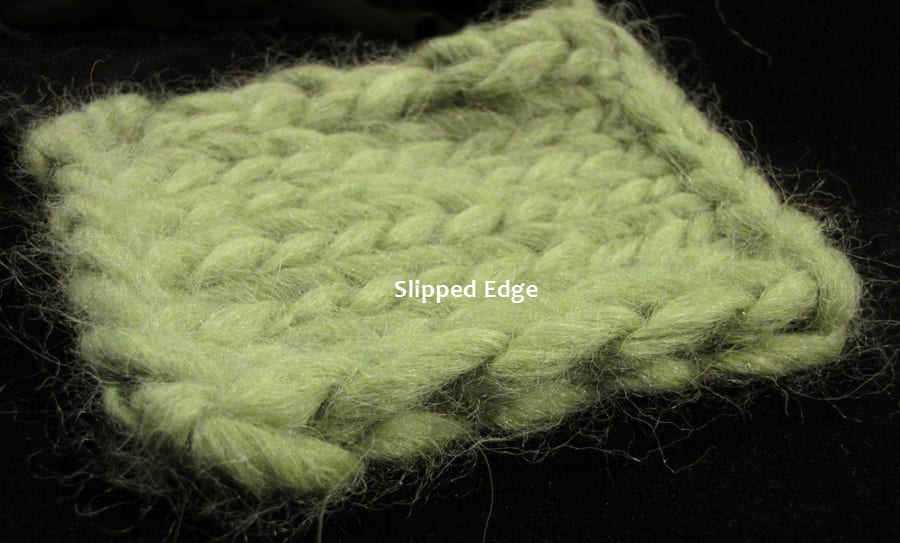
 I think that a slipped stitch leaves a much cleaner edge on Stockinette-stitch fabric, as you can see from the photos below.
As you can see, slipping the first stitch leaves a row of elongated stitches along the side of the swatch, that look neat and tidy.
It’s also much easier to pick up and knit into edge stitches that have been slipped, because you can easily see which two loops to go under.
Mattress stitch is also simple to perform when sewing up two pieces of a sweater whose side stitches have been slipped.
Lastly, beginners tend to have loose (and just plain funky) side stitches as they get the hang of tensioning the yarn and creating the basic stitches.
Don’t Slip Stitches On Garter Stitch Edges
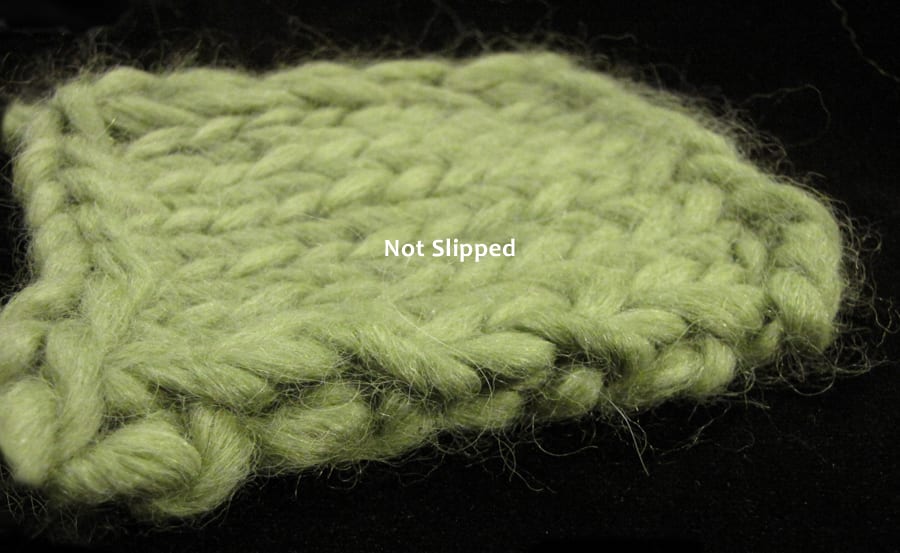
I don’t recommend slipping the first stitch of every row on Garter stitch – after photographing a swatch with one edge slipped and one not slipped, I think I prefer the not-slipped edge. You decide!

Below you can see the two edges up close.
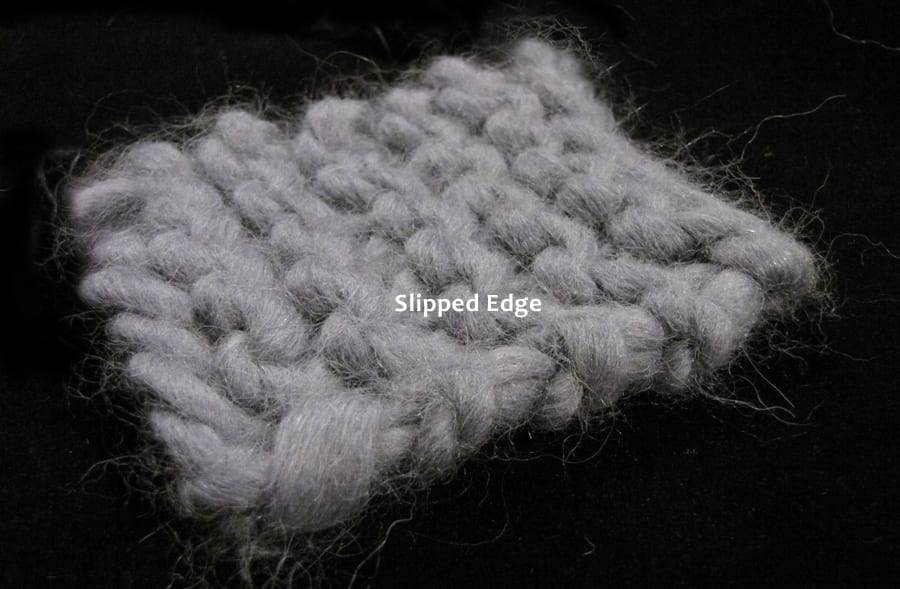
The swatch edges seem almost identical, but I think the slipped edge looks a little more bumpy and, in addition, the bumps aren’t aligned with the garter-stitch ridges, so they are kind of conspicuous.
I think this is barely noticeable, but…
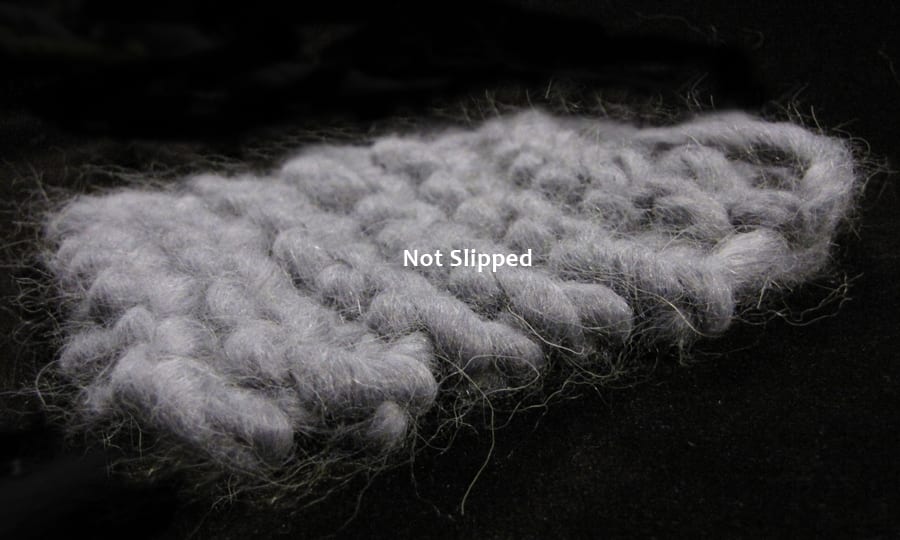 On the un-slipped swatch, the edge stitches perfectly blend with the garter-stitch ridges, making this an ideal edge.
However, if you are going to seam up or pick up and knit into your garter-stitch pieces, I still recommend that you slip the edge stitches so that you have an easy time finding the right loops to go through.
Pass The Stitch From Left To Right Needle Purlwise To Slip
So how and when do you do this move? Well, do it any time your pattern calls for you to Sl 1 (= “slip one stitch”), or any time you want a custom edge!
To slip the first stitch of every row is easy: pass the first stitch from the left needle tip to the right needle tip without knitting or purling it.
Just point your needle-tips towards each other and move that stitch over! This is also called slipping a stitch purl-wise.
This video shows exactly how to do it:

KNITFreedom - How To Slip A Stitch In Knitting - Sl 1 - Slipped St
Be Consistent: Slipping Purlwise Or Knitwise?
If you want, you can slip the stitch purl-wise when you are going to purl the row, and knit-wise when you are going to knit the row.
Or you can do like me, and always slip your stitches purl-wise, no matter what. You’ll never see the difference! All you need to do is be consistent.
Use These Classic Slip-Stitch Projects To Practice
 Knowing how to do a slip-stitch is important for some patterns, which use slipped-stitches to create texture-and-color effects.
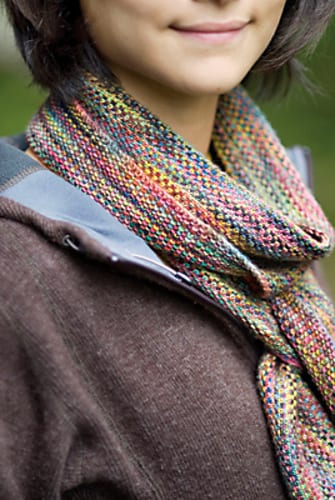
The popular Koigu Linen-Stitch Scarf (left), uses slipped stitches to turn three unrelated colors of Koigu KPPPM into a symphony of blended stitches.
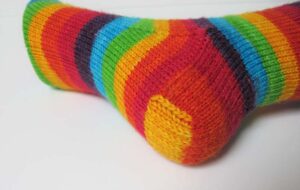
Any mosaic pattern such as the Family of Funky Stockings uses slipped stitches to create color designs while only knitting with one color per row.
Practice Slipping Stitches: The Eye-Of-The-Partridge Heel
 The eye-of-the-partridge heel is a fun pattern that uses slipped stitches to add texture and durability to any heel.
You can substitute this pattern for any other in your heel flap.
Why not give it a try?
Eye-of-the-Partridge Heel Pattern
Row 1: Sl 1, (k1, sl 1) to last st, k1.
Row 2: Sl 1, p across.
Row 3: Sl 1, (sl 1, k1) to end.
Row 4: Sl 1, p across.
Repeat rows 1-4 for desired heel flap length.
So go slip some stitches, already!
Keep Learning:
- How To Pick Up and Knit Stitches Two Ways
- How To Count Rows and Change Colors Smoothly on Garter Stitch
If you liked this tutorial on how to slip a stitch in knitting, post in the comments!
 Patterns featured slipped stitches: Vinété Slip-Stitch Throw Pillow for Beginners


34 thoughts on “How To Slip A Stitch In Knitting – Sl 1”
Hello there. My Aran pattern says (sl 1, p2). Do I slip the stitch knit wise or pearl wise. Thankyou
Hi there,
Normally you slip purlwise unless otherwise directed. So purlwise 👍🏼
Hi I’m new to knitting and wsmt to knit a teddybear
I was slipping all my stitches knit wise. Can I change this and alternate for the second half of the shawl I’m making? Or just leave all knitwise
Hi Darlene,
It depends if you’re slipping stitches in a decrease like SSK, or if you are doing a lace shawl and you’re slipping the stitches as part of a more complicated design. If you try a few you will see if you can tell the difference or not.
Help! I am a self-taught beginner knitter. I am knitting an afghan which says to slip the first stitch of every row. I am using circular needles. I have knitted through several skeins of thread. I still have the original slipped stitch. Because if I am slipping it every row it is the same stitch….what am I doing wrong..any advise would be great. Thank you!
Love the video, thanks for posting it. My question is about slipping the first stitch for easier seaming later. Do you add the slipped stitch to the pattern count or just slip it regardless of what stitch the pattern calls for? Thanks!
Did you ever receive an answer to this?
Great question Beth and Vic! Definitely DON’T add the slipped stitch to the pattern count. Just slip it instead of working it :)
I realize this blog post is years and years old but I’m hoping you may still reply to questions. My pattern says to slip the LAST stitch of each row knit wise. Is that do-able? I’m trying to practice with a swatch and can’t seem to figure it out. Thank you.
Hello would you mind stating which blog platform you’re working with? I’m planning to start my own blog soon but I’m having a tough time making a decision between BlogEngine/Wordpress/B2evolution and Drupal. The reason I ask is because your layout seems different then most blogs and I’m looking for something completely unique. P.S My apologies for being off-topic but I had to ask!
Hey Nike, yes! But it’s a complex answer and I’d like to give you the benefit of my experience working with a few different platforms. The thing is, it’s really late at night right now. I’m emailing myself a reminder and I’ll email you a well-thought-out response in a few days when I get to my email. I hope that works for you!
Hi Nike,
Well I tried emailing you but it didn’t go through. Here was my answer to your question:
“Sorry it’s taken me so long to respond to your comment. It’s been crazy around here because of the launch of the latest e-book. Are you still wondering which blogging platform to use?
Mine is a WordPress.org site, but I am in the middle of a very serious redesign and will be using Drupal for my new site. Which platform to use really depends on what you are going to use it for, what your current level of expertise is, and how much time you are willing to spend learning.
The layout of the site – how it looks – is pretty independent of the platform, so if looks are what you want, there’s no need to choose a complex and robust platform like Drupal. Except for that it’s awesome, but definitely has a steeper learning curve.
I’d be happy to go over the pros and cons of each platform with you.
Something I’d recommend is going to Lynda.com and watching the overview videos for each of the platforms – WordPress and Drupal 7. I watched the complete course for WordPress when I got started a few years ago, and then when it was time to switch to Drupal I watched that tutorial.
Just so you know my personal opinion: I’m switching to Drupal and never looking back. But everyone’s needs are unique. Make sure you know what yours are before you make any big decisions!”
thanks for making this so easy and understandable. I am a first time knitter and need all the help I can get.!!
You are so welcome, Esther. I will definitely be here for you as you continue to learn. :)
Happy Knitting!
How do I knit three then bring the wool in back as if to pearl slip a stitch and then knit three again and repeat across?
Hi Arlene,
Knit three stitches. Leave your working yarn to the back of the work. Slip the next stitch with your needles tip-to-tip. Then knit three more stitches. Basically, your instructions are telling you to leave your working yarn to the back of your work as you work all the directions.
I made a headband for my daughter that called for every row to begin with a slip one stitch with the yarn in front. When I finished the headband rolled up like a little rope. Was it because I slipped the purl rows as well as the knit rows?
No, it’s probably because the headband was knitted in stockinette stitch and stockinette stitch likes to roll up, regardless of whether you slip the edge stitch or not. You’d have to do something like a 2-stitch garter-stitch border to really stop the fabric from rolling. If you post a link to the pattern you followed in our forum at https://www.knitfreedom.com//forum, we can take a look at it and give you more specific advice.
I have a question about, can you use this slip stitch method when your making ,for example, a sweater with a pattern stitch?
Sure! You can use a slip-stitch in any pattern. Just note that it will pull in a little more than regular stockinette stitch. Make a swatch and see for yourself!
Hi. Thanks for all your helpful information. It’s really wonderful support for a novice knitter like me.
I have tried the ‘slip first stitch’ on a stockinette piece I am making, and while the knit row is fine, the slipped stitch on the purl row is really loose. I’ve tried all the different techniques to tighten it up (slip knitwise, yarn in front, purl last stitch of knit row, etc) but nothing works.
I’m sure it is a problem with the way I knit, but can’t figure it out. Any help much appreciated! Thanks!
Hm. Without behind able to see you knit, here’s what I would try: slip the first stitch of the purl row, purl the next stitch, and then tug the yarn, tightening both stitches. Sometimes when you have two stitches it’s a little easier to tighten them. I think of them like two camel humps (I don’t know why – probably something Cat Bordhi came up with…) Anyway- I hope this helps!
I was just doing a search for a friend of mine about slipped stitch edges and found your blog . . . just wanted to comment on the garter stitch info above . . .
I DO slip the first stitch on garter stitch, however, I slip with yarn in front, then move yarn to the back . . . it gives a very nice clean finish (similar to what you get when you slip in stockinette) — much (much, much, much) cleaner than a regular edge in stockinette.
I have just finished making three (3!!!) Einstein coats from Sally Melville’s pattern (all for children) all in garter stitch and all edges slip stitch . . . made it very easy to seam, to join pieces (since it’s really an origami kind of sweater) and to pick up stitches for where I revised the pattern and put on a bottom rib, a button/buttonhole band, and a collar.
You may want to revisit this using the yf slip yb knit approach.
p2
Wow, thanks for this great suggestion! I will have a look at this. Thanks so much for commenting!
I just did this on a project and it worked great! Thanks :)
I inadvertently did as PENANDRA and love the edge! I’m using super bulky blanket yarn for the first time. I discovered I also needed to knit the last stitch of each row to make both edges smooth. I should have added a stitch so as not to interfere with the stitch pattern, but it’s a minimal issue. This method is eliminating the yarn wrapping around the last stitch, making a bump.
Hi Beth, thank you so much for sharing! I love this trick.
When I want a nice smooth chain-like edge on something like a garter st. scarf or garter st. mitered squares where I will have to pick up and knit ,what I do that works is I slip the last stitch of each row Purl-wise with the yarn in front and I knit through the back loop of the first stitch of each row. I learned that on the first garment I knit which was a mitered square vest and luckily the instructions said it would be easier to do it that way. At the time I had no idea why, but now I do!
Hi Sandi!
Thanks so much for sharing this story! I’m so glad that you learned the right way, even if you didn’t know that you were doing it right when you learned!
Keep up the great work!
Who is that handsome man modeling the scarf?! As cute as he is, he’s probably already taken :(
Thanks Liat,
I feel much better now about how and when to slip that first stitch. You are awesome. It took me several days to get here to read it because I have been trying to read all the threads and responses on the forum in Ravelry. You can really learn so much by doing that. I got so involved with it, that I forgot about your blog, in fact for a while I thought I was on your blog, even though I knew I was on Ravelry. Thanks again for answering my question.
Hahaha! I’ve been trying to make sure the same thing doesn’t happen to me! I was happy about your question because it turned out to be inspiration for what I think is a really good and informative blog post!
I love that Eye of the Partridge heel, I’ll definitely be trying that! I can always find something new to learn here, Liat. Thank you!