 Let’s learn to do short rows!
Short rows are becoming a hot topic on Ravelry, so here’s a nice, clear tutorial on how to do them.
A “short row” is simply what happens when you work across a row but don’t get to the end.
The pattern instructs you to go almost to the end (maybe one or two stitches before), and then turn around and go back.
This creates a domed shape that is good for heels and other curvy parts of the body.
For those of you who have turned a heel before, whether it be the Fleegle heel for your toe-up sock, or a square (heel flap) heel for your top-down sock, you’ve already done this, on the “turn heel” part of your sock.
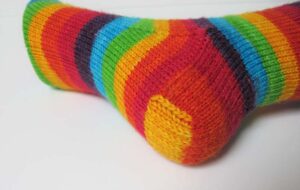
However, some socks patterns call for a heel that is made entirely by doing short-rows: there are no increases, no heel flaps, no picking up stitches, nothing!
The short-row heel is even and round-looking, and my favorite part about it that makes it very useful sometimes is that you can easily make the heel in a different color, as in the Delicious Knee Socks by Cosmicpluto Knits!, above.
 The short-row technique is not only used in sock heels, however.
It is used anywhere the designer wants to create a 3D or curved shape, as in the popular Calorimetry headband, the silly Fish Hat (Dead or Alive?), and the gorgeous and ephemeral Whisper Cardigan (left).
The “Wrap and Turn” Prevents A Gap
The key to correctly doing short-rows is knowing how to do the Wrap and Turn (no, it’s not a new dance move).
It’s a clever way of keeping the stitches close to each other while you are doing short-rows, so that you don’t create gaps when you turn around.
Doing short-rows also incorporates picking up and knitting the wraps once you’re done with the short-rows, so that they become invisible.
I demonstrate both techniques in the video below:
![[KnitFreedom] How To Do Short Row Shaping And The "Wrap and Turn"](https://i.ytimg.com/vi/_PAADqkCjrg/hqdefault.jpg)
[KnitFreedom] How To Do Short Row Shaping And The "Wrap and Turn"
Create A Short-Row Heel In Any Sock With This Formula
The following short-row heel formula, from beloved knitter Amy Swanson, shows how to create a heel in ANY sock, using short rows.
 After you’ve cast on and increased for the toe, knit in Stockinette stitch until your work reaches 1.5 inches from the back of your heel.
You may want to stretch the sock a little when you put it on your foot to measure, as you will be wearing it snug and not saggy.
If you are doing Magic Loop, your sock stitches will be divided in half.
Leave one half alone for now (the instep) and work the following steps across the stitches on the other half (the heel needle).
Now, a quick calculation: take note of how many stitches are on your heel needle before you begin the short rows (this would probably be around 28 for a medium size sock with fingering-weight yarn).
Multiply this number by 0.4 and round to the nearest whole number (in our example, 11). Let’s call this number A. Now, working back and forth over your heel stitches, begin the heel.
Row 1 [RS]: K to last st, W&T.
Row 2 [WS]: P to last st, W&T.
Row 3 [RS]: K to st before last wrapped st, W&T.
Row 4 [WS]: P to st before last wrapped st, W&T.
Repeat Rows 3 and 4 until (A) sts remain unwrapped between wrapped sts on either side of work. You will be ready to start a RS row.
Note: when wrapping stitches at turning points of short rows which follow, note that stitches will now have two wraps; these stitches will be referred to as double-wrapped stitches.
When working a double-wrapped stitch on a subsequent row, pick up both wraps and work them together with the stitch which had been wrapped.
Row 5 [RS]: K to first wrapped st, k wrapped st, W&T.
Row 6 [WS]: Sl 1, p to first wrapped st, p wrapped st, W&T.
Row 7 [RS]: Sl 1, k to first double-wrapped st, k double-wrapped st, W&T
Row 8 [WS]: Sl 1, p to first double-wrapped st, p double-wrapped st, W&T
Repeat Rows 7 and 8 until one double-wrapped stitch remains at each end of work.
Row 9 [RS]: Sl 1, k to double-wrapped st, k double-wrapped st. Do not turn work.
You should now have the original number of stitches left on your heel needle. Resume working in the round until it is time to do your cuff.
Related Post: Short-Row Shaping II: How To Invisibly Hide Wraps On The Purl Side
Keep Learning:
If you liked this tutorial on short row shaping, post in the comments!


72 thoughts on “Short-Row Shaping: Learn to “Wrap and Turn””
Will the same technique work if I am working 2×2 ribbing in the round? Some of the wraps were created on the wrong side of the work but have to be worked on the right side. No matter what I have tried, it is messy.
Hi Deborah,
I’m not sure. It sound a little complicated but we could probably figure it out. I give private knitting help to all KnitFreedom members. Sign up at https://www.knitfreedom.com/ and email me at [email protected] with your pattern information. :)
I look forward to helping you,
Liat
Hello. This helped me alot on picking up the wrap. Most sock patterns heels are doing a knit front and back then a w&t. Do you need to do a KFB? Do you have a video to show how a KFB and W&T looks like?
Thank you
Hi Gilbert,
I’m so glad this helped you! You would only do the KFB if your pattern specifically calls for it. I have a video of the KFB – you can find it here: https://www.knitfreedom.com/knitting-video/kfb-knit-front-and-back/
Thank you so much for your short row tutorial, it helped immensely! I knit a sweater with short row instructions for the back, really weird. With a lot of trial and error I finally figured it out. I was sitting in the hospital er with my husband and ask a lady sitting next to me if she was a knitter, she assured me she was not. I explained my dilemma and she found a you tube instruction and walked me through the process. I am so happy that you address some of the unusual knitting instructions. Thanks again.
Sharon
Hi,
I used to avoid Wrap and Turn patterns at all costs. I found that German Short Rows are an awesome alternative and have been using them ever since. So easy to do and recognize and they’re very neat too.
I hate wrap and turn with a passion, what can I use for a substitute?
When you wrap and turn do you increase! It’s a collar on a baby Cardigan the pattern doesn’t say how many stitches I should end up with, driving me crazy, can you advise.
No, when you wrap and turn, you simply switch directions – you are not increasing the number of stitches. Try it on a little swatch for yourself and see!
I hope this helps :)
Liat Gat
KnitFreedom
Hi Liat,
Your site is the first place I go when I need a video on a new technique. I have found picking up wraps to be tedious. I’ve heard people swear by the German short rows. I’d love to try it on my next wrap and turn project. I’d love to see you do a video of German short rows.
Thanks
Thank you for being so awesome! I’m presently on leave for personal reasons so I won’t be able to post a video on German short rows for a while but I will most definitely look into it when I can.
Happy Knitting
Hugs
Liat
Hi Liat,
I already know how to knit a toe up sock using magic loop (thanks to you and your class) but I also want to be able to knit from the top down but even after watching your videos, I don’t get the part where I need to pick up stitches :-( I tried so hard). I was wondering if there’s other options for me to knit top down without the picking stitches part and using magic loop and if there is, do you have a video that I can watch..the only way I can learn something new is by watching videos.
Thank you!!!
You are the best!!
I have religiously followed all of your toe-up sock patterns and love the way you teach. I recently came across instructions where you w/t and when picking up the wraps, you add a wrap to the adjacent stitch, creating the need to pick up a double wrapped stitch the next time. This has been totally frustrating, and I’m wondering why some patterns call for double wraps and others don’t.
Hello Kikukat (I love your name!),
I’m so glad you like my videos! But I’m sorry you’re super-frustrated. Can you post a link to these double-wrap instructions? Are you saying that I teach that somewhere? Because it doesn’t sound familiar to me. As far as I know, you can always just use the regular picking-up-wraps technique I teach.
Liat
the perfect explanation of short rows and the very most effective w&t techniques for me! many thanks!
Dear Liat,
Greetings from Ireland.
I am amazed that you take the time to post your wonderfully clear videos, so that lots of people can learn from your vast knowledge of everything to do with knitting.
Thanks,
Kay.
I just watched your video on short rows and would love to get a book on this as it is something that I have never done although I am a very experienced knitter. I have started knitting again after a long break and am doing socks and love knitting them.
Hi…
I really like this video however the pattern I’m working on is in garter stitch and I’ve heard that when you W&T and “knit” back I’m confused. My instructions say”
“Knit to wrapped st, knit wrap tog with wrapped st”….I understand the knit to part but what in the world does the second half mean? (knit wrap tog with wrapped st). Is it possibly a typo?
Thanks for any help you can provide. Oh, this is a shawl.
Kathy
Thank you! Again. Every time I read one of your tips my hands start twitching to try it! I really do need to finish packing for my move. At least knitting helps calm my nerves
Thank you so much for this, beautifully explained and cleared it all up for me. I really am grateful.
Thanks for this tutorial!
The last tip, on how to make the horizontal stich disappear, was new to me.
Thank you again.
I am glad to come upon your site. I have learned a lot!
Basic heel shaping and short rows have not been a problem for me – I’ve made many socks following patterns just fine. But now I’m getting into doing some major adjustments to some patterns and getting the numbers right on the short rows has been a major problem. Your ‘formula’ is exactly what I need!!!! I’m working on a pair of bulky wool socks for my son and will use the formula to finish the heel turn. Thank you so much!
Liat, thanks for another wonderful video tutorial. I love the way you explain things and the camera work is always excellent. I would be so confused if it were shot with the camera facing you! I’ve learned so much from you.
You are so sweet. I’m so glad that my videos are helpful to you.
I do my best to make my videos clear and easy to understand. It’s good to hear that they’re working for you. :)
Happy Knitting!
Awesome. I’m trying my first pair of toe-up socks. Making them for my son. I couldn’t quite get the heel right. Your video really helped to show me what I was doing wrong. Thank you so much.
Mercy, you are so welcome. :)
thank you now I can do shortrows
You’re welcome, that’s awesome!
Terific video tutorial. So much can be done with short rows.
Linda, you are so right. I’m so glad that you enjoyed the tutorial.
Hi,
I too am a knitting teacher so I am very grateful for your helpful tutorial.
Heel “turning” was the one thing I never really got around to.
Thank you.
Sharon.
You are very welcome. :)
I get it now!!! Thanks so much for your video!!
Hi Liat,
Thanks so much for the count down on the w&t, I finished my socks and they are awesome! I am very anxious to start the fingering weight now. I have question regarding the use of W&T over the ssk/p2tog method. The second is much easier to me, is there a difference as to why you would use the W&T over the other? If I have a pattern that uses the W&T, but wanted to substitute the ssk/p2tog, how would I do this?
Thanks for the great patterns and videos. I can now say that I have knit a pair of socks!
D
Hi D,
You have to be careful: the ssk/p2tog is not a substitute for the W&T. The W&T is part of the short rows and it doesn’t reduce the number of stitches at all. If you want, you can just turn without wrapping – I don’t find it makes much of a difference. The part AFTER the W&T part is where you do the decreases, and your pattern will probably tell you to do the ssk/p2tog like what you’re used to. Am I right?
Amazing. Wonderful. Thx much for sharing. I wasted a weekend trying to follow directions and videos. This video fit my needs perfectly. Peace out, knit out.
Dear Liat,
I am working the new heel flap worsted sock pattern. I have my 32 stitches on the heel needle and have finished the gusset increases. I know this is going to sound stupid, but I have already had to take out the heel turn and start again. I am not an experienced sock knitter and this is my first toe up sock. I’ve watched the great videos you have and have learned how to do the w&t. My problem is, I need to count these rows. I cannot tell what the heck I am doing and when I have 4 stitches not wrapped. I think until I get more experienced reading my sock knitting, I need the rows counted out. So row 1 is fine, K21, W&t. I need to know how many to purl, then w&t etc. I feel a little stupid asking this, but I have frogged once already. Sigh……do you have this written out by any chance?
thanks,
D
Hi Deb,
I worked out the numbers and I think it should be something like:
K21, W&T.
P10, W&T.
K9, W&T.
P8, W&T.
K7, W&T.
P6, W&T.
K5, W&T.
P4, W&T.
Let me know if this works! I hope it helps.
Thank you! I have watched and read several tutorials and yours is the first that completely explained the process so I understood.
That’s awesome! I’m happy that I could help. :)
I understand now how to do the W&T, but have another question. In your video, you did the W&T every other stitch (leaving a regular stitch between them. Was that only for clarity? The instructions say to knit to stitch right before wrapped stitch … so there are no regularly knitted stitches between the wraps. Was that clear as mud?? Or am I just being dense?
Hi Pat,
Great question! Actually the pattern itself will dictate how many stitches you need to leave between each wrapped stitch. In the video I showed wrapping every other stitch, but that’s not always the case.
The closer together the wraps are, the more curved the piece of knitting will be. For example, the heel on a sock will have the warps very close together. A curved shawl might space out the wraps by four or five stitches in between each one.
So as long as you follow the pattern, you will be ok – the pattern will always specify how many stitches should be in between each wrapped stitch.
Wow! You make it look so easy. I have learned so much and being 78 that is an accomplishment. Thanks so much.
You are too sweet. :) I’m so glad that I can help you learn some new tricks! Keep up the great work. I’m happy to keep bringing you helpful tips to make knitting easy fun. :)
Liat,
Your explanations are clear and easy to follow. My only comment is that you might want to add some other types of short rows to your blog entry. There are methods that use a ‘yarn over’ rather than a ‘wrap’ but nicest of all is the Sherman Short-Row Toe and Heel — you just knit as usual for the decrease side then when you start increasing you pick up the stitch below the last stitch on that row. Easy as can be.
Wow, Barb, I need to look into this! Thank you so much.
In answer to the query some one has here. Your method also has you picking up double wraps – and hence kniting or purling 3 stitches together!
You don’t explain how to pick up the purl wraps. Presumably you purl them and not knit them (you say to do the same on the other side on the video). Also, if you pick them up (the wraps) in the same way you will see the wraps and it will look different from the knit side.
I followed your tutorial for the knit side and another for the purl side. The end result was very nice.
sara » Thanks for helping our reader figure this out! I linked your comment to her comment so people can find your solution.
I’m trying to make a hat with earwarmers already in the shape of the hat and in the round. The insructions say (1) K 56 wrap next stitch and turn, the next (2) says knit 38 wrap next stitch and turn. It continues the same way down to the last row of 10 rows, each row with a different knit amount and then the line ends up with wrap next stitch and turn. I’m confused, if I use a wrap and turn method, am I not already turned? Never done this before but you really know what you’re doing so I thought you could help me. I bought this pattern off Annies Attic on the internet so I don’t know who to contact. Thank you in advance for any help. Also, the pattern doesn’t say anything about knitting up to a certain point, (like mst start a short row wrap and they knit up to the last 3 stitches. I don’t have last stitches because I have already knited up to 56. I’ve knitted 3 rounds, then knitted 56 where the first instruction says kit 56 wrap next stitch and turn. You instruct so well, just like a teacher, I hope you can straighten me out. Thanks again and if you can’t help me it’s okay – have a Merry Christmas….
Hi Claire,
I really want to help you get sorted out on your hat – I am a little confused by your question, though. Can you post this as a new thread in the forum and we can get this figured out for you? Thanks!
Hi,
this is the ONLY video that made sense to me. I am a beginning knitter and bought a pretty scarf pattern. I watched at least 6 others and couldn’t get it at all. Your’s is super clear. You do it slowly and repeat. Just great!! Thanks so much!
Hi Ursula –
Thank you so much for your sweet compliments. :) I am so glad that the pace and setup of the videos is helpful for you. I hope this helps you finish your pretty new scarf pattern!
Happy Knitting!
This is helpful. Charlene Schurch has a technique where the stitches end up double wrapped and you pick up both wraps and then knit or purl 3 tog. I’m having trouble with that part – figuring out how the pick-up with 3 wraps.
Your question has been answered by a helpful reader here.
Thank you so much! This was a sock saver!!
You are so welcome! I’m so glad that I could help! :)
Thank you! This clarifies the mystery that is short row heels for me. I can’t wait to try it on my new pair of socks!
Thank you Erin! Try it and let me know how it turns out. I am always here if you get stuck.
Thank you, thank you, thank you! I’ve seen all kinds of videos for how to do this on Youtube. Yours makes sense! Your video shows how to do it and not get holes. It looks very smooth and I am thrilled to finally be knitting socks that look professional.
Thank you Cindy! I am thrilled too :)
Hi Liat!
I’m getting really gutsy (fearless knitter anyone?) — I haven’t even made a sock yet and I’m going to try adjusting your toe-up worsted sock to fit my enormous feet for my first sock project. I already know I want 48 stitches around instead of 32 but didn’t know how to adjust the heel counts. The formula helps immensely! Thanks for creating such a wonderful resource for knitters everywhere. If it wasn’t for you I’d still be doing washcloths, scarves and caps and nothing else.
Wow, Rich, that’s awesome! I’m SO excited that you are ready to try toe-up socks. 48 stitches is a lot more than 32 – have you taken stretchiness into account? Also, my toe-up sock pattern does not use this short-row heel formula- the Fleegle heel is even easier to adjust (just see”Advanced Toe-Up Socks”in your Knitting Superstar ebook.
I found out your pattern uses the fleegle heel — Rebecca answered my questions on Ravelry. I chose 48 because the”Plain Old Ragg Sock”pattern in Judith Durant’s Never Knit Your Man a Sweater… calls for 48 stitches around. It’s a top-down pattern instead of toe-up but the circumference should be the same. I’m into the foot portion now and almost have enough done to try on. Another day or two will tell if I have too many stitches. I’m loving the heck out of Magic Loop! Especially since it’s straight knitting — which I can now do continental! :-D
Yay! I’m so happy you love Magic Loop! I hoped you would. Look at you go!
This is an excellent tutorial! You are the first person who has been able to make me not only understand how to do the wrap and turn, but to really explain why anyone would want to do this. I get it now and I thank you!
Yay! I’m so glad!
I did my homework on this one and it paid off. I sat here in to the wee hours of the morning just watching Liat’s short row heel video and followed with my yarn and magic loop and I finally understand the Short-Row Heel Formula ! woowoo!
Heya Liat!
GREAT VIDEO, as always, excellent tutorials, easy to see and follow along with.
I know you said you will be going over to the Ravelry Group and try to be more visible there, so I hope it’s ok if I ask a question here, but I’ll go over to the Ravelry Group and pose it there too (and check in there for answers) Don’t you wish you were TWINS now?? LOL
I have done this W&T once. I think (that’s a BIG I think..) that I forgot to”unwrap”the wraps when I came back-what happens when you forget to unwrap the wraps and Ktog with the wrapped stitch?
(now you know the rest of the Many Twisted Stitches story) ;)
Off to Ravelry to post this question there~
Kthnxbai~
S~
Yep! I answered it here!
The short row heel formula still looks a little confusing to me, but I’m sure that’s because I’ve not actually done it yet. The video was very clear. I can’t believe how simple that looked. I tried knitting something once that called for wraps and turns. Not having ‘seen’ it done, I got very confused and gave up on it. My type learning requires ‘seeing’, which is why I love your videos. Things I thought I’d never get the chance to learn, living in a small town with no access to classes or an LYS, I now know I will learn. Yea! ;-)
Yeah!! I think patterns that try to describe the”wrap and turn”with words make it sound a lot more confusing than it is.
If you try the heel formula, let us know how it goes! I will explain and fix anything that turns out to be confusing.
I am a newbie and this helps alot. Thank you! Ok off to try this out….