How to Do Basic Mosaic Knitting
In Monday’s blog post introducing the color-knitting technique of mosaic knitting, I showed you a variety of the creative, colorful, and textured mosaic knitting patterns out there.
Now it’s time for you to try your hand at this new technique. As much as I can try to describe how mosaic knitting patterns work, the easiest way to understand is to try it yourself.

By the end of this tutorial, you’ll have made a little mosaic swatch of a simple brick pattern, which happens to be the foundation of quite a few cute and easy projects (like the Ballband Dishcloth above).
You’ll also learn how to switch colors neatly when making stripes (which is key in mosaic knitting because you only knit one color at a time, so you have to alternate between the yarns every couple rows – read: stripes).
Lastly, you’ll learn my favorite quick tip for binding off that will make any swatch lay flat and even (gotta love that).
Here’s the swatch we’ll be making:
Easy Mosaic Brick Pattern – Sample Swatch Tutorial

Knitting the whole swatch should take 20-30 minutes (that’s just a guess). My video is about 10 minutes long, and I show you everything except for the plain knitting rows.
Prepare Your Yarn and Needles

Time to get your yarn and needles out! Find two colors of yarn that are the same weight, that is, two worsted-weight yarns, two bulky-weight yarns, etc.
Get a pair of straight needles in the size recommended on your yarn band (US size 7 for worsted weight and US size 9 for bulky weight).
Bulky yarn is my favorite choice of weights for swatching and learning new techniques.
Next, look over the instructions for the Easy Mosaic Brick Pattern below. If you understand most of the abbreviations, give it a go and try to knit the swatch on your own!
Try the Swatch On Your Own First
The reason I want you to try this swatch on your own first is because when you watch the video with me, you will have some experience and context. You also might have some questions you want answered. It’s also good practice in just trusting yourself to read a new pattern, uninfluenced by any prior explanation.
If you don’t want to knit the swatch on your own, or don’t understand the pattern instructions, that’s ok – I’ve explained everything in the videos and in the photo tutorials that follow.
(In my upcoming mosaic knitting video class, Fantastic Mosaics, I give you tips and troubleshooting videos to help you get the most out of this tutorial, so if you have any trouble at all, know that there’s more than just what you see here.)
Last thing before you get started – If you prefer photo tutorials to video (or if you just need a reminder as you’re working through the swatch), there are detailed step-by-step photo instructions below the video.
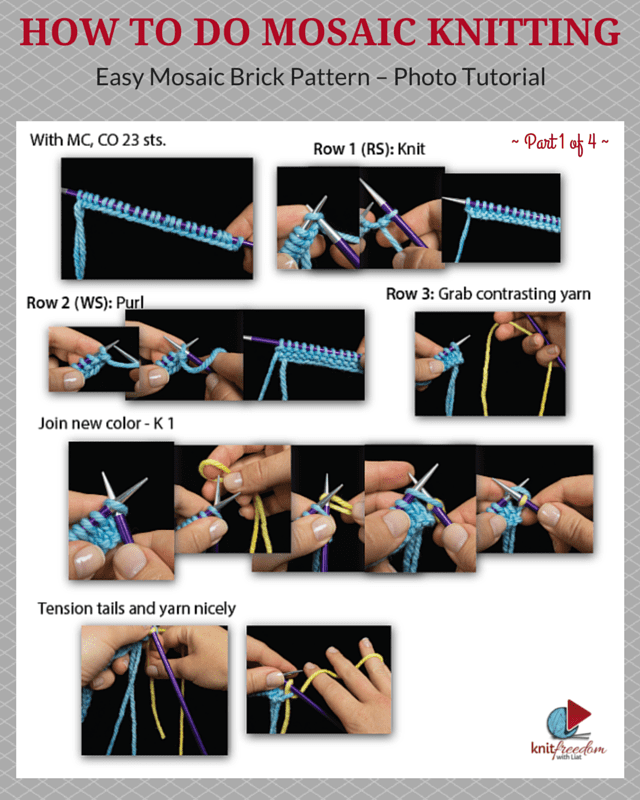
Easy Mosaic Brick Pattern
With MC, CO 23 sts or a multiple of 6 sts -1.
Row 1: (RS): With MC: K.
Row 2 (WS) and all WS rows: WORK EVEN. For this row, that’s Purl.
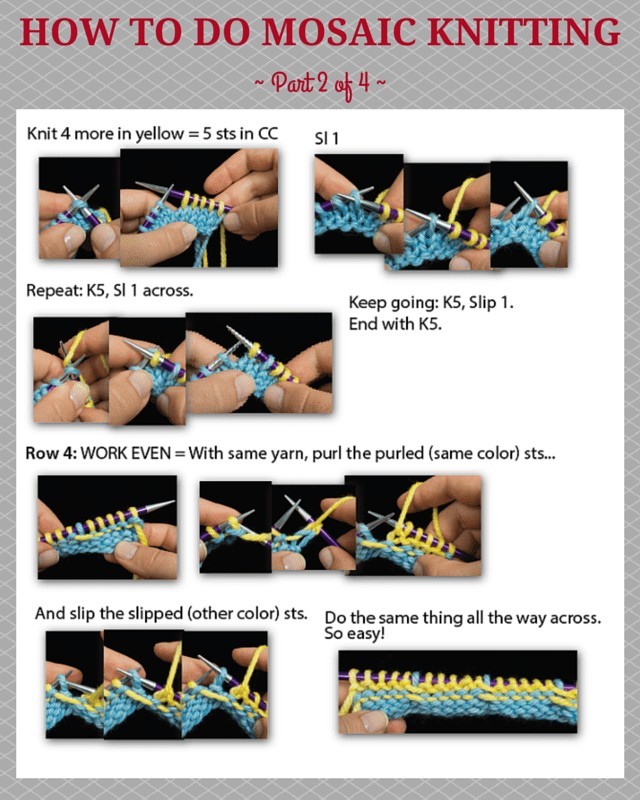
Row 3: Switch to CC: *K5, sl 1, rep from * to last 5 sts, end k5.
Row 4: *P5, sl 1, rep from * to last 5 sts, end p5.
Row 5: With MC, repeat row 1.
Row 6: Repeat row 2.
Row 7: With CC, k2, *sl 1, k5, rep from * to last 3 sts, end sl 1, k2.
Row 8: P2, sl 1, *p5, sl 1, rep from * to last 3 sts, end p3.
Row 9: With MC: K.
Row 10 (WS): BO in knit¹.
¹“Bind off in knit” means knit each stitch as you bind it off (even though you’re on the WS).
Easy Mosaic Brick Pattern – Video
In this mosaic knitting video I use blue for my MC (main color) and yellow for my CC (contrasting color).

How to Do Basic Mosaic Knitting – Easy Brick Mosaic Pattern


How did you do? Not as hard as it looks, is it? Good job for giving this swatch a try.
Coming Soon: Fantastic Mosaics –
KnitFreedom’s New Mosaic Knitting Video Class
Curious to know more? I teach tons more mosaic knitting techniques in my upcoming video class, Fantastic Mosaics, coming March 28th.

Stay tuned (and be sure you’re signed up for the newsletter) because not only will you get an email when this new course is available, you’ll learn how to join the giveaway for a free copy plus more prizes (and one-on-one time with me!).
Leave a Comment
How did you do on the swatch? Did you like the step-by-step photo tutorial? What could I do to make new techniques even easier for you to learn? Let me know by leaving me a comment below. See you tomorrow for the giveaway!
See also: How to Slip A Stitch in Knitting – Sl 1


74 thoughts on “How To Do Basic Mosaic Knitting – Video and Step-by-Step Photo Tutorial”
The Mosaic is a lot of fun! I’m looking forward to practicing by making a few dishcloths and going on to something really nice!
That video really whetted my appetite!!! Can’t wait to get the entire course on March 28! Liat, all of your videos are excellent. Your speaking style is so soothing and encouraging!
Mosaic beginner row8 ends with P2 but I had an extra stitch. Where did I go wrong?
Lorraine, it should be purl 3, not purl 2 at the end of Row 8. Liat is fixing that line.
I love your teaching methods. I was afraid to even try socks until I saw your tutorial on toe-up socks. Makes it oh so easy! I’m not sure how many pairs of socks I’ve knitted now – and I keep trying different methods to find out which works best for me.
I can hardly wait to do my mosaic swatch.,. but unfortunately will have to wait until some ironing is done (yuck). I’ve knitted in my head also. It was cool to see how that elongated stitch was accomplished (the slipped stitches).
So my birthday is the 29th. Do you give birthday discounts? (joking)
Still can’t find out if my comment was published (or accepted).
Hi Judy :-)
Fear not, it’s been published :-) It’s here: https://www.knitfreedom.com//color-knitting/how-to-do-basic-mosaic-knitting-video-photo-tutorial#comment-65169
I *love” color work and am making a Mosaic prayer shawl, but would like to learn how to put a border on it as the edges are not really attractive. Looking forward to the new video.
I can’t believe I can knit with two colours! Thank you very much for this tutorial. As an adult with learning disabilities, your step by step photos and videos are invaulable to me.
I’m dreaming (grin) of a blanket in mosaic. Not sure about the colors yet, or (part) wool or acryl…
I have always appreciated that you show both American and Continental styles of knitting, Liat. In this video, however, when you switched to American, your comment was “against my better judgment.” This caught me off guard a bit because it sounded judgmental and snobbish. Yes, I know Continental goes faster, but can we please remember that people knit for the love of knitting, not to show we’re somehow superior to other knitters. Too sensitive? Perhaps. I’ve been a fan for a long time, Liat, but I think those kinds of comments are unnecessary.
Awww, I’m sorry Bonnie – my comment wasn’t meant as a judgement. It was a throw away comment, my (apparently poor!) attempt at humor. Sorry to have offended you.
Liat, You did an excellent job with your video showing this mosaic knitting with 2 colors. Your video and instructions are wonderful and I love watching you knit in the video. Wish you had a shop in my city that we could have you come teach. I love listening to you talk “knitting”. Thank you so much for taking the time to make the video and for the highlighted side bar as it is playing. That is first class instructions.
I don’t know how far it is from you so this might be a daft suggestion (forgive me, I’m British and my geography is terrible!) but Liat’s planning on doing book signings in California when her book comes out in February 2016.
Or, if February is too long to wait, I’d recommend signing up for the newsletter. You’ll get an email whenever Liat’s doing a live event or a meetup (something she loves to do when she’s traveling to a different city.)
Great beginning pattern to try out this new technique. I’ve been wanting to get into colorwork, but have been intimidated by it. As usual, Liat comes through with super easy to follow instructions that give me the confidence to try!
I finished a square of this pattern – and one thing I noticed is that on the sides I have a thicker cord-like edge that has rolled under the work. Obviously that carried yarn has to go somewhere – but could you show what the edge on the wrong-side is supposed to look like? I’m afraid I’ve tightened the edges too much, or had some other mistake to warp my work at the edge some…
Hi Sean,
Thank you for your sweet comment! You are going to be able to do colorwork no problem. I have faith in you. Besides, you need your Boba Fett hat!
Thinking about your swatch, yes, it sounds like something funny has happened. If you look at the step-by-step photos, the last photo shows what the edges should look like. Do mine look like yours?
If your swatch is rolling in from the side edges, you might be pulling the yarn too tight when you knit the first stitch after you’ve slipped a stitch. I have a troubleshooting section in Fantastic Mosaics that covers this exact issue, so let me know if that doesn’t help you!
Hello Liat .. So good to receive these instructions .. love the change in print colour as lines completed and your very clear advice. It is a wonderful way to learn, or just relax and enjoy your expertise, and I’d like you to know just how much it is appreciated. Thank you for your generosity and I wish you well.
Thank you so much Margaret!
I made the swatch – I am very excited to knit something with this technique. Any baby blankets??? It is so much fun!!!!
You make it look so easy. I always thought it was hard! Your instructions are just the best. Thank you so much.
<3
thank you I enjoyed your video!
Hi Liat , this is so easy to understand, great job, thank you and looking forward to more.
Cheers Dawn
Daneen,
There are actually 2 errors in Row 8. Just add a “slip 1” to the Row 8 instructions after the first Purl 2, then continue. When you get to the end of the row, it says to Purl 2, but there are 3 stitches left on the needle. Purl all 3.
I LOVE this idea! But I’m not a huge fan of the “out of place”-looking slipped stitch. Is your class going to talk about ways to make that one stitch maybe look a little less obvious? Maybe another way to do it that hides that long slipped stitch?
Hi Becky,
The elongated slipped stitch is actually part of the design – that’s what makes mosaic knitting what it is. Mosaic knitting is not only a color design, it has texture, too. The only way to make color designs without elongated stitches is to knit them in Fair-Isle or another stranded knitting technique.
In the class I don’t talk about how to make it less obvious, but at the same time, there are many mosaic patterns out there where the elongated stitch happens to be less obvious. The throw pillow pattern in the class, for example, is very subtle with the slipped stitches. You cannot hardly tell at all.
Thank you so much! Love this. I’m curious (may not be a beginner question here) – if I wanted to have, say, 5 or 7 or 9 blue rows between each yellow row, how far can I let the 2nd color yarn edge yarn hang out on the edge? In other words – How many rows can I leave the 2nd color “hanging out” before I need to knit it back in again? Thanks again, I so love your work! <3
Hi Maya,
Great question! You can actually knit for as many rows as you want before needing to knit with the other color. The trick is to twist the yarns around each other every 2 rows, and then continue knitting with the same color. This keeps the unused yarn strand nice and close to the edge of the piece.
In the pillow pattern in Fantastic Mosaics this is exactly what we do, so my video for that section demonstrates how to do this.
Wow so easy! I am defiantly going to try it on a beanie I’m making for myself:-)
I was wondering about the sides where you change colors of yarn.. Do you twist the colors and keep on knitting and if so, how do you finish the piece?
Hi May,
You don’t need to twist the colors on this swatch because you only knit for two rows with each color. As you pick up the new color and knit, the edges are formed. If you look at the picture of the finished swatch at the end of the photo tutorial, you will see that the edges look quite nice without any extra work.
If you want to keep knitting the swatch, just repeat rows 1-8 until it is as long as you like. End after having done a row 2 or a row 6, and bind off.
You are brilliant, wonderful and a terrific teacher – thank you many times over.
Totally different topic question: You use Signature needles – are they the Stilettos or the other ones and why have you chosen them over other brands?
Thank you again for all your wonderful instructions and inspirations!
Hi Linda,
Thank you!! I’m so happy you like my teaching! :D
About the Signature needles, yes, they’re the Stiletto tips.
I really love knitting with Signature needles because it is just effortless. The stitches slide without feeling slippery, the tips are pointy without being sharp, and the needles feel substantial without feeling heavy. They are just perfect! I’ve gathered a collection over the years by getting a pair on my birthday and a pair at Christmas.
As always, Liat, your instructions give me confidence that I can try any new technique. Thank you for all you do. Like Jeanie, I had a hiccup on row 8 but after doing what you’ve instructed before (read your knitting), was able to see the missing slip 1 in the written instruction. Really like the photos and even more so the video. I’m such a visual person. Excited about the upcoming Fantastic Mosaics. Best regards!
Thanks Joann! Liat will be correcting the typo on line 8 later today. So glad you enjoyed it! :-)
I’m having same problem as Jeanie…
Thank you Deneen :-) It’s a typo correction coming today :-)
Liat you make the best knitting videos ever! You always use contrasting yarn and needles and knit your stitches with such clarity. This video is another example of your expertise in knitting and tutoring. Thanks for all you do.
I’m new to mosaic knitting and I was fine until I got to Row 8 in the written instructions. If I P2, *P5, Sl1…* I lose the slipped stitch from the previous row. I tinked back several rows 3 times until I finally figured out there is a Sl1 missing after the first P2 and before the * * in row 8. Now I see the slipped stitch! Lovely!
Yep, there’s a typo on line 8. I’ll get that fixed – thank you for spotting it! :)
Thanks! I am always excited to learn new techniques. I was able to follow your written instructions, but the video was great, I like videos better cause I can actually see the hand movements. Photos leave me confused sometimes!
Looking forward to the class.
You are the absolute best! I cannot say it enough. I am so excited for something new and the swatch was so much fun, I can only imagine what the course is going to be like. Fabulous like all you other courses I am sure! Thank you, Liat, for all you do.
Awwww, Jodi, on Liat’s behalf, thank you so much :-) She will be so thrilled to read this!
Not being a particularly adventurous knitter, I’ve never considered attempting mosaic knitting. I just assumed it was hard! You just proved that with a good teacher, and a good video tutorial, most any kind of knitting is doable. I didn’t knit the swatch, but I did watch the video all the way through (knitting in my head), and can’t believe how simple the process is. Again, thank you so much for sharing your time and experience. :-)
So glad you got past your fears and persuaded yourself to give it a try, if only “knitting in your head” right now (love that phrase!)
Oops, I should have proof read my comment. Next to last line should have read “imagine so many possibilities. Thank you for bringing mosaic knitting to light and your instructions are slways so clear.” I can’t imagine where that whole thought went to and I’m happy that I can knit better than I can use the computer.
I love introducing new techniques and possibilities so thank you for taking the time to give it a try Joan :)
Excellent! The idea of having the written instructions alongside the working video was perfect for me. When I first read of your newest idea, you must realize that it would lead me, and others, to looking up mosaic knitting online. I am totally entralled with the simplicity of the basic swatch and can imosaic knitting to light and your instructions that are always so clear.
Thank you Liat
That is the eseyest way to knit colors and to use stash you explain it very good as you alwals do
Love your tutorials, they are so detailed & love the fact that they are both continental & English style knitting demos! I have given your website info to all my buds in knitting clubs I am in. They have learned to do socks (toe up) & are as addicted to it as I am. Also, we do lots of knitting for charities in our area & these tips & trips save us from having to pay for lessons in town (very small population & supplies & lessons are costly for most of us retirees). Keep up the fantastic job you are doing. I feel like you are sitting beside me showing me the way to do things I would never have tried before.
You knit for charity? That’s wonderful! So happy to hear that my tutorials are being put to such great use! :)
Hi!
Thanks for the video. It was great. I always prefer videos to fotos. I’ll give it a try to this technique tonight! :)
How did you get on Eugenia? Would you share a photo on the Facebook page? I’d love to see!
Love working the mosaic pattern. Also really like the step-by-step photos since I’m on satellite and can’t watch a lot of videos on-line. Sometimes the photos are all I need – just to see how the needles and yarn are supposed to be positioned.
Great job as usual!! Waiting for Saturday!
So glad it hear it Vicki! :-)
Love it, thank you!!!
I dearly love your tutorials in video. You are an excellent teacher for those of us who are visual learners and sometimes slow on the uptake. Thank you so much for all your hard work so that we can learn new things besides dish rags and shawls. Because of your videos I have managed to knit a pair of socks (toe up) and I dearly love to knit them now. I have lost a lot of my sight due to diabetes but with light colored yarn and a little heavier yarn I have managed to knit house socks for my husband and sister. Once again thank you soooo much. S. Mitchell
Hi Sandra,
Thank you so much for your kind words! I love that you learned to knit toe-up socks – isn’t it the best to know how to do that? It’s so inspiring to know that you were able to knit socks even though you cannot see well – that is amazing! Thank you for writing and telling me.
Big hugs!
Liat
This was fun to do and I was lucky enough to have yarn in the same colors as what was shown in the lesson. I’m thinking of a cowl or blanket with this type of knitting. Oh….I’m losing my mind of the possibilities with it. Fun, fun, fun!
Hehe! Did I send you down the rabbit hole Mary? :-) I can’t wait to see what you create!
Great pattern…
Wonderful instructions given in such a clear manner. You are an excellent teacher!!
Since this is stockinette will the edges roll for a longer piece?
Hi Deb,
The edges will roll if you do a longer swatch. Here’s a trick though – you can do the whole thing in Garter stitch OR Stockinette stitch! Just knit the WS rows instead of purling them.
the video was not available to me.
Now I am able to see the video.
Superb! Thank you for letting us know :)
As always Liat your instructions are first rate and easy to understand . Your projects are great for confidence building and moving up that latter for knitting success! Thank you for all u do. I’m enjoying it, in between sock knitting:-)
I’m so happy to hear this Janie – thank you!
thank-YOU!! just perfect.. excellent timing.. my current project Loves YOU!!
(me too!)
Awwww, so glad the timing was great for you Susan! <3
Fantastic! This is so fun I couldn’t stop knitting! I can’t wait for the video class! The video is, as always, perfect. Didn’t use/need the step by steps, I much prefer the video, but they look good! I know this tutorial was a little teaser for us, but I didn’t see anything about how to continue on if you want to do more than the nine rows rather than binding off. I figured it out, but beginners may not know to repeat rows 1-8 if they want to make a larger swatch. It might be good to include that in the instructions. I can see this swatch turning into a scarf! Thanks for all you do for us Liat!
Hi Peggy,
I’m so glad you liked the swatch! I think you’re really going to like the pattern for the pillow, then.
Good tip about adding how to continue the swatch. I’ll go into the class and update that when I have a minute. Thanks!