Most written instructions for Kitchener Stitch are too complex to follow. No more avoiding sock projects because you don’t like Kitchener stitch! This tutorial will help you achieve a perfectly smooth bind-off on your sock toes and feel proud you’ve got the hang of a really hard technique.

Most written instructions for Kitchener Stitch are too complex to follow. Watch this easy video on Kitchener stitch to correctly bind off your top-down socks with confidence.
If You’ve Had Trouble with Kitchener Stitch, You’re Not The Only One

Take Heart! Many Knitters Have Found Success Using Our Step-by-Step Tutorial

Pumped and ready to try it? Watch the animation below to see the basic movements.
How to Do Kitchener Stitch: A Quick Overview
This animation shows a general idea of what you’ll be doing. After just a few moments watching you’ll see that the movements are repeated and not impossible. Scroll down to learn the full technique.

As you can see, we’re taking stitches off the needle one by one and weaving the yarn in and around the stitches in a special way. To practice on your own knitting, you’ll need a few supplies:
Supplies Needed for Kitchener Stitch
All you need is a tapestry needle (either blunt or curved; I prefer blunt) for this task, and some scissors to cut the tail yarn to length.
Examples of “Ready to Start Kitchener Stitch”


Start Learning In 3 Easy Steps
- Cut the tail of your yarn to three times the width of your stitches PLUS 6 inches more for weaving in (I’ll show you what this looks like in the video below).
- Thread the yarn tail onto a tapestry needle.
- Watch the video below. Weave the tail through your stitches according to the step-by-step instructions.
Video: How to Do Kitchener Stitch Step-by-Step Without Fear


How to Do Kitchener Stitch Without Fear - KnitFreedom.com
This video can help you have a positive attitude about Kitchener stitch and show you just how easy it is to seam up your knitting. Watch it and add this important skill to your knitting toolbox today!
Print Out a Handy Cheat Sheet Diagram
You don’t have to look up a video online every time you bind off your socks. Print out this handy diagram and keep it with your patterns to have a quick reminder of how to do the steps.


Follow Along with Step-by-Step Photos
Click here to download the complete step-by-step image tutorial.
To create Kitchener stitch step-by-step, follow these photo instructions. They will show you clearly what each step is supposed to look like and how to do it.

Tips for Success
If you have trouble with your tension (i.e. stitches seem too tight or too loose) or you get lost in the instructions and can’t remember where you are, the following tips will help you.
1. Always keep the yarn below the needle tips.


2. Watch your tension.


Tip #3: Bring the needles close together every time you pull the yarn through.
This will to help you get the tension right.


4. If you get lost and don’t remember where you are in the sequence, look at your working yarn.

Top Questions About Kitchener Stitch, Answered
Now that you know the basics of Kitchener stitch, here are the answers to some common questions:
1. How much tail do I need for Kitchener stitch?
Measure out three times the width of the stitches to be bound off, plus add 6 inches for weaving in.

2. How do you set up for Kitchener stitch?
- Go purlwise into first stitch on front needle. Pull yarn through.
- Go knitwise into first stitch on back needle. Pull yarn through.
3. How do you do Kitchener stitch?
After you do the setup above, repeat the following steps:
- Go knitwise into first stitch on front needle. Take the stitch off.
- Go purlwise into first stitch on front needle. Pull yarn through.
- Go purlwise into first stitch on back needle. Take the stitch off.
- Go knitwise into first stitch on back needle. Pull yarn through.
To finish, work step 1 and then 3.
4. How do you remember Kitchener stitch?
Repeat the following steps: (front needle) Knit off, purl; (back needle) Purl off, knit.
5. What do “knitwise” and “purlwise” mean?
 “Knitwise:” With the needle going into the stitch from front to back, as if to knit.
 “Purlwise:” With the needle going into the stitch from back to front, as if to purl.
6. How can I improve my tension on Kitchener stitch?
It is easy to do Kitchener stitch and have the seam come out too loose or too tight. Follow these tension tips so that your Kitchener stitch bind-off is invisible, stretchy, and blends in perfectly with the surrounding stitches.

How to Have Great Tension on Kitchener Stitch - KnitFreedom.com
To improve your tension on Kitchener stitch, try the following tips:
- Pull your yarn carefully when pulling it through the stitches. Do not pull hard. Pull until the yarn is just snug.
- Stop and give the finished section of the bind-off a little tug as you go, so that you can see if it’s too tight or too loose.
- Bring the needles close to each other every time you pull the yarn through. If you keep them far apart, it will make it difficult to get the tension right.
- The row of stitches you’re creating should match the tension of the surrounding stitches.
7. What do I do if my bind-off is too tight or too loose?
- If your Kitchener stitch is too loose, use your tapestry needle to pick through the stitches one by one and pull the extra yarn down the seam to tighten it up (I show this in the video above).
- If your Kitchener stitch is too tight, the best thing is to undo it and start over (see below).
8. How do you undo Kitchener stitch?
Undoing Kitchener stitch can be time-consuming and frustrating. This video shows two techniques for undoing Kitchener stitch so that if your bind-off isn’t perfect, you take it out without stress.

How to Undo Kitchener Stitch - KnitFreedom.com
To undo Kitchener stitch, take the tapestry needle and follow the path of yarn back through the stitches the way you came, putting each stitch back on the needle, with the needle going in from front to back through the stitch, as you go. Do this very carefully. This will take some time but it will be worth the effort to get a bind-off you are proud of.
9. Does it matter what yarn I use for Kitchener stitch?
If you are using a delicate yarn, that is, any single-ply yarn that breaks if you give it a sharp tug with your hards, be careful when doing Kitchener stitch. When pulling the yarn through the stitches, do not pull too fast or too tight, because the yarn could break. Just go slowly and carefully.
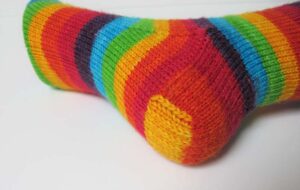
10. What does Kitchener stitch look like when complete?
Kitchener stitch looks like a plain row of knitting (Stockinette stitch). It should seamlessly blend in with the stitches on either end. There should be no pronounced ridge or corners, just a smooth transition from one piece of knitting to the other.


11. What is the matching cast-on for Kitchener Stitch?
")
To match your cast-on to your Kitchener stitch, use Judy’s Magic Cast-On.
12. What are other uses of Kitchener stitch?
Besides seaming the toes of socks, Kitchener is great for closing up an afterthought heel.
An afterthought heel is made by placing the heel stitches on scrap yarn and knitting the sock as a straight tube. You then place the heel stitches on needles, knit the heel, and seam up the stitches using Kitchener stitch.
Kitchener Stitch for Garter Stitch and Ribbing

Kitchener stitch isn’t just for Stockinette stitch fabrics. You can graft seams together on garter stitch and even ribbed fabrics using Kitchener.
Kitchener Stitch for Garter Stitch
 A video of how to do Kitchener Stitch on Garter Stitch is available as part of KnitFreedom’s I Love Bind-Offs Video Knitting Library.
Instructions:
-
- Cut yarn, leaving 3x the width of the sts to be bound off, + 6 in. for weaving in later. Make sure you can see purl bumps facing you on both front and back needles.
- Thread yarn onto a tapestry needle.
- With tapestry needle, go purlwise into 1st st on front needle. Pull yarn through.
- Go purlwise into 1st st on back needle. Pull yarn through.
__ Repeat:
-
- Go knitwise into 1st st on front needle. Take st off needle.
- Go purlwise into next st on front needle. Pull yarn through.
- Go knitwise into 1st st on back needle. Take st off needle.
- Go purlwise into next st on back needle. Pull yarn through.
__
- Repeat steps 5-8 to last 2 sts.
- Go knitwise into 1st st on front needle. St comes off. Pull yarn through.
- Go knitwise into 1st st on back needle. St comes off. Pull yarn through.
Kitchener Stitch for 1×1 Rib
Kitchener stitch on 1×1 rib will end up with a jog in the stitches unless you prepare your provisional cast-on exactly right. This videos shows each step to setting up and doing Kitchener stitch correctly on 1×1 rib without any headaches.

Kitchener Stitch on 1x1 Rib with Provisional Cast-On for 1x1 Rib
These instructions show how to seamlessly join 1×1 rib top-to-bottom, that is, when you join provisional cast-on stitches to the edge to be bound off.
Cast on your ribbing using a provisional cast-on. Make sure to knit the first row of stitches before starting your ribbing, or else you won’t be able to get the waste yarn out later.
When you are ready to bind off, pull our the waste yarn of your provisional cast-on. Feed the knitting needle through the loops the provisional cast-on has saved, making sure to get the half-loop on either side.
You should have one more loop on the provisional cast-on needle than you do on your working needle.
There are no setup stitches for Kitchener stitch on 1×1 rib. Work the following sequence according to what kind of stitch you are binding off on the front needle.
For a technical explanation of how this works (and how to graft 1×1 ribbing top-to-top) I recommend Joni Coniglio’s excellent Interweave article Grafting Knitting, Myth 2: Grafted Ribbing Will Always Have a Half-Stitch Jog.
For a knit stitch:
Front needle: Feed tapestry needle through purlwise. Do not remove stitch.
Back needle: Feed tapestry needle through purlwise. Remove stitch.
Back needle: Feed tapestry needle through knitwise. Do not remove stitch.
Front needle: Feed tapestry needle through knitwise. Remove stitch.
For a purl stitch:
Front needle: Feed tapestry needle through knitwise. Do not remove stitch.
Back needle: Feed tapestry needle through knitwise. Remove stitch.
Back needle: Feed tapestry needle through purlwise. Do not remove stitch.
Front needle: Feed tapestry needle through purlwise. Remove stitch.
Kitchener Stitch in the Round
Kitchener stitch in the round can be fiddly, especially if you are using Magic Loop. This video shows you how to overcome all the tricky bits so you get a perfectly seamless continuous tube every time.

How to Do Kitchener Stitch in the Round - KnitFreedom.com
If you need to close up two ends of a tube seamlessly, prepare your knitting by putting both ends on their own circular needle.
- Cut the tail to leave 4x the circumference of the tube to be seamed. Put the tail yarn on a tapestry needle.
- Make sure all needle tips face to the right.
- Bring the last stitches of the back needle of the back tube up to the back of the first stitches of the front tube.
- Insert a locking stitch marker into the last stitch on the back needle and another one into the first stitch on the front needle. We will return to these stitches when finishing the last stitches of the bind-off.
- Work Kitchener stitch as normal across these two circular needles.
- When you finish the last stitches, use the marked stitches as the very last stitches in the round. This will close any gap.
To see this technique performed on an actual Fair-Isle project, I recommend Knit Purl Hunter’s excellent video on Kitchener stitch in the round.
Kitchener Stitch Without a Tapestry Needle
 You might not have a tapestry needle handy when you get to the bind-off on your top-down socks. This video shows you how to do Kitchener stitch using a spare knitting needle instead of a tapestry needle so you can wear your top-down socks without waiting another minute!

How to Do Kitchener Stitch Without a Tapestry Needle - KnitFreedom.com
How to understand this bind-off without having to learn a completely “new” technique:
- To feed the yarn through the stitch knitwise, purl. Pull the yarn through.
- To feed the yarn through the stitch purlwise, knit. Pull the yarn through.
Watch the video to see what I mean.
To prepare:
– Cut the yarn tail as for normal Kitchener stitch (3x the width of stitches to be bound off, plus 6 inches for weaving in).
– Tension the yarn tail in your fingers as for knitting (American or Continental style).
Setup: Work steps 2 and 4 below once.
Repeat:
- Front needle: Purl the first stitch and pull the yarn through. Take the stitch off.
- Front needle: Knit the first stitch and pull the yarn through. Leave the stitch on.
- Back needle: Knit the first stitch and pull the yarn through. Take the stitch off.
- Back needle: Purl the first stitch and pull the yarn through. Leave the stitch on.
To finish: When you have 1 stitch left on each needle, work steps 1 and 3 above once.
Thank you to Knitting I Love whose video on how to do Kitchener without a tapestry needle provided the inspiration for this tutorial.
Using Kitchener Stitch as an Invisible Bind-Off for 2×2 Rib (the Kitchener Double-Rib Bind-Off)

One of the most amazing uses I’ve found for Kitchener stitch is as part of an invisible bind-off for 2×2 rib. This can be used on the top of toe-up socks or anywhere you want a stretchy, invisible edge on your 2×2 rib.
A video of how to do this amazing invisible 2×2 rib bind-off is available as part of KnitFreedom’s I Love Bind-Offs.
I originally learned this technique from Cap Sease’s great book Cast On, Bind Off, and I highly recommend that book.
Free Patterns for Practice
You can practice Kitchener stitch by knitting these seamless square coasters using leftover fingering or DK-weight yarn. The coasters shown here were made with Sea Silk by Hand Maiden.
This pattern also lets you practice important intermediate knitting techniques like Judy’s Magic Cast-On and knitting in the round.
Kitchener Pattern: Seamless Square Coffee Coasters


Materials:
Needles: 1 circular needle, 40-47 inches long, US size 4.
Yarn: 40 yards fingering or DK-weight yarn.
Makes four 3-inch x 3-inch coasters.
Instructions:
- CO 28 using Judy’s Magic Cast-On.
- Knit in the round on Magic Loop for 34 rounds. (Tip: How to count rows in knitting)
- BO using Kitchener stitch.
Weave in ends inside coaster. Block and enjoy!
Sock Patterns for Practicing Kitchener Stitch
Kitchener stitch is perfect (and was made famous for) binding off the toes on top-down socks. Here you can download free KnitFreedom patterns for top-down socks in different weights of yarn.


Conclusion
I hope you have enjoyed this guide and that it has helped you overcome any fear of Kitchener stitch.
Just so you know, if you feel at all frustrated or overwhelmed, I know how it feels to look at instructions for a new technique and decide you’d rather throw your knitting away than try to figure them out.
I’ve coached thousands of knitters to success with Kitchener stitch and I know you can do it, too.
Here is my promise to you:
- You don’t have to get it right away
- Just give it your best shot so you have something to judge against
- I’m here to help you if you need, just email me.
Remember, learning Kitchener stitch really is as simple as 1, 2, 3:
- Grab a tapestry needle
- Measure and cut your tail yarn
- Follow the photos or video sequence above to seam your knitting.
Leave a Comment
Did this tutorial enlighten or inspire you? Did you go from doubting yourself to feeling proud of what you can do? Let me know in the comments!


14 thoughts on “The Complete Video Guide to Seaming Your Knitting With Kitchener Stitch”
You show some creative ways of using the Kitchener Stitch. Have you ever tried the Finchley Graft? It might not be a good substitute for all applications, but in general I find it much easier to use than Kitchener.
Will never avoid doing this again………… HATS OFF TO YOU AGAIN AND AGAIN FOR MAKING KNITTING SOOOOOOOOOOOOOOOO EASY and a wonderful craft a gift…. a way to relax.
Love the way you are communicating with us this way too.
YOU ARE SUCH A SPECIAL PERSON…… A FRIEND TO US ALL !
Love you, Louise
Yaaay! I’m so glad this gave you the motivation to never avoid Kitchener stitch. Thank you so much for supporting me. I’m glad you like the new extra-thorough blog posts!! I’m enjoying writing them and sharing them with you. You are such a positive force, I’m grateful for you Louise.
Liat
Fabulous Kitchener directions. Gives me hope I can finally do it!
Hi Ellisen, thanks so much for checking out the guide! You can ABSOLUTELY do it. And I’m here if you need any help!
Cheers,
Liat
I do toe up socks so I had never heard of Kitchener stitch. Then I had a price to on a pattern Nana Cowl. After knitting the cowl flat I had to join the ends. I went to the local yarn shop (Bayou Yarn Shoppe) and paid a for a lesson. We taught each other and I brought it home to do the seam. Challenging but I got through it. I love your videos so I will view to lock it in.
Hi Steven, great to meet you! Thanks for commenting (and posting a photo!!). I love that your first time with Kitchener was on a long seam like this! Talk about trial by fire! Now you can come back to this post to refresh your knowledge if you ever decide to do it again. Cheers!
Love the video tutorial! I’ve used it also on an infinity scarf. This will become my Sean of choice! Thank you! So clear to me now!!
Thank you so much!!
Excellent video! Is there how to use Kitchener stitch to graft applied i-cord binding on live stitches? Kathy
Hi Kathy, what a great question! For Kitchener stitch, you need two edges with live stitches. You could pick up and knit into the edge of the i-cord binding, and then Kitchener together, but I would just create the i-cord binding at the same time as the bind-off, and skip the Kitchener step.
This is called the I-Cord Bind-Off, and it’s fabulous. You can preview it here: I Cord Bind-Off. It’s part of our “I Love Bind-Offs” video knitting library.
I hope this helps!
Hi again Kathy,
Just wanted to let you know I found this Interweave article by grafting master Joni Coniglio that might help you out: https://www.interweave.com/article/knitting/grafting-icord-edges/
Best instructor online, clear instruction, GIF is great, and the written instructions are helpful. I’ve never tried the Kitchener, but I just might.
Hi Pam, thank you so much for checking out our guide! I so appreciate your feedback. When you are ready to try Kitchener stitch, you know where to come!