 Think details don’t matter?
Consider the difference between a breakfast muffin and a four-dollar cupcake.
Or between the morning coffee you fix for yourself and the after-dinner coffee service you prepare for guests.
Between the epsom-salt bath you take for your tired feet and the petal-strewn, candle-lit bath you prepared for that second date.
Finishing touches are special, because they require extra effort.
They take love and intention and often they require skill – and all three are clearly visible in the end product.
Haven’t you found that this is true in knitting? Don’t you treasure the projects you’ve made with care?
One of the special details I included in the mitten pattern I published last week comes right at the beginning: the Italian Cast-On.
A Finishing Touch That You Can Do At The Beginning
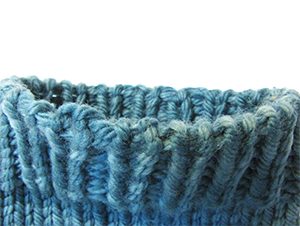 Just like the Invisible Ribbed Bind-Off, the Italian cast-on makes a stretchy invisible edge that blends perfectly into 1×1 ribbing.
See how the cast-on edge seems to be hemmed, or rounded off? – – ->
The trick is the stitches that are used in the cast-on.
The Secret: Alternate Knits and Purls To Make A Ribbed Edge
With a normal long-tail cast-on, the stitches that go on the needle are knit stitches, with a chain of stitches around the bottom to hold them together.
With the Italian cast-on, you actually cast on a knit stitch and then a purl stitch (I’ll show you how), thereby avoiding any line or separation when you start ribbing.
Line Break
The trouble is, even though the Italian cast-on makes a perfect edge for ribbing, it’s not very sturdy on its own. It’s just one strand of yarn, like the backwards-loop cast-on.
So in order to make a gorgeous edge, the Italian cast-on needs reinforcement.
To Protect The Cast-On Edge, Add Tubular Set-Up Rows
What??
I know, right – “Tubular set-up rows?”
For whatever reason, that’s what they’re called, and they are the perfect partner for the Italian cast-on. They add sturdiness and strength to the edge by creating a reinforcement of alternately slipped and knitted stitches.
Know how when you slip a stitch, the working yarn makes a little ladder across the back of the stitch?
On projects like Fair-Isle sweaters, the unused colors “float” across the back of the work, adding strength and warmth.
When we use that same technique on the Italian cast-on, the little floats pull the knitting together while the slipped stitches reinforce the columns of the ribbing and make the knit stitches stand out.
Use This Cast-On For Projects With Worsted to Bulky Yarn
When should you take the trouble to do a stretchy, invisible cast-on like the Italian cast-on?
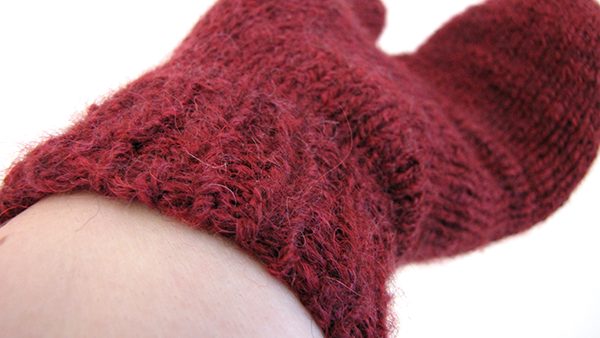 Anytime you have a project that starts with highly-visible ribbing, you can add a nice edge using the Italian cast-on.
I especially recommend it for projects using bulky yarn, like my bulky-weight mitten pattern.
The reason for that is, the thicker the yarn, the more visible the cast-on edge.
You can see how it looks above on my Basic Worsted-Weight Mittens.
Tip: Brioche projects are a great opportunity to use the Italian cast-on.
Brioche knitting is just ribbing at heart, only stretchier, so you do need to use a special cast-on like this one to make sure that the edge doesn’t look funny.
In the video below, I use a bulky-weight yarn to demonstrate the technique. You can see what the edge is supposed to look like and how nice it looks, especially on thicker yarns.
Video: How To Do The Italian Cast-On And Tubular Set-Up
Written directions are below the video.
Italian Tubular Cast-On
Italian Cast-On Written Instructions:
- Measure out a long tail of yarn for your cast-on.
- Place the yarn over your needle as you would normally do with a slipknot. No slipknot needed.
- Position your yarn in slingshot position.
- To cast on a knit stitch: Bring the needle towards you, under the far loop of yarn on your thumb, over the loop of yarn on your forefinger, back under the far loop of yarn on your thumb, and tighten the stitch up on the needle.
- To cast on a purl stitch: Bring the needle away from you, over the loop of yarn on your forefinger, down and under both the yarn on your forefinger and the far loop of yarn on your thumb, up and over the far loop of yarn on your thumb, and away from you again and under the loop of yarn on your forefinger. Bring the needle up and tighten the stitch to your needle.
- Repeat steps 4-5 until you have the number of stitches you need for your cast-on. When you knit to the first loop you have placed on the needle, knit it together with the last stitch.
Tubular Set-Up Written Instructions:
- Cast on an even number of stitches using the Italian cast-on. Turn work.
- Row 1: K1, sl 1 wyif, move yarn to back. Repeat across row. P last 2 sts together. Turn.
- Row 2: K1, sl 1 wyif, move yarn to back. Repeat across row. P last st.
Abbreviations:
sl 1 wyif – slip 1 with yarn in front
Are you going to try this technique out? Leave a comment and let me know what you think!
Acknowledgments:
1) I learned this technique from Nancy Marchant’s fabulous book, Brioche Knitting.
2) I have no idea where the name “Italian cast-on” came from, but it sure sounds fancy!
Resources:
- Try this on the new Worsted-Weight Mitten pattern
- Learn the matching invisible ribbed bind-off: the Italian Bind-Off
- Use this technique on a brioche project: Beginner and Intermediate Brioche Knitting

In other news, I am now in Buenos Aires, Argentina! It’s the middle of winter here, and wow, even though I expected it, what a change from California!
I’ve started to explore my neighborhood, usually while rocking my chunky cabled legwarmers, the Aspen Ice hat, and some cashmere fingerless mitts.
First impressions of Buenos Aires: not sunny enough! I guess I’ve never lived in a city with tall buildings before – I see the sun on buildings outside my window, but when I go outside, it’s nowhere to be found.
Thankfully, if I get too cold, there’s always my daily driver:
The class is totally in Spanish, of course, and to me it sounds very beautiful.
The food: I found out right away that you don’t go to the grocery store if you want fresh produce. You go to the fruit-and-vegetable stand, and there are lots of them, and they’re open late.
They stack up the food in pyramids, and if they don’t have change for you, they just tell you they’ll give you another banana and call it even.
Speaking of food, we had a peanut butter tasting, with little spoons and everything.
Dani loved it right away: “Mmmm… qué rico.” Gi wasn’t so sure: “I guess it’s an acquired taste?” and their little one, Vera, refused to try it at all! Well, I suppose that’s how I feel about some of the food down here too…
Up next week, another long-awaited free pattern: Toe-Up Socks with a Heel Flap. See you then!
For another slick way to cast on for a ribbed project, check out Edge Treatments: How to Knit a Picot Hem.
Leave a comment below – I love to hear your thoughts.







94 thoughts on “A Perfect Detail: The Italian Cast-On”
Thank you for this video and accompanying text with clear, concise directions! I made two practice short cast-ons and am ready to apply it to a pair of fingerless mitts.
Hooray! Thanks for your comment, Kathleen, I’m so excited this has helped you!!
All other videos and drawings suck. Yours is the only good one. It’s not even good, it’s great. It explains what no one else can, about the Italian cast on’s length and flexibility and delicate wraps which need reinforcement, how and why. Also, you have no mistakes or lack of clarity and no incomplete steps. Thanks, Liat!
Thank you so much, Iceland! I haven’t read this post in a while and you’re right – it IS good! I’ll do my best to keep giving good explanations like this one.
Thanks again for your comment :)
Thank you SO much for the helpful post! I just tried your way of doing the italian cast on in the round and it made a HUGE difference, much more manageable. I would recommend uploading your video to YouTube as well so people can find it there. I had tried searching on there a ba-zillion times for “italian cast on in the round” and couldn’t find anything as good as what you have here.
Very clear and helpful video. Too bad I didn’t find it BEFORE I cast on my mittens. Just finishing the first one and going to try it for the mate. Just wondering if this will work for a K2P2 rib as well? I would kind of like the mitts to match. Thanks, J
OH THANK YOU! I consider myself an advanced knitter, but I can’t begin to tell you how many youtube video’s I have sat though trying to learn this. You were able to show me in just a few minutes..Thank you AGAIN!. Now, off I go to undo these and add more tail..I short-sheeted my cast-on row.
Just stumbled on your website – it’s wonderful, thank you so much for all the ideas.
Just a question about numbers of rows. As you’ve added two slip stitch rows after the cast on, should I reduce the number of conventional rib rows? My pattern calls for 7 rows of rib and I’m considering just doing 6.
Hi there!
No, there’s no need to reduce the number of rows. The set-up rows of this cast-on don’t really add to the height of the project – they just create the rounded cast-on edge. I would stick with the normal number of rows first and see how that looks. :)
sob…sob..sob..Tears of joy..after watching your video…Perfect…After three days of searching for a ‘simple’ tubular cast on in the round…feeling like a fool wondering in the dark…I found my guide. I felt like you were in my head answering all my questions before I could voice them. You made it soooo simple and so relevant. You are my knitting savior.
Obrigada
Hooray! Well, I’m not happy I made you cry, but I am so happy you found my video. I am always here for you – you won’t be in the dark any more! Hugs :)
Hi Liat,
You’re the best :)
I just turned 60 – but stillmaking plans for as when I grow up LOL- and I have to admit that you’re the one who got me hooked to knitting again.
not that I’m a daily knitter – it still comes by flares.
My middle name is impatience, so thin needles are not my friends, although I love the looks of fine knitting.
Thanks to your continental knitting instruction, magic loop trick, the easy heels in sock knitting, knitting has become fun i.s.o. only one way to create a product.
(In school I learned to knit on rusty needles with sturdy cotton when I was about 6 years old; my mother was more into crotcheting (faster) but still I educated myself by practising every stitch in the crafts book we had at home. But I did not enjoy the battle with dpn’s – no socks for me!)
I owe you!
Care for some artisan soap perhaps? One of my oter passions :D
keep up the good work!
Regarding the Italian cast on: Japan wouldn’t be so strange as the originator of this method: both countries are known for their delicacy when it comes to handwork.
Often things go by names they don’t earn, like a “Dutch” treat, or talking Double Dutch – guess there’s no more doubt about my origin. ;)
Hi Liat, just followed thru from my email to your tutorial. You make it so easy and believe me I haven’t said that to many of my teachers in 60 yrs. Thank you once again for sharing. I always look forward to emails so keep them coming.
Yours sincerely, Linda
I’m going to try the Italian cast on for my top down socks, fingering weight. Now when casting on for two….I’m assuming I’ll cast on Italian style first half of first sock…then second sock completing the “two rows” then while still working back and forth…move on to the first sock to finish the “two rows.”? I think….I see what happens I guess…the worst that can happen is it doesn’t work.
Hi Liat!
Love your blog, your tips, love everything!
The new format is great!
Bacio per te cara!
Liat,
You are, without a doubt the MOST superlative knitting instructor on the web or anywhere else. I have only been knitting a couple years and was totally self taught until i found you here. You have taught me so many wonderfully fun things, like toe-up socks two at a time.
Today you have repeated yourself, in more ways than you might realize. Not only did i learn this awesome cast on, i also learned that for all my knitting experience, i have been tensioning the yarn for casting on backwards. LOL go figure. i always wondered why i got extra little loopy things in my long tail cast on. NOW i know.
i am going to run and go start a chemo cap for a charity that i knit for. I think this cast on will be great as it is stretchy and soft.
Thanks again for all your hard work to teach us so well.
Maureen
Maureen, thank you! You make my heart so happy! And how wonderful that you learned something extra while watching the video that is going to help you in all your projects – not just projects where you use this cast-on. Please post a photo of your chemo cap on the KNITFreedom Facebook page when you are done!
Liat, this is a wonderful video. My mother has sensitive swolen ankles and I will practice and use this to make her socks that don’t squeeze her ankles. Your instructions are always so well instituted and making learning fun and easy.
Hi Liat, I really like the Italian cast on and will try it – it looks as if it makes a nice start for ribbing but I may find other uses for it too. I like all the information you send out in whatever form – keep it coming and thank you so much for the sharing!
Love this web site. Keep up the good work. Very thoughtful and enjoy spending time on it. E-mails are fine with me.
I look forward to the daily email from you. Your videos are a real help for me. I have mastered the magic loop and am looking to find a pattern for childrens mittens using it. I do most of my knitting for charity..The cap and mitten sets for little ones are so cute and it is so much fun…..
thank you. Your reviews help me learn a lot about knitting. I had 18 hours of brain surgery and had to relearn a lot. Knitting has been a great eye hand coordenation aid for me. I had never heard of magic loop before seeing your workup on it. I had knit one pair of socks on the knitter’s star of death before that. Never again. Now I am enjoying making a pair for my sister. She is 5’11 1/2 ” tall, guess what size her sock is. I’m 6’2″
and mine is just a little larger than hers. Once again, Liat, Thank You
Tom
Tom, I’m so glad my videos could help you regain your knitting knowledge and show you some new things, too – like how to never use DPNs again! I hope you continue to enjoy the new techniques as I post them.
Hi, I love the e-mails and all the info you give. I don’t always get to them right away but when I do I enjoys going over everything. The new format is great! Thank you! Look forward to the next one.
I love receiving it this way…………….. Everything in one click :)
It’s like a visit to a favorite knitting shop… with all of us sitting around sharing… and laughing :)
How did I ever get along without you before Liat…. HOW?
You know what… No matter the format, I am eager to receive all mail from you. Like I said, it’s really like being in a knitting shop… with all those wonder selections of yarns surrounding me… along with all those other goodies… buttons, patterns, people…. colors. Yes… this way does help to color my world.
Hope this will be enjoyed by all.
Love seeing you Safta playing pingpong…… I had to share that with a few friends.
Love learning that word… “Safta”… and sharing it with my friends who miss their Safta a lot.
I do share your blogs…. video clip… and already some of my friends are part of our world…. the world you created for us all. THANKS
Ciao…. Louise
Yay!! Louise, I am SO happy that being on my site and getting the emails feels like a knitting shop to you. Yessss! I also know that wonderful, inspiring, colorful experience that you are describing, and I’m so flattered that you get that feeling from our little community at KNITFreedom, and that you tell your friends about it too. Thank you and hugs!
Here’s my 2¢! I love this method of receiving info from you. Very grateful for the instructions on the Italian Cast-On! Hope you have a great time in Buenos Aires!
Hi Liat. Thanks for the new technique. I definately like to receive the emails. I read my emails everyday and sometime I forget to check the blogs for week.
PS. Love Buenos Aires. Had my honeymoon there. Eventhough is winter trying dulce de leche ice cream at Frido is a must. Villa Angustura in the south is a beautiful place you may want to check. Safe travels.
I don’t go on Facebook but – As usual, Great video Liat, I like that you let us see AND hear your “duh?” comments when you think you make a mistake because when you do make a mistake (which is seldom) you show us how to fix it – Thanks because I make zillions of mistakes – oops – learning mishaps :-). The one thing I did not hear you say and maybe I missed it, was do you use the same amount of tail for this cast on as for a regular long tail cast on or do you need a longer tail?
Great question – you would use about the same about of yarn as for a long-tail cast-on. I’m glad you like it when I leave in the mistakes – I’m never sure I should, but then, like you said, I get to show everyone that mistakes are NO big deal – even when the camera is rolling!
I love the way you teach! Now I can’t wait to start a new project and try this cast on method – but what do I do with my 3 started projects? :-)
Haha just refer to this blog post: The Ideal Number of Knitting Projects to Work On at One Time
I like this format. I generally use my iPhone so can’t access video but I’ll bookmark and ck it when I get around to opening my computer, something I don’t do unless I have to so appreciate the written description of stitch or in this case CO, as I can try the stitch anyway. I rarely get time to go looking for blogs unless the come to me via email. Thanks.
Margaret, this is great to know. By the way, all the videos on KNITFreedom also work when you’re on your iPhone. Have you tried it?
The new format is great! Your idea helps people like me (procrastinators-“I’ll come back to it later” – that is) actually follow along on a daily basis! Thanks!
Hi!
I absolutely love getting the blog posts in my email, and I hope you never stop doing this. Sometimes when I get busy, I forget to check blogs, but I NEVER forget to check my email.
I love your posts and save them all for reference. You’re a marvellous teacher, and we’re so lucky to have you! Thanks for all your hard work – it’s very much appreciated.
Cheers,
Susannah
I prefer the shorter e-mail and the link to be video and blog. That way I can choose what I follow up on and not have to sort through the whole blog info in the e-mail and again on the blog. Love your information and the format you use.
I like this format! The video included was wonderful. Everything was in one place. Been knitting for over 50 years and keep finding out what I do not know. lol-Keep it up!
I love this cast on but I can’t see where the end of the long tail cast on is when doing these stitches. Thank you.
Hello, Liat…
Either way…. I just love your videos…keep them coming. I look forward to your emails.
I would like to know if you can use this technique to knit a 2 x 2 rib? If so, could you make a video to demonstrate it as well?
Hi Liat,
Just wanted you to know that I think you are a terrific teacher and I appreciate the information you provide. I always learn better from your videos than any others. Thank you very much!
I am looking forward to trying this technique. Thank you for making it so clear and understandable.
Anne, that’s great! I’m glad you are going to try it.
Hi! I really like getting all of the info in the email instead of a snippet that leads me to a website. I would have loved it if the written instructions were included in the email as well.
Thanks for all the really great information you share so freely!
Lori, that’s great feedback. Thank you!
I prefer getting the blog in my e-mail because it allows me to keep it and refer to it whenever I need to. Sometimes is hard to find what I am looking for on the web or I may not always be sure what I am looking for and it is quicker to search my e-mail than a website. Love getting all the knitting tips.
Thank you Laura! See, this is why I ask my wonderful readers. I didn’t think of that!
Love the e-mails always! This one with the video and the blog added to it, I especially like — keep up the good work. You are so generous with all of your help and hints.
Thanks!!
Beverly that’s great! I’m glad you commented here to let me know you like getting more of the blog post in your email. Hugs!
Thank you so much to share this technique! I will try this on my next project.
Oh good! I hope it comes out great.
Thanks for the video! I had a question. I am doing toe up socks and was wondering when I get to the cuff if I can do this? Is it any different? How would I cast off?
Thanks!
Hi Jennifer, I have a video for a technique that makes an edge just like this only on the bind-off end – it’s called the Invisible Ribbed or Italian bind-off. I hope this helps!
Loved this new format.
Good! Sounds like it was a hit.
Hi! Liat;
Love the email format. When short on time it is nice to have everything in one place and if you want more in depth information you can go to the blog. Love to hear about the places you travel to and your take on it. I love your teaching style and have learned so much from you, especially the subtle little tricks to just kick up the basic fare. Please keep up the excellent work, I so look forward to your emails and blog. Thanks for expanding my mind and talents, you rock!
Kathy, you’re so welcome. This is great feedback. I’m so happy to know that you are learning a lot from the blog and that you like my style. Yay! I will keep working hard on it. Hugs!
Thanks for all the videos and links. I have enjoyed seeing your travels and have learned so much. I am learning to make socks but trying each sock on a circular needle. I have learned the hard way not to get variegated yarn in dark colors to hard to see fun fun!
Mary, I’m glad you’ve got such a great attitude towards learning from your mistakes. You will go far!
Thanks for the great video! Can you start any pattern of ribbing this way, by just casting on in the pattern you’re going to use (like K2P2 or K4P2, for example) ?
Hmm, I haven’t tried it! Will you try it and let us know? I bet the K2P2 might work…
Dear Liat,
I love your videos! Even though I have been knitting for nearly 40 years, I learn new things from your videos very often. You are a wonderful teacher. Keep up the good work! (BTW, love your name!)
Sincerely, Tamara Densmore
Tamara, what a lovely comment. You make my heart happy!
Very nice, start for ribbing.
This longer more complete email is just perfect. Now I will stay current instead of marking the email to follow the links later.
Amazing how clicks count. This email will save me time.
Thank you
B.
Hey, I’m glad I can save you time. It’s really helpful that you came here and commented!
I like your videos, they are very easy to learn different tecnics. I also like your newsletter. I’m not a blogger so I do like getting the info. in my email. Thanks for all the tips.
Thanks, Carol. It sounds like the folks that got the blog post in their email today really liked that format better.
Hi Liat,
I liked how you sent it via email. By going to the email I know I will definetly see it. Otherwise I might forget to just look at the blog. Thanks again for all your informative tips and videos.
Trudy
Trudy, the most important thing for me is that you read the email and learn the technique. So if sending it in the email works better for you, I may start doing that.
Hi Liat,
Wonderful that you did this video. I was taught this around 30 years ago and it was then called Japanese cast on. The lady took knitting lessons in Japan. There is also a way to do it for a two/two rib. You have to cross some of the stitches.
Of course, as time went by I had forgotten how to do both of them! Nice to have one of these back.
Thanks, Pat
Hi Pat! Do you think you can remember how to do it for 2×2 rib? Melissa wanted to know in this comment.
Thank you so much! Excellent video and explanations. I first learned this cast on from a brioche video, but I found it confusing and hard to understand and remember. Now it makes sense. I think I will use this for many ribbed edges now. Thanks again! And enjoy your travels. :)
Hey girl! I’m so glad I could make this cast-on understandable – I think it’s definitely one of the hardest ones I’ve seen. I learned it by looking at illustrations in a book, and I was like, “Can this be right??” But I was determined to make sense of it. Thanks, as always, for your loyal support and comments!
I love receiving the e-mails with tips and a link to the blog. It allows me to pick and choose what I really want to follow-up with. It is always fun to watch the videos from the link included if it is something I think I might want/need to learn. Keep up the great work!
Pat, it’s good to know that you like the new “experimental” format. Thanks!
I like the longer post. Should have included the written instructions below the video in the email post though! :)
I like this method better because I can save the email and refer to it as often as I need to.
Thank you for teaching these great techniques!
H MarieAnge, another reader said the same thing! Guess you guys are onto something. I will definitely take to heart the part about including the written instructions, so that you’ll have everything saved in your email. Thanks!
I will definitely try this cast on and will send the information on to my knitting group. Thanks.
Marta, I so appreciate you sending this on to your knitting group. That really means a lot to me, and it will help me out, too. Happy knitting!
I love the blog posts in my gmail and esp. how-to videos, thank you!!
Linda, that’s fantastic! Good to know.
I love the way you wrote this post. Thank you for all your tips. I often do one of your ideas at my knitting groups and everyone asks where I learned that. Of course, I tell them and they get very excited and join your blog. Keep enlightening us!
Woohoo! Thanks so much, Pat! Keep telling your friends about me and I’ll keep giving you my best on this blog. Hugs!
I love learning about new cast ons. This one is a great addition to my bag of tracks and keep up the great work
Diana, that reminds me that many readers want to have a whole e-book just of cast-ons. I’ll have to keep filming more and more until I have enough for a nice video-reference ebook. Thanks!
Your posts and videos are so clear and make it all look so easy, I’ve tried things that I might otherwise have passed over. I agree with TooTwistedDonna, “You have helped me become a more adventurous knitter.” Thanks.
Janet, that’s fabulous. Keep trying new things, you will go far!
Love this post…and all your adventures and travel, and of course your knitting tips,….thank you for sharing your twist on life..it is always full of wonderful nuggets.
Thank you Janel! You make it fun for me to blog about knitting, knowing that you’re enjoying my take on things.
like it , thanks!
Hi Liat, Love your blog!
I like the longer posts. It gives you all the information in one place so you don’t have to go clicking all over the web.
You have helped me become a more adventurous knitter!!!
thanks
TooTwistedDonna
Thanks Donna! That’s exactly my goal! And thanks for the feedback about the longer posts. Do you mean in your email, or just on my blog in general?
I like getting the info in the e-mail. I don’t always get to the blog part, but, definitely get to the e-mail part on a daily basis. Thanks for all the posts. I am going to try the Italian Cast On. Part of knitting is trying new ideas/techniques. Makes things fun!!